Tip: You can use filters for better results
-
Latest News
-
Quick Start
-
Work Place
-
-
- How to schedule tickets
- How to search for tickets
- How to query tickets
- How to filter for tickets
- How to use the Ticket Clipboard tab
- How to grab/ungrab tickets
- How to link & unlink components together
- How to download ticket data as a excel sheet
- How to copy filters/queries for colleagues
- How to email filters/queries to colleagues
- How to assign/unassign tickets to/from partners
- How to manage parts
- How to show tickets on Map
- How to open tickets in a new tab
- How to use container tickets
-
-
- How to use the Optimizer
- How to schedule tickets
- How to publish/unpublish tickets
- How to lock/unlock tickets
- How to lock/unlock engineers
- How to manually reschedule PUDOs
- How to show tickets on Map
- How to manage availabilities
- How to manage subgroups
- How to display an additional time zone
- How to move tickets back to the Ticket Pool
-
-
-
- How to manage parts
- How to assign/unassign tickets to/from partners
- How to use the Interaction buttons
- How to use the Workflow buttons
- How to use communications
- How to schedule tickets
- How to edit ticket details
- How to cancel a ticket
- How to use the Remove Pending button
- How to report a ticket
- How to create intervention infos
- How to create intervention reports
- How to cancel an appointment
- How to clone tickets
- How to edit private notes
- How to add & remove skills
-
Admin Panel
-
- How to connect with ServiceNow
- How to create test tickets
- What are aliases?
- What does workflow mean?
- What are appearances in context of workflows?
- What are buttons in context of workflows?
- What are automations in context of workflows?
- What are guides in context of workflows?
- What are actions in context of workflows?
-
- What is the Process menu?
- What does workflow mean?
- What are appearances in context of workflows?
- What are buttons in context of workflows?
- What are automations in context of workflows?
- What are guides in context of workflows?
- What are actions in context of workflows?
- How to create & edit projects
- How to create & edit custom forms
- How to create & edit lists
- How to customize the Customer Portal
- How to create & edit automated actions
- How to create & edit conditions
- How to create & edit indications
- How to set up email templates
- How to create & edit ticket durations
- How to create & edit custom fields
- How to create & edit value sets
- How to create & edit SLA Profiles
- How to repair tickets with Ticket Workflow Monitoring
-
Fieldcode FMA app
-
- Fieldcode FMA app
- How to download the Fieldcode FMA app
- How to login
- How to configure multiple accounts
- How to enable/disable notifications
- How to change the theme
- How to log work times
- How to synchronize tickets
- How to navigate to appointments
- How to log drive times & drive breaks
- How to inform dispatchers
- How to view archived appointments
-
-
Customer Portal
How to complete the reporting phase
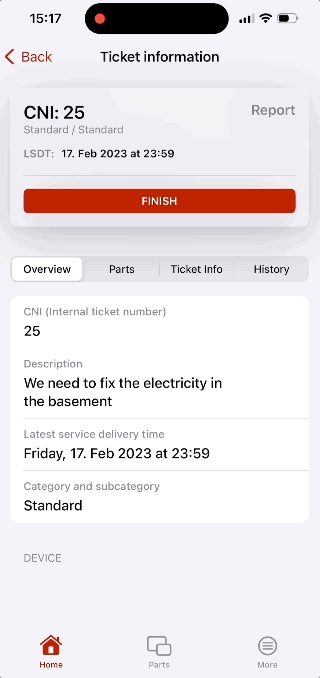
After tapping the Finish button inside a ticket in the appointment phase, it’s time to enter the report phase and report the ticket to resolve the ticket.
The reporting consists of two parts, one is the actual report and the second part is the sign-off from the end user to finish the ticket.
In the report, the work start and work end times are taken over.
You can manually edit times, dates, and wishes by tapping the corresponding calendar and time buttons.
After that, you fill in if the Intervention was successful or not. It is mandatory to fill in a work report, regardless of how the intervention went.
Click REPORT SUMMARY to proceed to customer sign-off. The mobile device will enter landscape mode and the customer can sign comfortably.
Click Submit and Finish to finish the ticket.
How to finish the appointment
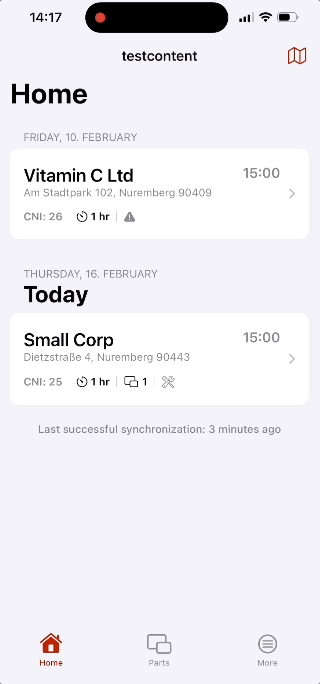
The finish button informs the dispatchers that you finished working on the ticket. You can trigger it either from the top bar or from the Ticket tab.
Tap on Yes again to confirm that the appointment is finished.
In the example below the engineer didn’t finish the work on the ticket just yet,
therefore the engineer has to finish the ticket first, before closing the appointment and proceeding to report!
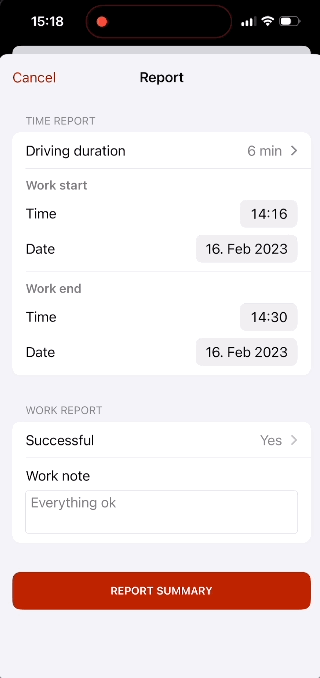
How to fill in the report
Time report
Duration: Select the Driving time that was required for this ticket.
Work start: Insert the date and time when you started working on this ticket.
End time: Insert the date and time when you finished working on this ticket.
Work report
Is intervention successful?: Select Yes or no, depending on if you were able to resolve the ticket problem.
Work note: Add a work note message for this ticket.
Click on Report summary afterward.
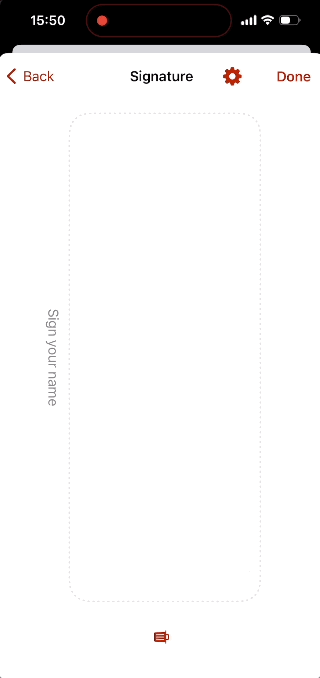
How to submit the report summary
You will find a summary of all your entered details now and a message informing you that it is important the customer has read the report and agrees to the results of the intervention.
Click on Submit and sign ticket(s).
An interface where the customer can put in the signature by touch should appear.
The engineer should let the customer sign his work and click on Submit and finish afterward.
Clear button/Trash button: Allows the customer to redo the signature in case there were issues.
Submit and finish button: Allows you to finish the ticket and redirects you back to Home.
Note: After finishing the work on all tickets (including child ticket reports) you have to finish the whole appointment to complete the process.
This will mark the ticket in the system as RESOLVED.
Your customer is not available for the signature sign-off?
Your customer rejected the signature sign-off?
Your customer is unavailable for the signature sign-off?
Your customer provides the signature sign-off separately?
In any of the cases mentioned above you can click the option button (wheel) inside the signature screen and select the appropriate option in order to finish the report.
0 out of 5 stars
| 5 Stars | 0% | |
| 4 Stars | 0% | |
| 3 Stars | 0% | |
| 2 Stars | 0% | |
| 1 Stars | 0% |