Tip: You can use filters for better results
-
Latest News
-
Getting Started
-
Work Place
-
-
-
- About Buttons
- Action Buttons
- Schedule Tickets
- Ticket Info and COMS Buttons
- Add Parts
- Assign Partners
- Remove Tickets from the Ticket Clipboard
- Inline Skill Editing
- Create Intervention Info
- Create Intervention Reports
- Cancel Tickets
- Cancel Appointments
- Clone Tickets
- Edit Ticket Details
- Edit Privat Notes
- Report Tickets
- Close Tickets
-
Admin Panel
-
FMA 2 App
-
Customer Portal
- Conditions are mainly used for time-based events of tickets.
Example: Display a warning condition, when the due date is coming closer - Indications are mainly used for identifying duplicated ticket events.
Example: Display an info indication on new tickets with the same CNE.
About Indications
Indications can be set up and defined according to the needs of the project. For example, if a ticket contains duplicate data and you want to be notified, you can configure an indication.
Accessing the Indications Page
Navigate to Automations → Indications to add/edit indications.
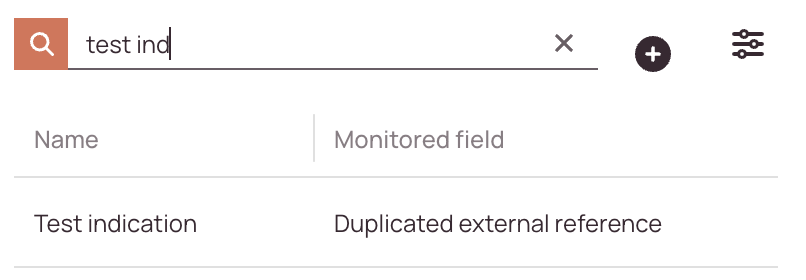
Searching for Indications
How to search:
- Navigate to Automations → Indications.
- Use the search bar at the top of the indications list.
- Enter any of the following:
- Description
- Creator
- Status (e.g., active, inactive)
-
As you type, the list will automatically filter to match your query.
Where and when are indications displayed?
Indications are used for highlighting tickets. Therefore they are displayed as warning, critical, and information alerts inside the Ticket Pool in the Info/Alert/Part column. Configured indications are also visible in the header of the Ticket details, in the Indication tab (under the Overview tab in the Ticket details).


If you have configured a time for your indication it will only show up for the selected time in days. The count starts from the moment the to-be-monitored indication is valid. After the time has passed, the indication will not be displayed anymore.
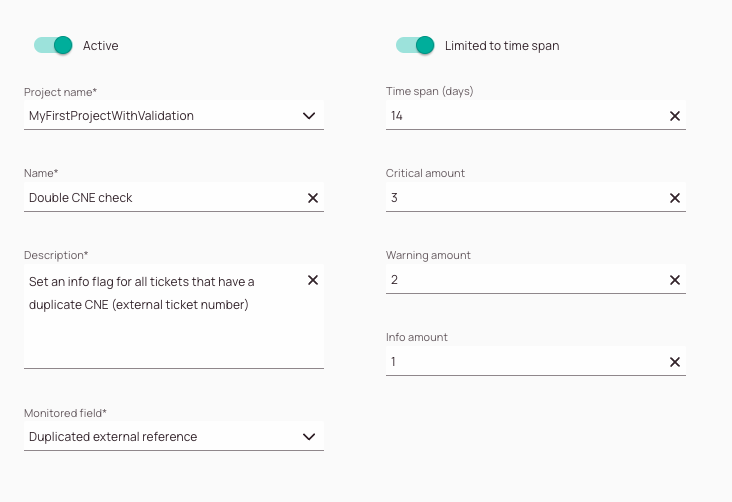
Understanding the indication form
-
Active toggle: Gives you the option if your new condition should be already active in the system after creation or not.
-
Project name dropdown: Select the project for which this indication should be active.
-
Name field: Enter a name for your new indication.
-
Description field: Try to enter a description which describes what your indication will do. Try to be as precise as possible.
-
Monitored field dropdown: The indication event triggers based on this stated field behind the sentence.
-
Limited to time span toggle: You have the option to limit a indication to trigger only inside a certain time span. If you select this toggle, the time span field will pop up and give you the option to configure how many days (time span) after the indication should trigger. After the time span passes by the indication will automatically deactivate.
-
Time span (days) field: Gives you the option to configure how many days (time span) after the indication should trigger. After the time span passes by the indication will automatically deactivate.
-
Critical amount field:Specify the number of duplicates after which the critical alert should be displayed.
-
Warning amount field: Specify the number of duplicates after which the warning alert should be displayed.
-
Info amount field: Specify the number of duplicates after which the info alert should be displayed.
Understanding the monitored fields
| Monitored field name | Description |
|---|---|
| Duplicated external reference | Checks for duplicate CNE numbers |
| Tickets with same device serial number | Checks for duplicate device serial numbers |
Understanding the indication behavior
Indications are mainly used for identifying duplicated ticket events.
Example: Display an info indication on new tickets with the same CNE. The info should display if there is one duplicated CNE ticket found, the warning if there is two two duplicated CNE tickets found, and the critical if there are three or more duplicates.
Example: Display a warning indication on new tickets with the same device serial number. The info should display if there is one duplicated ticket found with the same device serial number, the warning if there is two tickets with the same device serial number found, and the critical if there are three or more duplicates.
How to create & edit indications
- Click on the plus button to open the Indication form (or click on an item on the list to edit).
- Fill in the Indication form.
- Decide if your new or existing indication should be set to active in the system.
- Enter a name for your new or existing indication.
- Enter a description for your new or existing indication.
- Select a Monitored Field from the drop-down.
(Optional) - Limiting indications to a time span
- Enter the number of days for the time span.
The time span field covers a past period of time that is to be checked.
So, for example, if a ticket is to be checked for the same serial number in order to display an indication, this means that if you enter 5 days, that 5 days backwards from the ticket creation date will be checked for duplicates. - Enter the Critical amount. When the critical amount is reached, the critical badge will be displayed inside the Ticket Pool and the Ticket details.
- Enter a Warning amount. When the warning amount is reached, the warning badge will be displayed inside the Ticket Pool and Ticket details.
- Enter an Info amount. The info badge will be displayed inside the Ticket Pool and Ticket details when the amount is reached.
0 out of 5 stars
| 5 Stars | 0% | |
| 4 Stars | 0% | |
| 3 Stars | 0% | |
| 2 Stars | 0% | |
| 1 Stars | 0% |