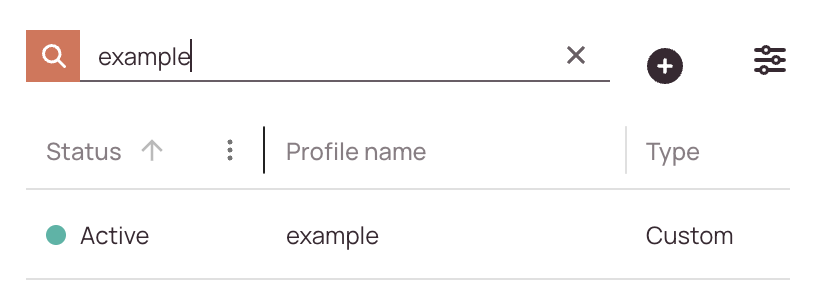
Tip: You can use filters for better results
How to search:
- Navigate to Projects and more → Customer Portal.
- Use the search bar at the top of the templates list.
- Enter any of the following:
- Customer Portal Profile Name
- Creator
- Status (e.g., active, inactive)
-
As you type, the list will automatically filter to match your query.
-
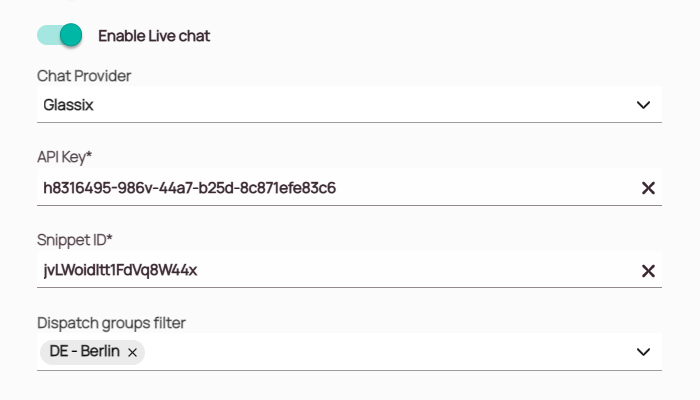
Select your live chat provider. Currently, only Glassix is supported in Fieldcode. Please reach out to our Support Team if you would like to have support from another provider.
-
Add the API Key, which can be found in you Glassix account at Glassix Dashboard → Settings → Developers → API Keys
-
Glassix provides your actual snippet ID inside your Glassix admin account, where you generate or copy the widget installation code. Glassix Dashboard → Settings → Widgets (or Chat Widget / Agent Widget) → Installation Code
-
You can decide which dispatch groups will use Live Chat.
-
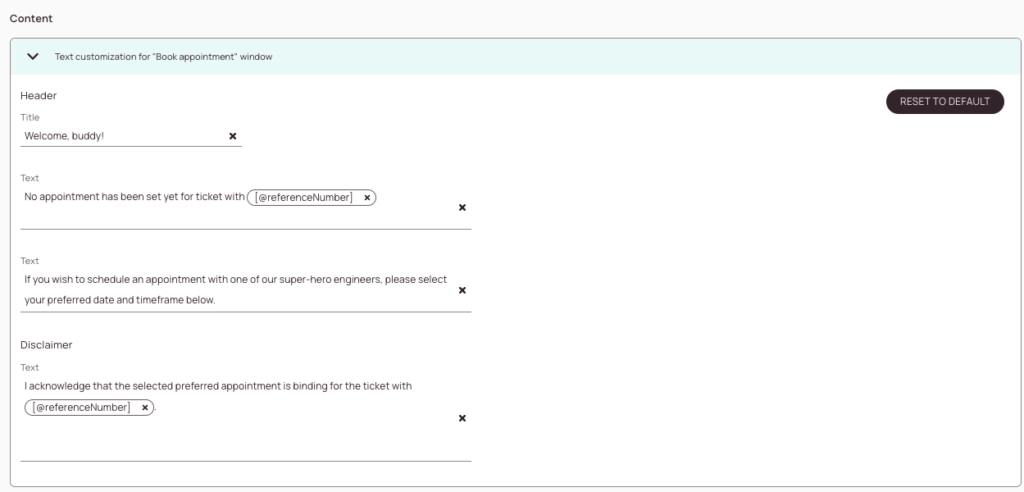
You can customize the Title (=Header section/Title field) of the booking window with your custom text and aliases!
-
You can customize the Appointment Text (=Header section/1st Text box field) of the booking window with your custom text and aliases!
-
You can customize the Explanation Text (=Header section/2nd Text box field) of the booking window with your custom text and aliases!
-
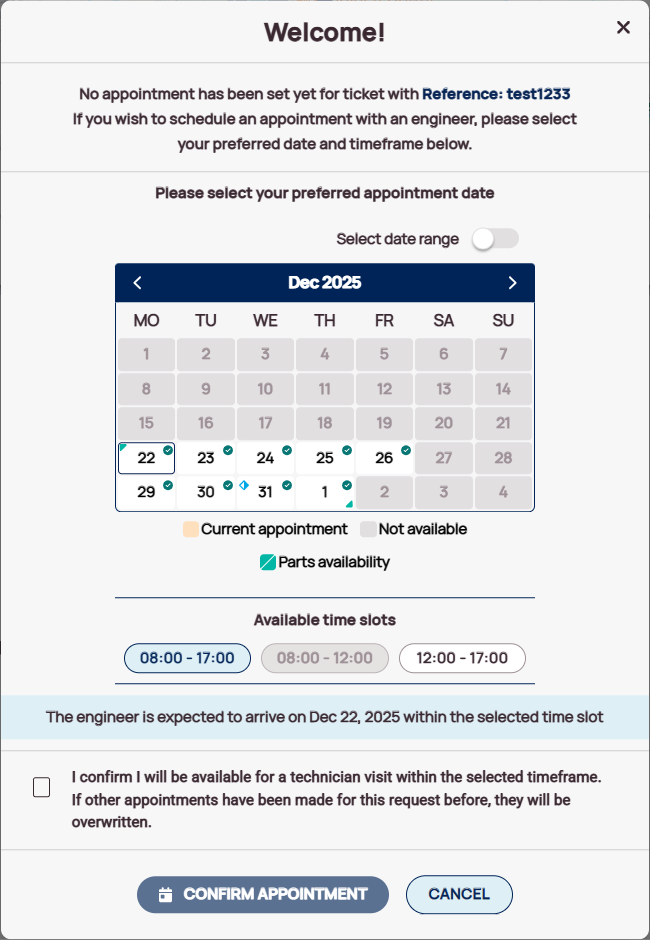
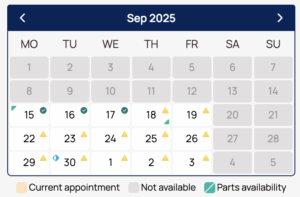
Days in the past, oustide of the parts availability window, or when no engineer is is available to work will be greyed out.
-
By default, a customer selects only the day of service, but you can add custom time slots and even set a default selection. If strict engineer availability is enabled, the time slots will be disabled when no engineer is available.
-
You can customize the Disclaimer Text (=Disclaimer section/Disclaimer field) of the booking window with your custom text and aliases!

-
Enable SLA Profiles for the Customer Portal toggle: This toggle decides if bookable appointment days are related to an existing SLA Profile.
-
Custom time interval toggle: This toggle allows you to customize which time intervals are available for booking. If you toggle this option off, the next business day will be the earliest bookable day.
Note: Calculations are based on the ticket creation time. -
Earliest time (business days) field: This field allows you to define the earliest available booking time. If you set it to 0, the booking will be available to customers on the same day. If you set 1 or higher, the booking will be available the next business day or days after.
-
Latest time (business days) field: This field allows you to define the latest available booking time. For example, if you enter 5, depending on the earliest time, dates will be made available from the first earliest defined date until the number of 5 current dates is reached.
-
Cut-off time for the booking field: With this field you can decide a cut-off time for possible bookings. Please note that the cut-off time is directly connected to the earliest time and latest time and uses those times as a calculation basis.
-
Allow the end user to select a date range toggle: This toggle gives end-users the option to select a date range in the calendar instead of just having the option to pick a particular date. If an end user picks a date range, the service window inside the Work place will adjust to that too. This option could be useful if you want to give your end users more flexibility in booking appointments. It can be beneficial for the Optimizer too, since the Optimizer will have more freedom to optimize tickets.
Note: If you have time slots enabled with a default time slot set in the Customer Portal profile, the date range selection will use this default time slot as the basis for the days check and booking time window. If no time slots are enabled for this Customer Portal profile, our standard full working day (9:00-17:00) time window will be used. -
Enable time-slots selection toggle: This toggle allows you to configure custom time slots that are available for end users to select. When you enable the time-slot selection toggle, you can freely add and define different custom time slots that are available for the customer to select within the Customer Portal when appointments are booked. Those individual time-slots will then be displayed and available for selection instead of the default ones. The default selected toggle lets you decide which option is pre-selected for the user when the user tries to pick an option.
-
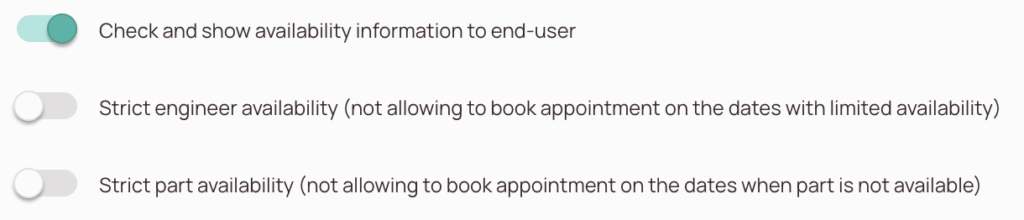
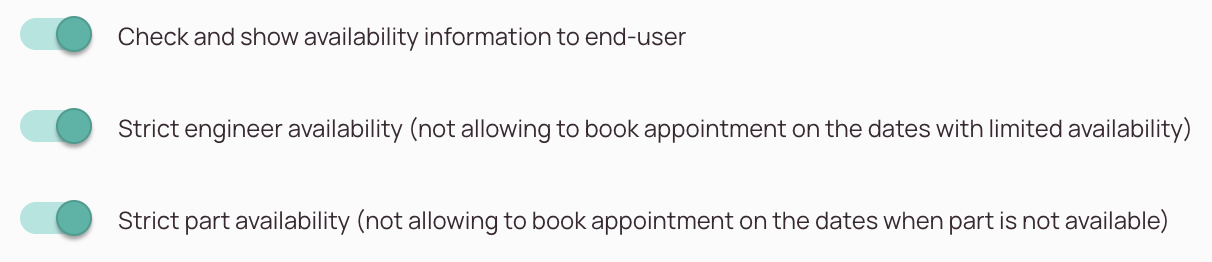
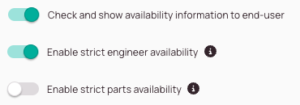
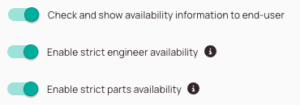
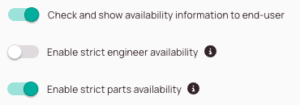
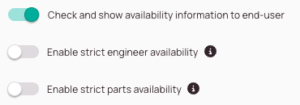
Check and show availability information to end users toggle: This toggle controls whether availability checks should be performed at all. If you turn this toggle off, dates will always be displayed as available without any further availability checks involved. This can be useful if you want to give your users maximum booking freedom, but on the other hand, it will create more manual organizational effort for your dispatchers. If you turn this option off, you are not able to control the engineer and parts availability toggles.
-
Enable strict engineer availability toggle: If this option is turned on, customers won’t be able to book appointments on dates without engineer availability. Please check out the table below to learn how the different combinations of the two availability toggles affect booking availabilities for customers.
-
Enable strict parts availability toggle: If this option is turned on, customers won’t be able to book appointments on dates without part availability.
Please check out the table below to learn how the different combinations of the two availability toggles affect booking availabilities for customers.
Use case example - Small printer company:
Your company (Easy Printer Solutions GmbH) has a second location in Arabia and has Sunday as a starting business day which differs from European standards where it would be Monday, therefore, the company also has other opening hours than the default settings provide (eg. also opening on Sunday).
You would configure a custom SLA Profile in this case.
Examples:
OFF: The default business hours are considered, which are 09:00 to 17:00 from Monday to Friday (Example shows SLA Profile section only for demonstration).

ON: The SLA Profile business hours are considered, for our example, we would assume that we also operate on Sundays.

| Toggle Combination | Dispatching Situation | End user experience | Icon |
|---|---|---|---|
 | Engineer and Parts are Available. | The date will be displayed as Available for booking. | |
| Engineer and Parts are Not Available. | The date will be displayed as Unavailable for booking. | ||
| Engineer is Available and Parts are Not Available. | The date will be displayed as Available for booking | ||
| Engineer is Not Available and Parts are Available. | The date will be displayed as Unavailable for booking. | ||
 | Engineer and Parts are Available. | The date will be displayed as Available for booking. | |
| Engineer and Parts are Not Available. | The date will be displayed as Unavailable for booking. | ||
| Engineer is Available and Parts are Not Available. | The date will be displayed as Unavailable for booking. | ||
| Engineer is Not Available and Parts are Available. | The date will be displayed as Available for booking. | ||
 | Engineer and Parts are Available. | The date will be displayed as Available for booking. | |
| Engineer and Parts are Not Available. | The date will be displayed as Available for booking. | ||
| Engineer is Available and Parts are Not Available. | The date will be displayed as Available for booking. | ||
| Engineer is Not Available and Parts are Available. | The date will be displayed as Available for booking. | ||
| Engineer and Parts are Available. | The date will be displayed as Available for booking. | ||
| Engineer and Parts are Not Available. | The date will be displayed as Available for booking. | ||
| Engineer is Available and Parts are Not Available. | The date will be displayed as Available for booking. | ||
| Engineer is Not Available and Parts are Available. | The date will be displayed as Available for booking. |
-
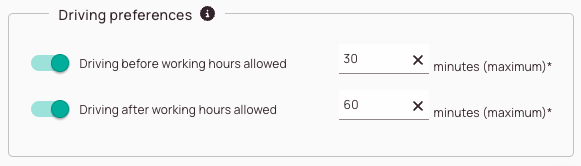
Driving before working hours allowed toggle – This option controls whether the end user can book appointments before the engineer’s actual working hours because driving hours may or may not count as working time, depending on your particular business strategy.
-
Driving after working hours allowed toggle – This option controls whether the end user can book appointments after the engineer’s actual working hours because driving hours may or may not count as working time, depending on your business strategy.
ON toggle: Assuming the working hours start at 9 AM, Driving before working hours allowed by 30 minutes, the Timeline could look as follows:
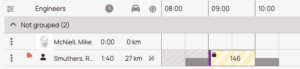
OFF toggle: Assuming the working hours start at 9 AM, Driving before working hours not allowed, the Timeline could look as follows for the Dispatcher:
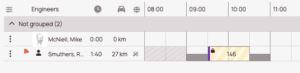
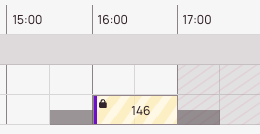
ON toggle: Assuming the working hours end at 5 PM, Driving after working hours allowed by 30 minutes, the Timeline could look as follows for the Dispatcher:
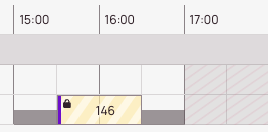
OFF toggle: Assuming the working hours start at 5 PM, Driving after working hours not allowed, the Timeline could look as follows for the Dispatcher:
-
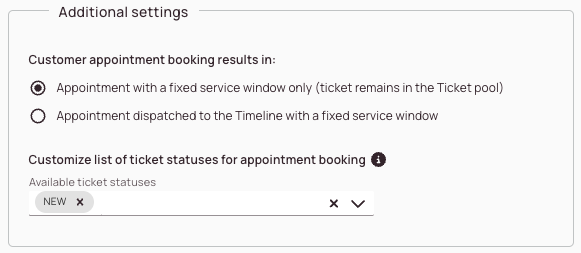
Appointment with a fixed service window only (ticket remains in the Ticket Pool) checkbox: Tickets that the end user booked via the Customer Portal will remain in the Ticket Pool with a fixed service window.
Effects:
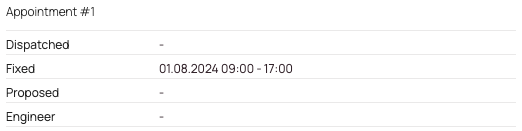
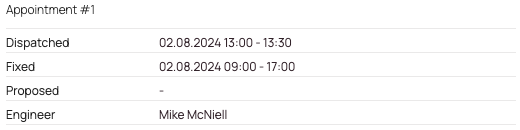
ON: With this option turned on the Ticket will remain in the Ticket Pool, and receive a fixed service window. The dispatcher will be required to dispatch the ticket. -
Appointment dispatched to the Timeline with a fixed service window checkbox: Tickets that the end user booked via the Customer Portal will directly move to the Timeline with a fixed service window.
Effects:
ON: With this option turned on the Ticket will be placed on the Timeline, and receive a fixed service window. -
Customize the list of ticket statuses for appointment booking drop-down: This gives you the option to customize at which statuses end-user’s have the flexibility to book appointments.
By default, the following statuses are pre-configured: New, Validation, Appointment, Pending Wait Onsite