Tip: You can use filters for better results
-
Latest News
-
Quick Start
-
Work Place
-
-
- How to schedule tickets
- How to search for tickets
- How to query tickets
- How to filter for tickets
- How to use the Ticket Clipboard tab
- How to grab/ungrab tickets
- How to link & unlink components together
- How to download ticket data as a excel sheet
- How to copy filters/queries for colleagues
- How to email filters/queries to colleagues
- How to assign/unassign tickets to partners
- How to manage parts
- How to show tickets on Map
- How to open tickets in a new tab
- How to use container tickets
-
-
- How to use the Optimizer
- How to schedule tickets
- How to publish/unpublish tickets
- How to lock/unlock tickets
- How to lock/unlock engineers
- How to manually reschedule PUDOs
- How to show tickets on Map
- How to manage availabilities
- How to manage subgroups
- How to display an additional time zone
- How to move tickets back to the Ticket Pool
-
-
-
- How to manage parts
- How to assign/unassign tickets to partners
- How to use the Interaction buttons
- How to use the Workflow buttons
- How to use communications
- How to schedule tickets
- How to edit ticket details
- How to cancel a ticket
- How to use the Remove Pending button
- How to report a ticket
- How to create intervention infos
- How to create intervention reports
- How to cancel an appointment
- How to clone tickets
-
Admin Panel
-
- What is the Process menu?
- What does workflow mean?
- What are Appearances?
- What are Actuators & Invocations?
- What are Automations?
- What are Guides?
- What are Actions?
- How to create & edit projects
- How to create & edit custom forms
- How to create & edit lists
- How to customize the Customer Portal
- How to create & edit automated actions
- How to create & edit conditions
- How to create & edit indications
- How to set up email templates
- How to create & edit ticket durations
- How to create & edit custom fields
- How to create & edit value sets
- How to create & edit SLA Profiles
- How to move stuck tickets
-
Fieldcode FMA app
-
- Fieldcode FMA app
- How to download the Fieldcode FMA app
- How to login
- How to configure multiple accounts
- How to enable/disable notifications
- How to change the theme
- How to log work times
- How to synchronize tickets
- How to navigate to appointments
- How to log drive times & drive breaks
- How to inform dispatchers
- How to view archived appointments
-
-
Customer Portal
How to book appointments
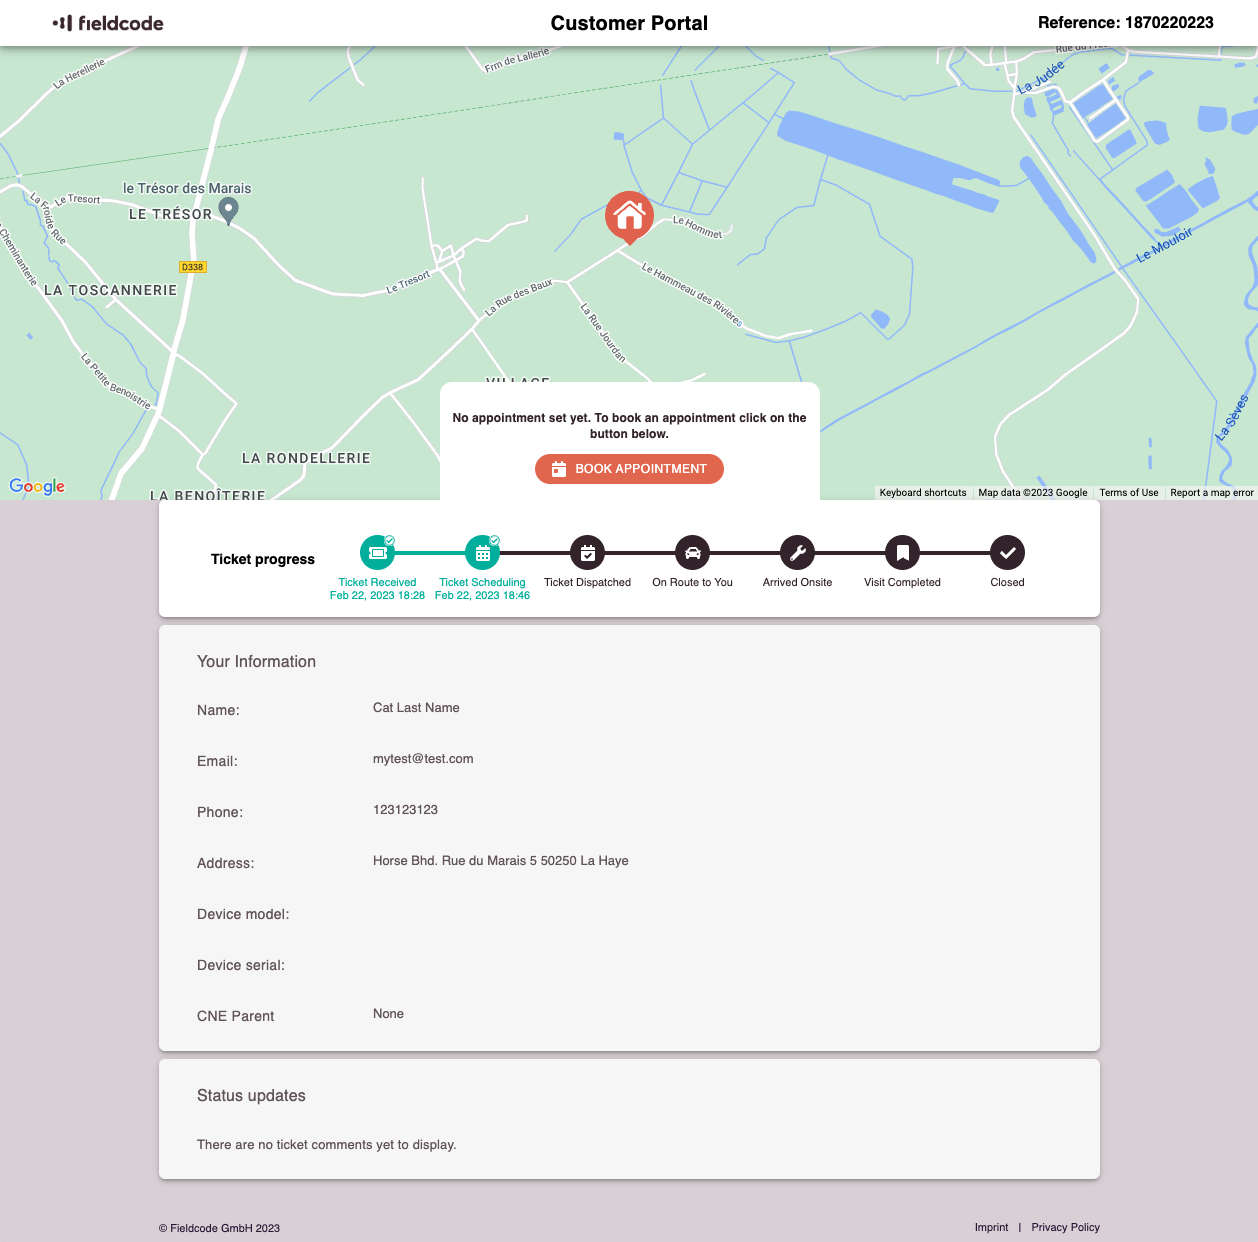
Let’s assume you as the ticket requestor followed the tracking link and you see that the ticket is in status Ticket Scheduling.
In this case, you may want to book the appointment because the dispatcher may have not set the appointment yet.
1 Checking the ticket status and booking the appointment
Check if the ticket is in status TICKET SCHEDULING and if the dispatcher hasn't booked an appointment for you yet. Click on BOOK APPOINTMENT.
2 What is the Customer Portal Availability Check?
The Customer Portal Availability Check inspects the following acceptance parameters to validate if there is a matching engineer available for the appointment for selected date/dates:
- Engineer availability check and skill requirement check to find a matching engineer
- Spare parts availability check to make sure engineer only goes on-site when all parts are available
If the system has made a suitable assumption, this is indicated by a green check.
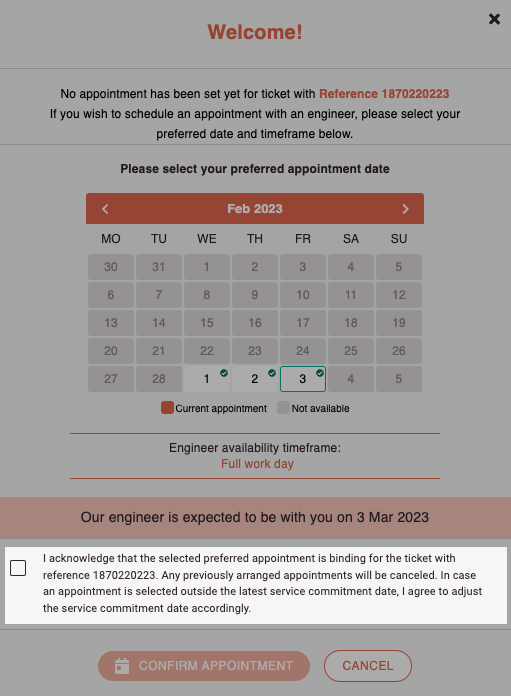
3 Selecting the appointment from the calendar
Select your preferred appointment date in the calendar.
You will see the latest service delivery time for your ticket indicated with a clock (if there is a LSDT for the ticket) which may influence your decision for the booking date.
You will also notice that the system does the engineer availability check, while you are trying to select the appointment date.
Please note that the booking slots available for booking don't include weekends by default and that the booking slots available for booking depend on the configured Customer Portal settings. The behavior of booking slots can be configured by company administrators inside Fieldcode Admin Panel -> Dispatch -> Customer Portal Settings.
Click on a date you want to book.

4 Picking a date from the calendar
Click on your desired date, in our case the 3rd February. The expected date of technicians arrival will be displayed in the calendar after clicking.
The selected date will be framed.

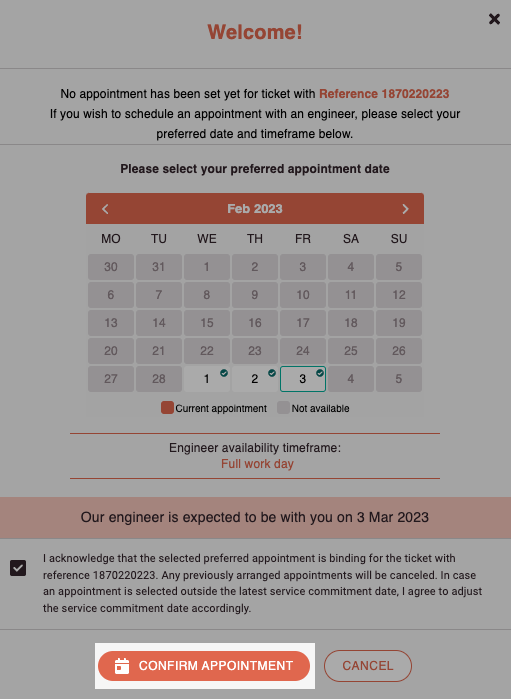
5 Confirming that the appointment is binding
Confirm that the appointment is binding by checking the corresponding checkbox.
6 Finishing the appointment booking
Click on CONFIRM APPOINTMENT.
Your appointment is now booked.
0 out of 5 stars
| 5 Stars | 0% | |
| 4 Stars | 0% | |
| 3 Stars | 0% | |
| 2 Stars | 0% | |
| 1 Stars | 0% |