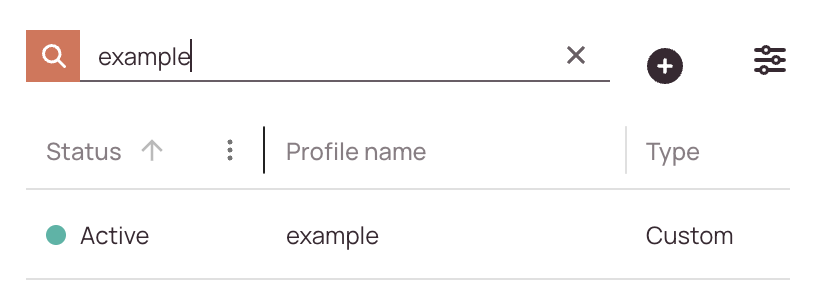
Tip: You can use filters for better results
-
Latest News
-
Getting Started
-
Work Place
-
-
-
- About Buttons
- Action Buttons
- Schedule Tickets
- Ticket Info and COMS Buttons
- Add Parts
- Assign Partners
- Remove Tickets from the Ticket Clipboard
- Inline Skill Editing
- Create Intervention Info
- Create Intervention Reports
- Cancel Tickets
- Cancel Appointments
- Clone Tickets
- Edit Ticket Details
- Edit Privat Notes
- Report Tickets
- Close Tickets
-
Admin Panel
-
FMA 2 App
-
Customer Portal
About Customer Portal Settings
The Customer Portal Settings page allows you to customize the design, behavior, and appearance of the Customer Portal. The Customer Portal shows up for your customers at the end of the day, so adding a little bit of personal company touch and personality to it might be just the thing you want to configure in the Customer Portal Settings page. You can also control if end users should be able to leave feedback on the ticket, that dispatchers are required to react to. Also inside the Customer Portal Settings, you can configure custom SLA profiles, which will determine the for the end user available booking windows.
You also have the option to configure multiple different Customer Portal Profiles, which will apply based on a selected project.
Accessing the Customer Portal Page
Navigate to Projects and More -> Customer Portal to customize Customer Portal profiles.
Searching for Customer Portal Profiles
How to search:
- Navigate to Projects and more → Customer Portal.
- Use the search bar at the top of the templates list.
- Enter any of the following:
- Customer Portal Profile Name
- Creator
- Status (e.g., active, inactive)
-
As you type, the list will automatically filter to match your query.
Configuring Basic Settings
In the Basic tab, you can configure the basic behavior of the Customer Portal.
You are a small printer repair company that provides printer maintenance for end customers called Easy Printer Solution GmbH.
You are proud of your company identity and therefore want to provide a customized end-user experience when it comes to the Customer Portal.
Let's have a look at how the Easy Printer Solution could achieve this custom-tailored Customer Portal experience for their end customers.
Let’s have a look at the effects of the different toggles:
- Active toggle – This toggle lets you decide if the currently selected Customer Portal Profile should be activated in the system.
- Applicable to projects toggle – This toggle gives you the option to apply a Customer Portal Profile to certain projects.
The default Account profile settings will always apply to projects with no custom profiles assigned.
This gives you the maximum control of customization as you can create different profiles on a per-project basis while also having a default profile. - End user comments toggle – This toggle basically decides if tracking link users should have the option to leave a message on the ticket. The message will appear inside Work place and dispatchers will be aware of it and take care of the message appropriately.
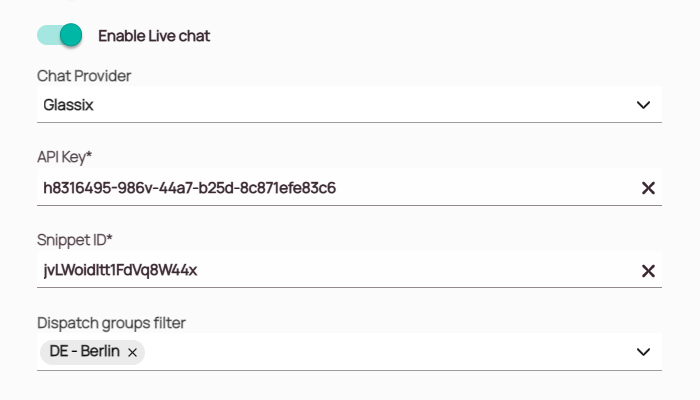
- Live Chat – It is possible to connect to a live chat provider to facilitate communications with customers.
- Branding toggle – Click on the Add file button to add a new custom logo. This toggle basically decides if the default Fieldcode Logo that is shown to the tracking link used on the Customer Portal should be replaced by a custom logo. The custom logo must meet the further above stated requirements.
- Use a custom link toggle – This toggle is only available if “Use a custom logo” is enabled. If enabled you can link a website behind your company logo, which the tracking link end user can click to be forwarded to eg. the company website.
Note: If you do not enable the “Use a custom link” toggle, but have the “Use a custom logo” enabled, clicking on the logo will have no effects.
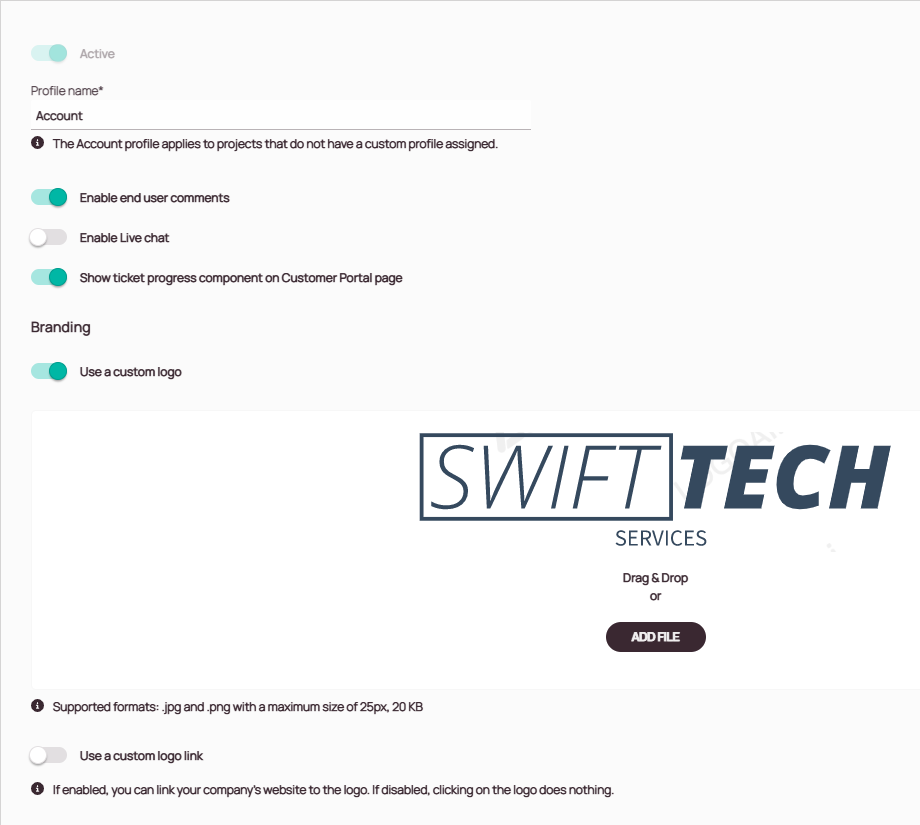
*Swift Tech Services is not a real company. Any resemblance to an actual company is purely coincidental.
How to enable Live Chat
-
Select your live chat provider. Currently, only Glassix is supported in Fieldcode. Please reach out to our Support Team if you would like to have support from another provider.
-
Add the API Key, which can be found in you Glassix account at Glassix Dashboard → Settings → Developers → API Keys
-
Glassix provides your actual snippet ID inside your Glassix admin account, where you generate or copy the widget installation code. Glassix Dashboard → Settings → Widgets (or Chat Widget / Agent Widget) → Installation Code
-
You can decide which dispatch groups will use Live Chat.
Configuring Content Settings
In the Content tab, you can customize the text inside the “Book appointment” and “Change appointment” windows. The custom text will be visible to your end users when they are trying to book or change appointments via the Customer Portal. You can always reset to the default text if you are not happy with your custom texts by clicking the RESET TO DEFAULT button.
The Easy Printer Solution GmbH wants to sound "very personal, nice and engaging" when communicating with their end users. Therefore the company decides to change the text that is displayed when end-users book appointments or change appointments inside the Customer Portal. They can achieve this by going into the Customer Portal Settings page inside the Admin Panel and clicking on the Content tab. There they can freely adjust the text and use matching aliases.
- (Optional) – Change the Salutation message, you can use aliases by typing @ inside the box.
- (Optional) – Change the Book appointment title message, you can use aliases by typing @ inside the box.
- (Optional) – Change the main message, you can use aliases by typing @ inside the box.
- (Optional) – Change the Disclaimer message, you can use aliases by typing @ inside the box.
- (Optional) – You can always reset to the default text by clicking the RESET TO DEFAULT button in case you cannot get the text right to your taste.
- Click Save.
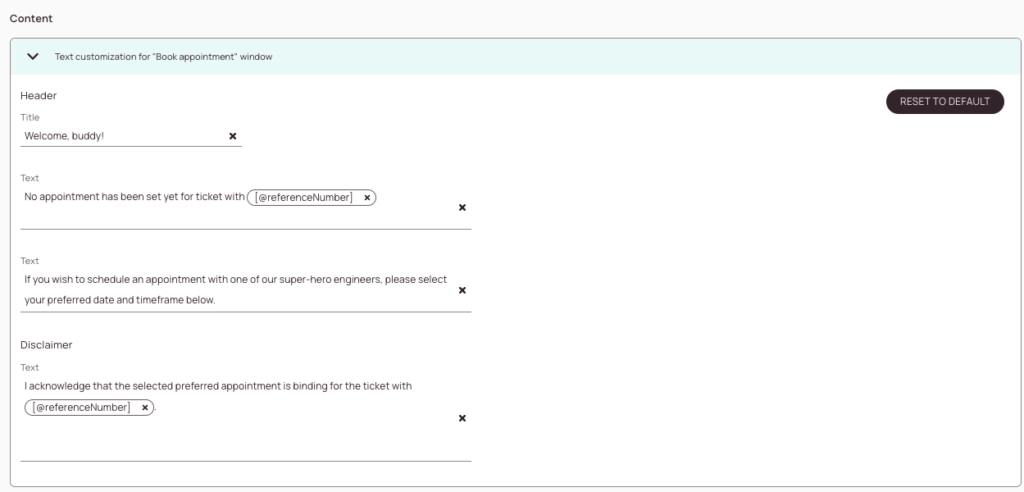
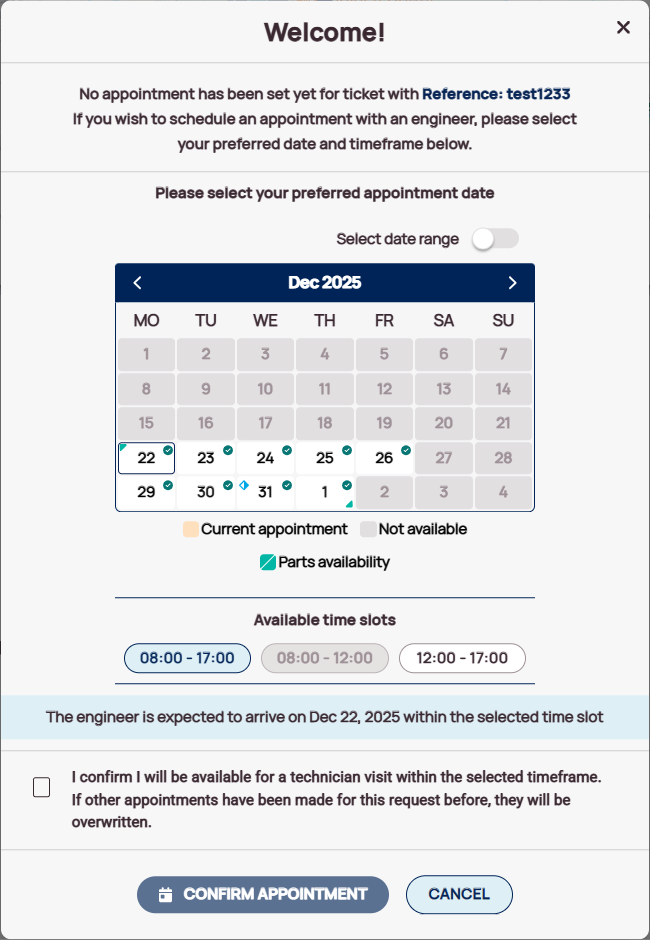
Which sections of the booking window can be customized?
-
You can customize the Title (=Header section/Title field) of the booking window with your custom text and aliases!
-
You can customize the Appointment Text (=Header section/1st Text box field) of the booking window with your custom text and aliases!
-
You can customize the Explanation Text (=Header section/2nd Text box field) of the booking window with your custom text and aliases!
-
Days in the past, oustide of the parts availability window, or when no engineer is is available to work will be greyed out.
-
By default, a customer selects only the day of service, but you can add custom time slots and even set a default selection. If strict engineer availability is enabled, the time slots will be disabled when no engineer is available.
-
You can customize the Disclaimer Text (=Disclaimer section/Disclaimer field) of the booking window with your custom text and aliases!
Configuring Appointment Booking Settings
In the Appointment booking tab, you can for example configure if SLA profiles should be taken into consideration when proposing booking windows to customers.
Note: SLA Profiles are generally configured separately inside Process -> SLA Profiles. You also have the option to make only custom time intervals bookable inside SLA Profiles and much more.
If you want to learn how to fully benefit from SLA Profiles, please check out the SLA Profile Walkthrough topic.
Booking preferences section
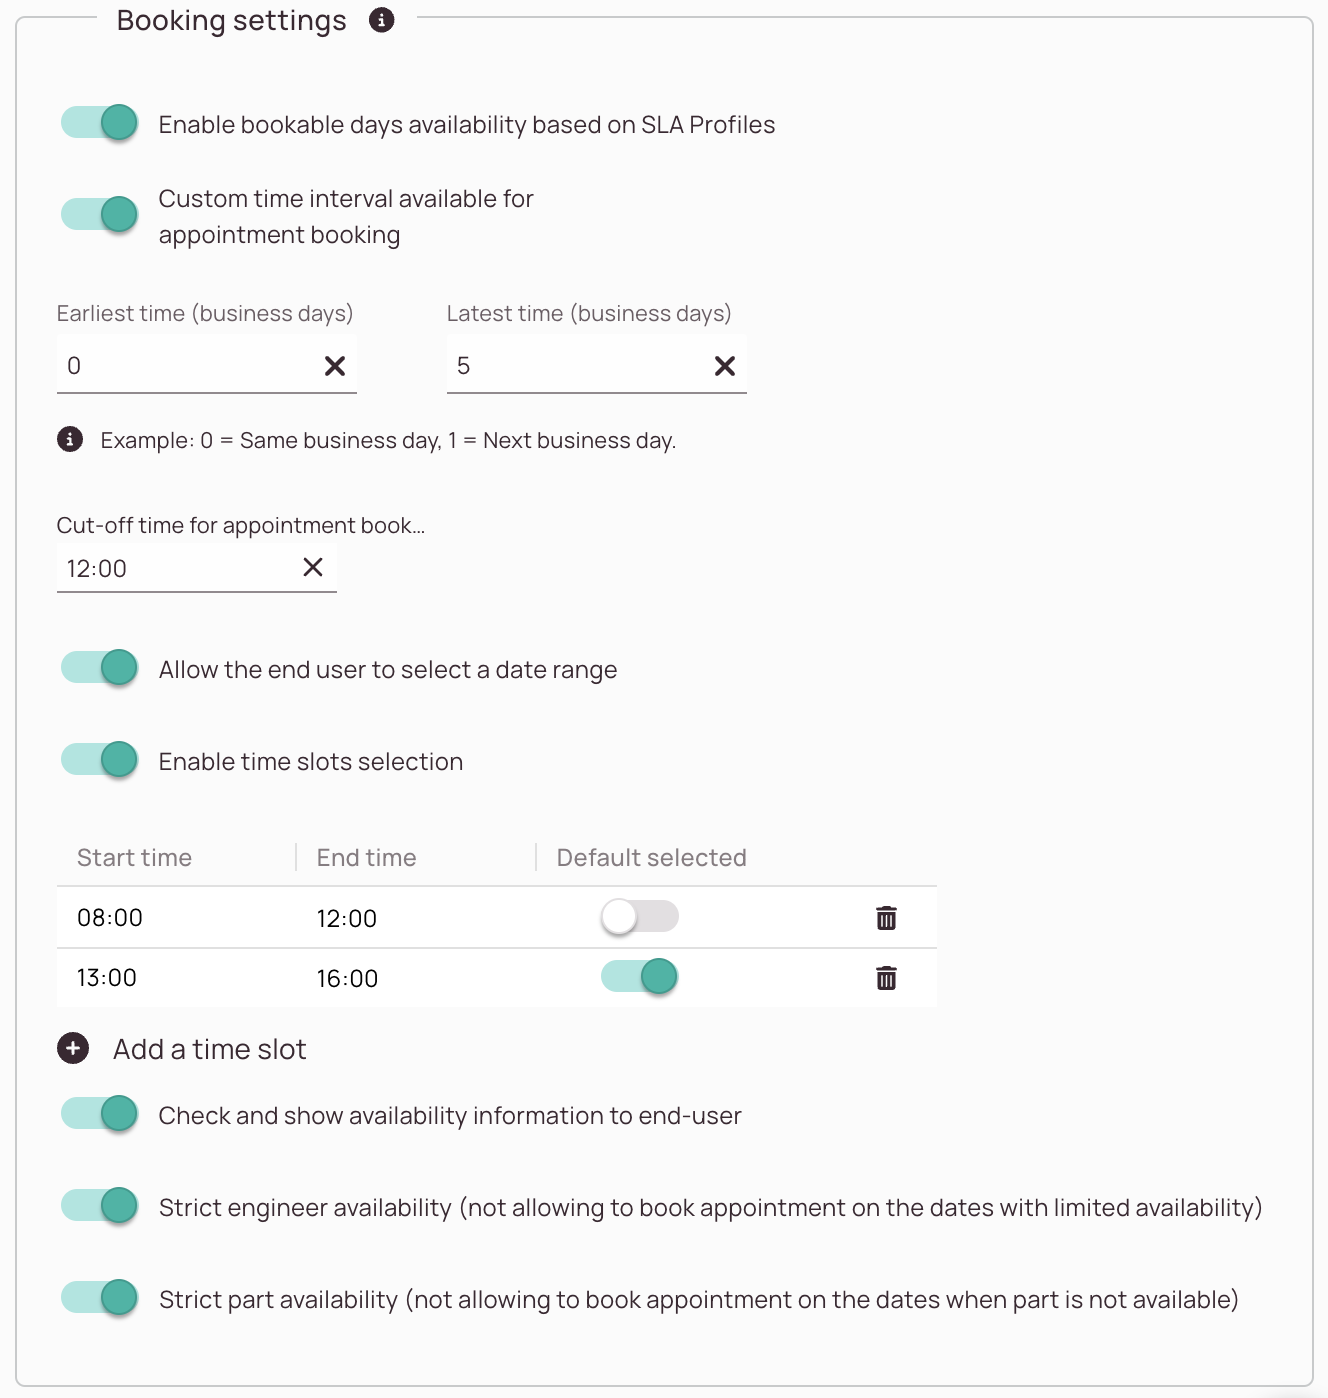
You have the option to take your engineers’ driving preferences into account and adapt the behavior to business requirements within the Customer Portal:
-
Enable SLA Profiles for the Customer Portal toggle: This toggle decides if bookable appointment days are related to an existing SLA Profile.
-
Custom time interval toggle: This toggle allows you to customize which time intervals are available for booking. If you toggle this option off, the next business day will be the earliest bookable day.
Note: Calculations are based on the ticket creation time. -
Earliest time (business days) field: This field allows you to define the earliest available booking time. If you set it to 0, the booking will be available to customers on the same day. If you set 1 or higher, the booking will be available the next business day or days after.
-
Latest time (business days) field: This field allows you to define the latest available booking time. For example, if you enter 5, depending on the earliest time, dates will be made available from the first earliest defined date until the number of 5 current dates is reached.
-
Cut-off time for the booking field: With this field you can decide a cut-off time for possible bookings. Please note that the cut-off time is directly connected to the earliest time and latest time and uses those times as a calculation basis.
-
Allow the end user to select a date range toggle: This toggle gives end-users the option to select a date range in the calendar instead of just having the option to pick a particular date. If an end user picks a date range, the service window inside the Work place will adjust to that too. This option could be useful if you want to give your end users more flexibility in booking appointments. It can be beneficial for the Optimizer too, since the Optimizer will have more freedom to optimize tickets.
Note: If you have time slots enabled with a default time slot set in the Customer Portal profile, the date range selection will use this default time slot as the basis for the days check and booking time window. If no time slots are enabled for this Customer Portal profile, our standard full working day (9:00-17:00) time window will be used. -
Enable time-slots selection toggle: This toggle allows you to configure custom time slots that are available for end users to select. When you enable the time-slot selection toggle, you can freely add and define different custom time slots that are available for the customer to select within the Customer Portal when appointments are booked. Those individual time-slots will then be displayed and available for selection instead of the default ones. The default selected toggle lets you decide which option is pre-selected for the user when the user tries to pick an option.
-
Check and show availability information to end users toggle: This toggle controls whether availability checks should be performed at all. If you turn this toggle off, dates will always be displayed as available without any further availability checks involved. This can be useful if you want to give your users maximum booking freedom, but on the other hand, it will create more manual organizational effort for your dispatchers. If you turn this option off, you are not able to control the engineer and parts availability toggles.
-
Enable strict engineer availability toggle: If this option is turned on, customers won’t be able to book appointments on dates without engineer availability. Please check out the table below to learn how the different combinations of the two availability toggles affect booking availabilities for customers.
-
Enable strict parts availability toggle: If this option is turned on, customers won’t be able to book appointments on dates without part availability.
Please check out the table below to learn how the different combinations of the two availability toggles affect booking availabilities for customers.
Use case example - Small printer company:
Your company (Easy Printer Solutions GmbH) has a second location in Arabia and has Sunday as a starting business day which differs from European standards where it would be Monday, therefore, the company also has other opening hours than the default settings provide (eg. also opening on Sunday).
You would configure a custom SLA Profile in this case.
Examples:
OFF: The default business hours are considered, which are 09:00 to 17:00 from Monday to Friday (Example shows SLA Profile section only for demonstration).

ON: The SLA Profile business hours are considered, for our example, we would assume that we also operate on Sundays.

Use case example - Small printer company:
The earliest time is the first day that is available as the booking window, this can be for example already the same business day (Setting: 0) compared to the default setting where it would be the next business at the earliest. The latest time is the last time that is available for booking, this could be for example 48 hours after the ticket was created according to fixed SLA agreements (Setting: 1). Calculations are based on the ticket creation time.
Examples:
Earliest time (business days) is set to 0: The first available booking day will be the same business day from the end-user's perspective.
Earliest time (business days) is set to 1: The first available booking day will be the next day from the end-user's perspective.
Latest time (business days) is set to 5: The last available booking day will count from the earliest time on. So depending on your setting it will count onwards.
With the Cut-off time for the booking field, you can decide the cut-off time for possible bookings.
Please note that the cut-off time is directly connected to the earliest time and latest time and uses those times as a calculation basis.
Example:
You set the cut-off time to noon (12:00): When your customer tries to book in the afternoon (12:01), no availability is displayed for that day because it is after the cut-off time. Availability will be there the next day. Setting a cut-off time can reduce stress on the dispatcher/engineer and ensure smooth business.
Use case example - Small printer company:
You notice that the default time-slots bring stress into your company, because end users tend to book a lot of appointments inside short time ranges. Therefore you would like to steer the situation a bit better, by providing bigger time slots to customers, in order have more planning freedom for appointments. Therefore you decide to make only bigger time-slots available for your end users, to not overwhelm your engineers with appointments.
Example:
You set time-slots like 08:00 to 12:00 and 13:00 to 16:00 instead of more finely staggered time-slots. With those bigger time-slots, dispatchers and engineer have less stress in planning and doing tickets and end- users will still remain happy, because they know their ticket will be done within this time-slot. As and added benefit the optimizer would also have more room to re-organize tickets more efficiently because of the enhanced flexibility on the Timeline.
This toggle controls whether availability checks should be performed at all. If you turn this toggle off, dates will always be displayed as available without any further availability checks involved. This can be useful if you want to give your end-users maximum booking freedom, but on the other hand, it will create more manual organizational effort for your dispatchers. If you turn this option off, you are not able to control the engineer and parts availability toggles.
You can also individualize the strictness by trying out different combinations with the engineer and part availability toggles.
Please check out the two tables further below to learn more about how these toggles are impacting the system and therefore also the end user experience.
Examples:
ON: Availability checks are performed. The outcomes will be displayed to the end user either with no availability, availability, or with warnings.
OFF: Availability checks are not performed. Almost all dates will always be displayed as available, excluding the weekends.
How to give end-users more freedom for appointment booking
For that purpose, you can configure the toggles with strict engineer and strict parts availability inside the Customer Portal Admin panel page.

Turn them both Off, but keep the “Check and show availability information to end-user toggle” on, and when the customer opens the Appointment Calendar, the system checks availabilities in the background, and then, depending on the results, customers may be warned that there are no engineers with the appropriate skills available for the selected date, or that parts are not yet available. However, customers can still book their preferred date.
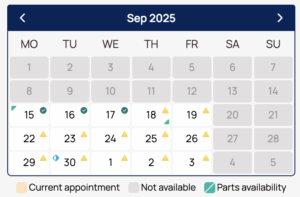
If the customer selected a date in green, and “Appointment dispatched to the Timeline with fixed service window” is configured, the ticket with connecting PUDOs will be placed immediately on the Timeline.
If the end-user selected a date with a yellow warning, a fixed service window will be set on the ticket, but the ticket will stay in the Dispatch Pool and will require further dispatching actions in Work place.
Example: If the end user selects the 1st August, the appointment will be created as such and remain in the Dispatch Pool because the system did not find any available engineers on that date:

Example: If the end-users selects the 2nd August, the appointment will be placed on the Timeline with a fixed service window, and assigned to an available engineer:

For such cases you could disable the "Check and show availability information to end-user" completely. Then all dates will be shown as available and no availability checks will be performed. Please note that the "Check and show availability information to end-user" is toggled on for default configurations.
How to restrict end-users to to only book available dates
Simply turn on “Check and show availability information to end user” and turn on both toggles with strict engineer and parts availability. In this case, the days on which there are no parts available or no engineer available with the matching mandatory skills will be disabled for selection, and your customers won’t be able to book them at all.

But this way, if you configure “Appointment dispatched to the Timeline with fixed service window”, you can be sure that the ticket will end up on the Timeline and customers will not be able to overbook your engineers or select a date when the required parts are not yet available.
Example: Compared to the previous case where 1st August was available for booking but with a yellow warning sign, it is now instead completely disabled, the customer can only select one of the available dates:
General difference between Strict (ON) and Loose (OFF) options
Please note that the table below assumes that the Check and show availability information to end user is turned to ON.
| Toggle Name | Strictness | End user experience |
|---|---|---|
| Strict engineer availability | OFF | Yellow triangles are displayed. Appointments are bookable. |
| ON | Grayed out dates are displayed. Appointments are not bookable. | |
| Strict part availability | OFF | Green triangles indicate the parts availability range. Appointments are bookable outside the parts availability range. Booking at end user's own risk. |
| ON | Green triangles indicate the parts availability range. Appointments are bookable only within the parts availability dates. |
Toggle combination effects
The table below describes all the possible sub-toggle combinations regarding the Check and show availability information to end user toggle:
| Toggle Combination | Dispatching Situation | End user experience | Icon |
|---|---|---|---|
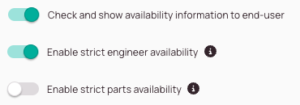 | Engineer and Parts are Available. | The date will be displayed as Available for booking. | |
| Engineer and Parts are Not Available. | The date will be displayed as Unavailable for booking. | ||
| Engineer is Available and Parts are Not Available. | The date will be displayed as Available for booking | ||
| Engineer is Not Available and Parts are Available. | The date will be displayed as Unavailable for booking. | ||
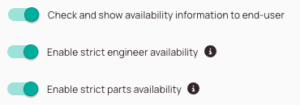 | Engineer and Parts are Available. | The date will be displayed as Available for booking. | |
| Engineer and Parts are Not Available. | The date will be displayed as Unavailable for booking. | ||
| Engineer is Available and Parts are Not Available. | The date will be displayed as Unavailable for booking. | ||
| Engineer is Not Available and Parts are Available. | The date will be displayed as Unavailable for booking. | ||
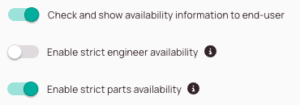 | Engineer and Parts are Available. | The date will be displayed as Available for booking. | |
| Engineer and Parts are Not Available. | The date will be displayed as Unavailable for booking. | ||
| Engineer is Available and Parts are Not Available. | The date will be displayed as Unavailable for booking. | ||
| Engineer is Not Available and Parts are Available. | The date will be displayed as Available for booking. | ||
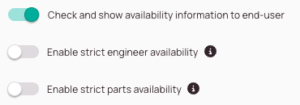 | Engineer and Parts are Available. | The date will be displayed as Available for booking. | |
| Engineer and Parts are Not Available. | The date will be displayed as Available for booking. | ||
| Engineer is Available and Parts are Not Available. | The date will be displayed as Available for booking. | ||
| Engineer is Not Available and Parts are Available. | The date will be displayed as Available for booking. | ||
| Engineer and Parts are Available. | The date will be displayed as Available for booking. | ||
| Engineer and Parts are Not Available. | The date will be displayed as Available for booking. | ||
| Engineer is Available and Parts are Not Available. | The date will be displayed as Available for booking. | ||
| Engineer is Not Available and Parts are Available. | The date will be displayed as Available for booking. |
Driving preferences section
The driving preferences tab gives you the option to define if driving hours should affect booking options for end users:

-
Driving before working hours allowed toggle – This option controls whether the end user can book appointments before the engineer’s actual working hours because driving hours may or may not count as working time, depending on your particular business strategy.
-
Driving after working hours allowed toggle – This option controls whether the end user can book appointments after the engineer’s actual working hours because driving hours may or may not count as working time, depending on your business strategy.
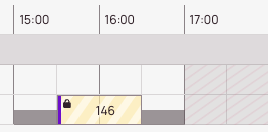
ON toggle: Assuming the working hours start at 9 AM, Driving before working hours allowed by 30 minutes, the Timeline could look as follows:

OFF toggle: Assuming the working hours start at 9 AM, Driving before working hours not allowed, the Timeline could look as follows for the Dispatcher:

ON toggle: Assuming the working hours end at 5 PM, Driving after working hours allowed by 30 minutes, the Timeline could look as follows for the Dispatcher:
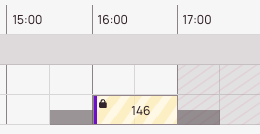
OFF toggle: Assuming the working hours start at 5 PM, Driving after working hours not allowed, the Timeline could look as follows for the Dispatcher:
Additional settings section
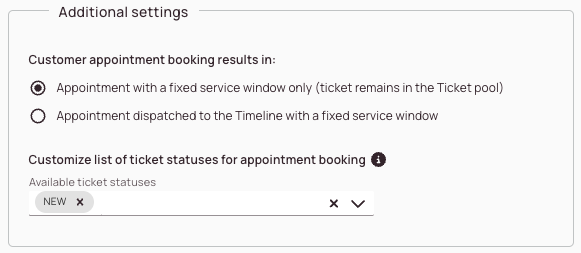
The Additional Settings section allows you to customize how end-users appointments are handled within the Work place. You can also specify the exact ticket workflow statuses for which appointment booking via the Customer Portal is available to end users.
-
Appointment with a fixed service window only (ticket remains in the Ticket Pool) checkbox: Tickets that the end user booked via the Customer Portal will remain in the Ticket Pool with a fixed service window.
Effects:
ON: With this option turned on the Ticket will remain in the Ticket Pool, and receive a fixed service window. The dispatcher will be required to dispatch the ticket. -
Appointment dispatched to the Timeline with a fixed service window checkbox: Tickets that the end user booked via the Customer Portal will directly move to the Timeline with a fixed service window.
Effects:
ON: With this option turned on the Ticket will be placed on the Timeline, and receive a fixed service window. -
Customize the list of ticket statuses for appointment booking drop-down: This gives you the option to customize at which statuses end-user’s have the flexibility to book appointments.
By default, the following statuses are pre-configured: New, Validation, Appointment, Pending Wait Onsite
- Appointment booking will be generally only available for unpublished tickets on your custom selected statuses.
- If you select only one status, for example, New, end users won't be able to book appointments in other statuses eg. Appointment.
Therefore administrators should always aim to select all statuses for which they want to allow the end user to book appointments. - If no selection is made in the dropdown, the appointment booking will be available for the default statuses.
- The default statuses that allow appointment booking are New, Validation, Appointment, and Pending Wait Onsite.
FAQ - Customer Portal
You can activate the Customer Portal in different ways. We will go over the most common ones here
- You can configure a “Send email” automated action and integrate Customer Portal links.
- You can configure a “Create Info” automated action and integrate Customer Portal links
- You can configure a “Send SMS” automated action and integrate Customer Portal links.
You have as well different options to configure what end users can achieve in the Customer Portal:
- Tracking Only – End users receive a link to track ticket progress.
- Tracking + Appointment Booking – End users receive a link to track progress and book appointments.
You can configure everything around the Customer Portal Activation inside Automated Actions in the Admin panel.
- Dispatchers need to create tickets with a valid and correct end-user email address.
- Dispatchers are not allowed to leave the email address field empty when creating tickets.
- The matching Automated Action for the Customer Portal functionality has to be activated.
Yes. You can configure portal profiles to allow tracking only.
The following settings can be currently configured inside the Customer Portal Settings page:
- You can create different Customer Portal Profiles for different projects
- You can configure if your end users should be able to leave feedback on tracked tickets
- You can configure a custom company logo that should be visible for your end users when using the tracking link
- You can configure that the custom company logo directs your end users to a custom website (usually you may aim for the company website)
- You can customize the salutation that is displayed inside the booking window and change the appointment window
- You can customize the text that is displayed inside the booking windows and change the appointment window
- You can customize the disclaimer text that is displayed inside the booking window and change the appointment window
- You can customize available end-user booking appointment windows by using SLA profiles
- You can customize available customer booking appointment time windows by using custom intervals
Yes. You can assign different portal profiles to different projects.
The custom logo must meet the following requirements:
- The picture must be in .jpg or .png format
- The maximum file size is 20 kilobytes
- The maximum pixel file should not exceed 25 pixels
Yes, you can clone Customer Portal Profiles. This makes sense if you want to use a profile as a template to create another profile for example for another project.
- Select a Profile from the Customer Portal List.
- Click on the black squared copy button.
No. Each portal link is ticket-specific and secure. No login is required.
Yes. The portal is optimized for both desktop and mobile devices.
5 out of 5 stars
2 ratings
| 5 Stars | 100% | |
| 4 Stars | 0% | |
| 3 Stars | 0% | |
| 2 Stars | 0% | |
| 1 Stars | 0% |

