Welcome to the Fieldcode Manual
Tip: Start typing in the input box for immediate search results.
-
Quick Start
-
- What is Fieldcode?
- Definitions
- What are tickets, projects and workflows?
- How to log in to Fieldcode
- What is the Fieldcode Support Panel?
- What are components?
- What are views?
- Ticket statuses and their meaning
- Ticket colors and their meaning
- Map symbols and their meaning
- Frequently Asked Questions
- Setting up Fieldcode
-
-
Release Notes
-
Short Overview
-
Fieldcode Work Place
-
-
- How to schedule tickets
- How to search for tickets
- How to expert-search for tickets
- How to filter for tickets
- How to grab/ungrab tickets
- How to link & unlink components together
- How to download ticket data as a excel sheet
- How to copy filters/queries for colleagues
- How to email filters/queries to colleagues
- How to assign/unassign tickets to partners
- How to manage spare parts
- How to show tickets on Map
- How to use the Clipboard
- How to open tickets in a new tab
- How to use container tickets
-
-
- How to use the Optimizer in the Timeline
- How to schedule tickets
- How to publish tickets to engineers from the Timeline
- How to lock/unlock tickets
- How to manually reschedule PUDOs
- How to show tickets on Map
- How to manage availabilities
- How to manage subgroups
- How to display an additional time zone
- How to move tickets back to the Ticket Pool
-
-
-
- How to use the Interaction buttons
- How to assign/unassign tickets to partners
- How to manage spare parts
- How to use the Workflow buttons
- How to use the Ticket info button
- How to use the Email button
- How to use the Comment button
- How to schedule tickets
- How to use the Remove Pending button
- How to cancel a ticket
-
Fieldcode Admin Panel
-
- What is the Process menu?
- What is the Workflows menu?
- How to create & edit projects
- Automated Actions in the overview
- How to setup custom Automated Actions
- How to setup pre-configured Automated Actions
- How to create & edit conditions
- How to create & edit indications
- How to set up email templates
- How to create & edit ticket durations
- How to create & edit custom fields
- How to create & edit custom forms
- How to create & edit value sets
- How to create & edit SLA Profiles
- How to move stuck tickets via Ticket Workflow Monitoring
-
- Articles coming soon
-
Fieldcode Mobile App
-
Fieldcode Customer Portal
Last updated:
How to manually reschedule PUDOs
Copy the URL link to this section to share
If PUDO Pick-Up or PUDO Drop-off is required for a ticket, PUDOs will usually by default added automatically to the right spot in the Timeline.
This is usually the case if a ticket requires parts (which need to be pick-upped at a PUDO location for example) to be successfully resolved.
However, it could be the case that a PUDO appointment needs manual rescheduling because of various reasons.
In this case, you have the option to manually reschedule the PUDO appointment, this is done as follows:
- Right-click on a PUDO location to open the context menu.
- Click on Reschedule PUDO appointment.
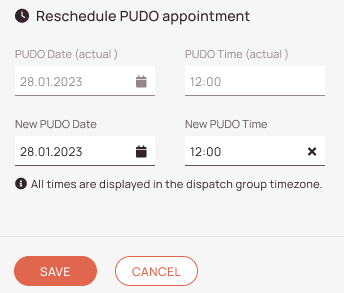
- You will see the already existing PUDO date and PUDO time in gray and can configure the new PUDO date and time in the second row.
- Click on the calendar in the second row and select a new date from the calendar (New PUDO Date).
- Enter a time in the second cell of the second row (NEW PUDO TIME).
- Click Save.

Was this article helpful?
Tags:
Table of Contents