Tip: You can use filters for better results
-
Latest News
-
Getting Started
-
Work Place
-
-
-
- About Buttons
- Action Buttons
- Schedule Tickets
- Ticket Info and COMS Buttons
- Add Parts
- Assign Partners
- Remove Tickets from the Ticket Clipboard
- Inline Skill Editing
- Create Intervention Info
- Create Intervention Reports
- Cancel Tickets
- Cancel Appointments
- Clone Tickets
- Edit Ticket Details
- Edit Privat Notes
- Report Tickets
- Close Tickets
-
Admin Panel
-
FMA 2 App
-
Customer Portal
About Container Tickets
Container tickets are primarily designed to handle rollout projects or device setup services.
A rollout project is usually a project with a bigger effort compared to just tickets with just one particular overall problem/task. Rollout projects in general require service delivery to a whole location or department and requires one or more engineers and one or more appointments in the process of delivering the service. This process normally requires more organizational efforts, than a standard ticket can deliver.
Additionally, to more organizational effort, you would also create more effort for the ticket system. For example, you suddenly require a lot of tickets regarding one big overall task because you need to roll out a lot of hardware, and software installations, or update installations at once to a whole department with a limited amount of time. Dispatchers, therefore, would need to assign tickets for every device the engineers need to install – and for an office with let’s say 100 employees – dispatchers would also need to create 100 separate tickets for this task. You can just imagine that this is not practical at all and a very manual and effort task. Container tickets therefore simplify the work for the dispatchers in this special use case and that’s also the use case where the container tickets functionality really brings benefits.
The container ticket is a superordinate ticket that can handle multiple appointments and engineers without the need to create separate tickets. Appointments are handled inside the superordinate ticket (inside the Intervention tab of the Ticket Details). The dispatcher will see the appointment with a reference to the superordinate ticket inside the Timeline component. The major key difference to a standard ticket is that the dispatcher may assign multiple appointments and multiple engineers inside the Scheduling Assistant. Engineers also resolve tickets as usual inside the FMA app, with the addition of the possibility to create child reports for more than one device/problem that the engineer resolves within one particular appointment.
The container ticket is a superordinate ticket that can handle multiple appointments and engineers without the need to create separate tickets. Appointments and engineers are handled inside the superordinate ticket (inside the Intervention tab of the Ticket Details).
No, this is currently not supported.
For this case we recommend to cancel the container ticket and create a new ticket instead.
By default all roles have the option to convert tickets to container tickets. There is no special configuration required inside the Admin panel concerning the utilization of container tickets.
Typical use case: Rollout projects
For example a company needs to rollout a bigger amount of devices a at once.
Fictive project requirements:
- 20 Workstations need to be unpacked, installed, and configured at desks on-site at the customer location.
- Project has a tight deadline, must be completed within two days.
- Three engineers are in in charge for the project.
- One of the engineer only works half-day.
- Another one of the three engineers needs to travel half-day to reach the customer location.
- Serial numbers and the assigned employees are required for all device setups.
Other typical use case: Device setup service projects
For example a hospital needs medical device setup services.
Fictive project requirements:
- Engineers are sent over to set up devices in course of 4 to 5 days.
- The engineers are required to set up 8 to 10 setups each day.
- The engineers do not want to schedule each setup individually since it is the same resource on the same location and it should be a smooth process.
- The project requires the assignment of multiple engineers to a ticket.
- The project requires to split a ticket to multiple onsite interventions.
- The project requires that the onsite times are adjusted for each technician individually.
- The project requires to have reporting enabled for each singly device in scope.
The container ticket feature can meet all those different requirements and circumstances.
- Container ticket – superordinate ticket – displayed in the Timeline – displayed in the Ticket Pool
- Container ticket appointment – displayed in the Intervention tab – displayed in the Timeline – not displayed in the Ticket Pool
- Child ticket/report – Subordinate ticket – not displayed in the Intervention tab (only in the child ticket itself) – displayed in the Ticket Pool (if RESOLVED)
- Standard ticket – displayed in the Timeline – displayed in the Ticket Pool
No, this is currently not supported. Optimization of container tickets is not supported.
The child report is behaving like a regular ticket report, the only difference is that you handle multiple devices inside an appointment and report each. The child report can be done by the engineer or dispatcher. A child report can become necessary if a engineer handles more than one device inside an appointment. The engineer would then create a child report inside his mobile application before closing the whole appointment for the day with the subordinate report. Child reports appear as resolved tickets inside the Ticket Pool.
Dispatchers can report additional child appointments and the whole appointment for a day (UNPUBLISHED APPOINTMENTS). Engineers can report additional child appointments and the whole appointment for a day (PUBLISHED APPOINTMENTS). Child ticket reports will appear as RESOLVED child tickets inside the Ticket Pool. Please be advised that closing whole appointments inside the FMA app also closes the possibility to add child ticket reports.
Absolutely! You can tailor the child ticket report form to your specific business needs inside the Admin panel -> Forms.
It might be the case that your container ticket overlaps with another ticket in the Timeline. In this case it is important to know, that your ticket is not lost, and you can still find it in the Ticket Pool and work with it regularly.
Using Container tickets
Fictive use case for container tickets:
The IT Corporation needs to roll out 20 new company laptops for their small new office in Nuremberg. The project is called “Device Rollout NBG Office 1”. The project is handled by the two engineers Scott and Smuthers and dispatcher Miller is the dispatcher in charge. Both engineers have different skill sets, Smuthers has more talent for hardware installations and Scott has more talent for software installations. The project needs to be completely resolved in two days and the IT Corporation, therefore, opens a matching ticket. Instead of now opening 20 different tickets, just one ticket is required for the job. The container ticket functionality is therefore capable of saving a lot of organizational extra effort. As a result of the ticket request dispatcher Miller decides to plan the mornings for the hardware and the evenings for the software installations inside the Scheduling Assistant. Dispatcher Miller is quite happy that he will be able to successfully solve this project, as the container ticket functionality gives him enough flexibility and freedom to freely schedule multiple appointments with multiple engineers and multiple interventions.
Let's create a container ticket for the IT Corporation!
Converting regular tickets to container:
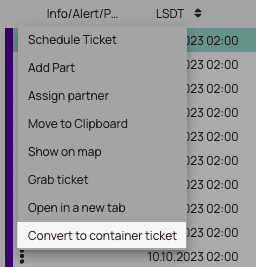
Right-click on the ticket you want to convert in the Ticket Pool. Then click on Convert to container ticket.
Note: Once you convert a ticket to a container ticket, you cannot revert it back to a standard ticket anymore.
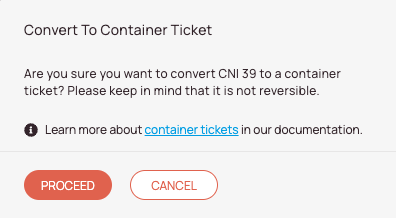
- Confirming the prompt:
You will be asked if you are sure that you want to convert the ticket, confirm by clicking on PROCEED.
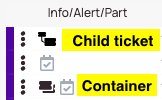
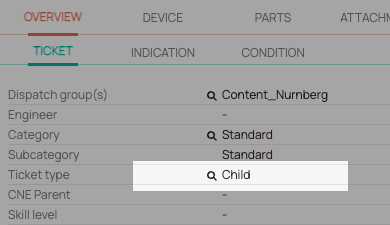
- Recognizing container tickets:
Container and child tickets can be recognized by an icon in the Info/Alert/Part column. The container ticket has a “stacked ticket icon” while the child ticket has a “related ticket icon”. What also changes is the ticket type, it changes from “Standard” to “Container” (displayed inside the Ticket Details Overview tab). If engineers or dispatchers create child ticket reports, the ticket type will be “Child”.
- Scheduling container tickets:
There is a separate scheduling window for container tickets, where you can schedule multiple appointments and multiple engineers at once or one after the other.
Note: The container ticket is superordinate ticket that can handle multiple appointments and engineers with the requirement of creating separate tickets. You could, however, still schedule only one appointment, and the child reporting would still be a possible option.
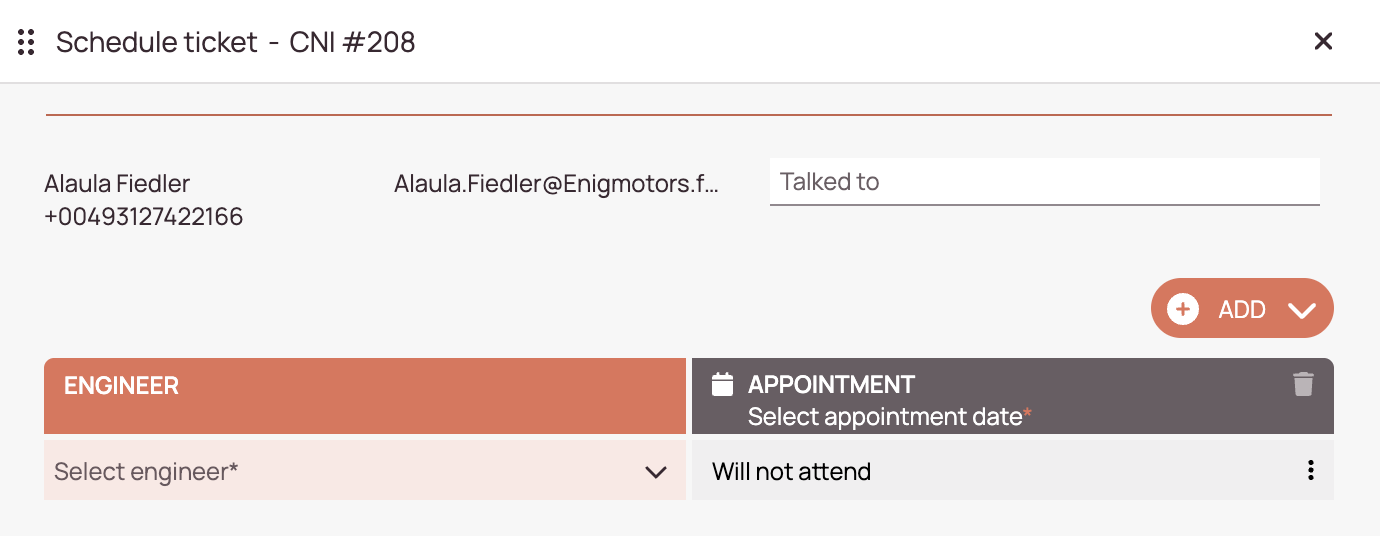
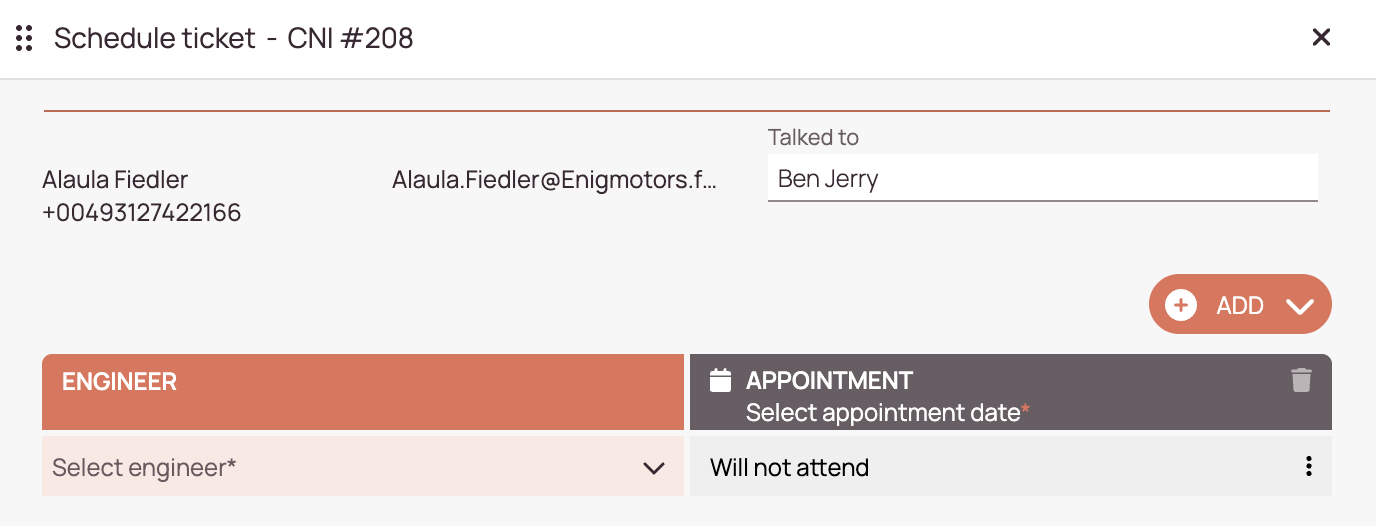
- Setting up multiple appointments: We will have a look at an exemplary case in the next step. You will notice an Engineer and Appointment column. You can select to whom you talked to, you can add one or multiple engineers, and you can add one or multiple appointments. You can do edits and updates to the appointments and engineers in the scheduling assistant as long as all appointments of the container ticket are unpublished.
- Rollout of 20 new laptops for the IT Corporation company: The IT Corporation wants to roll out 20 new laptops for their new office in Nuremberg. The Fieldcode company will be in charge for this job, the two engineers Smuthers and Scott have two days to do the rollout which includes the hardware installation (connecting cables, plugin the monitors etc.) in the office and the software installation (install necessary company-needed programs etc.). Smuthers is in charge for the hardware installations on two days in the morning. Scott is in charge for the software installations on two days in the evening.
- Configuring engineers:
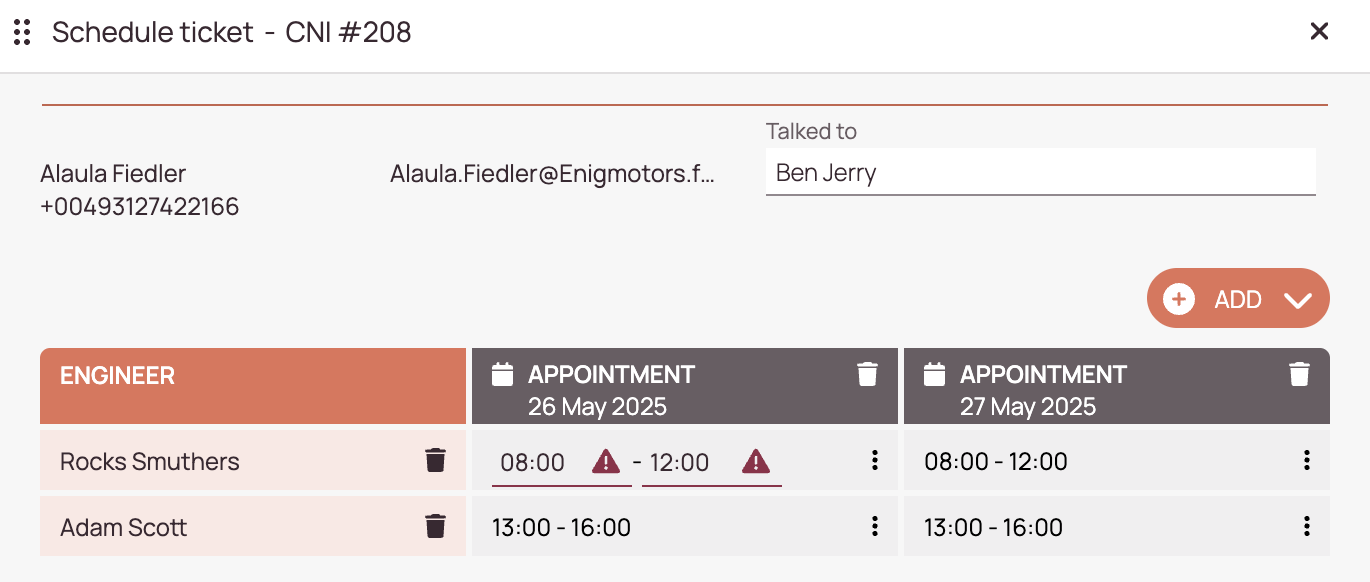
The dispatcher clicks on the the Add button. The dispatcher clicks on Add engineer to add another engineer to the table. Then the dispatcher clicks on Add appointment to add another appointment to the scheduling table.
The dispatcher selects the two engineers: Scott and Smuthers.
- Configuring appointments:
The dispatcher clicks inside the calendar of the appointment column header and selects the date of the first day. Then the dispatcher clicks inside the calendar of the second appointment column header and selects the date of the second day.
- Assigning dates: As next step the dispatcher assigns the the appointment times (time ranges) in all empty Appointment cells. Don’t forget to click Save after finishing the assignments. Note: You also have the flexibility to not assign times to certain engineers. This option is called Will not attend. You could use this option for example, if a engineer should be scheduled for one day and have off the other day.
- Assigning times:
As next step the dispatcher assigns the the appointment times (time ranges) in all empty Appointment cells. Don’t forget to click Save after finishing the assignments.
Note: You also have the flexibility to not assign times to certain engineers. This option is called Will not attend. You could use this option for example, if a engineer should be scheduled for one day and have off the other day.
- What happens in Work place?
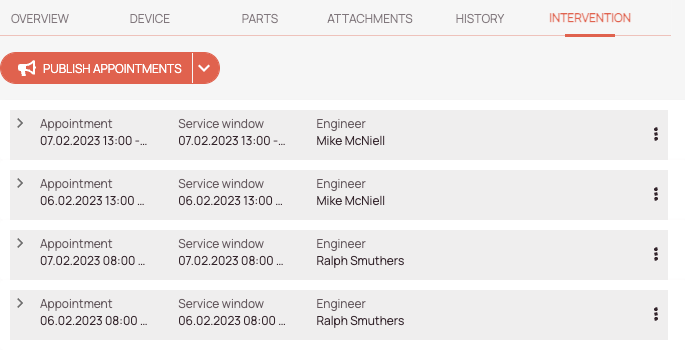
The container ticket is now split into several appointments, every appointment inside the container ticket is visible in the Timeline. Each appointment has the same container ticket number.
- What happens on the Timeline?
The container ticket is now split into several appointments, every appointment inside the container ticket is visible in the Timeline. Each appointment has the same container ticket number.

- What happens to container tickets?
After the container ticket is scheduled the ticket moves back from the Dispatch tab to the General tab. Now it is important to understand how a container ticket is behaving: A container ticket that has been scheduled moves to PENDING WAIT ONSITE status (if there’s no other custom workflow configured).
More background knowledge about container tickets:
- Appointments inside the container ticket can be PUBLISHED and UNPUBLISHED individually.
- The dispatcher schedules individual appointments and the workflow buttons for individual tickets
are inside the INTERVENTION tab. - Container tickets cannot be moved back to the Ticket Pool.
Drag & Drop is also disabled for container tickets. - The dispatcher can edit the container ticket and individual appointments if every ticket is UNPUBLISHED.
- As soon as one ticket is PUBLISHED dispatchers can only publish other tickets,
but not cancel individual appointments (Container ticket = Superordinate). - The dispatcher can still add/change/edit/delete certain appointments via the Scheduling Assistant. The container ticket stays on the current status until all appointments are either canceled (container ticket moves back to previous status) or reported (container ticket moves forward to next status).
- When all individual appointments are reported (either with child tickets being reported or appointment closed), the container ticket moves to the next status. Child tickets appear as RESOLVED/CLOSED tickets in the Ticket Pool search.
Note: To which status a ticket moves is totally dependent on the configured and used workflow. - Container tickets that are on RESOLVED/CLOSED status cannot be deleted from the Timeline anymore.
- Publishing all appointments to engineers:
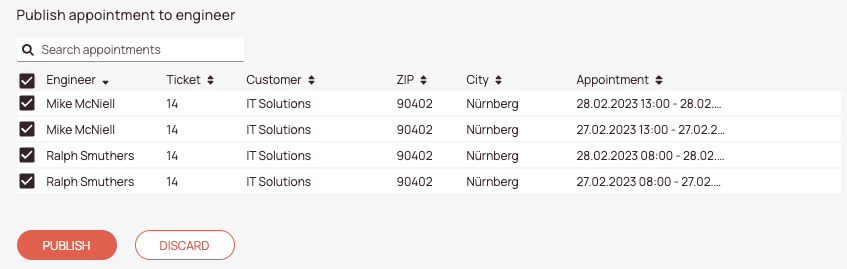
In the Intervention tab you click on PUBLISH APPOINTMENTS, select all engineers and click on PUBLISH. All appointments will synchronize to all engineers and they can start the work on the service field. Engineers will now create child reports, and resolve the tickets. After all tickets have been reported, the container ticket will automatically move to RESOLVED/CLOSED.
- Publishing all appointments to engineers:
Appointments inside container tickets can include child tickets (because engineers install multiple laptops, for example), therefore it is advisable to create child reports and report child reports individually. Please note that if engineers close the main appointment, they have no option to create other child reports anymore.
- (Android) – Engineer perspective – Creating child reports inside FMA app: Child reports are created after the engineer drove to the location and started to work on the ticket and then select the following in Tickets tab – Create Child Report. Engineers should always select the correct name when using the report form. For example it could be the case on the field that other engineers fill out one engineer’s report, because the other engineer is still busy with something else. Engineers should make sure to fill the correct name when creating reports.
- (iOS) – Engineer perspective – Creating child reports inside FMA app:
Child reports are created after the engineer arrived to the location and started to work on the ticket and then select the following in the Tickets tab – Create Child Report. Engineers should always select the correct name when using the report form. For example it could be the case on the field that other engineers fill out one engineer’s report, because the other engineer is still busy with something else. Engineers should make sure to fill in the correct name when creating reports.
- What can the dispatcher do before the container ticket has been published?
If the container ticket was not published yet, dispatchers are able to cancel the whole container ticket (Cancel Ticket button), dispatchers are able to cancel individual appointments (Cancel Appointment button), dispatchers are able to report individual appointments (Report button), dispatchers are able to edit container ticket details (Edit button), and dispatchers are able to do child ticket reports via the Work place (Child Ticket Report button). Engineers can do matching actions if appointments are PUBLISHED to them.
Tip for finding matching tickets quickly:
You can find matching related child tickets/ matching container tickets by clicking on the search button for ticket type inside the Ticket Details tab – Overview. Clicking on the search button will show the results listed inside the General tab in the Ticket Pool. If you search inside a container ticket, the result will show the child tickets (subordinate). If you search inside an child ticket, the result will show the superordinate container ticket (superordinate).
Container tickets compared to standard tickets
- Appointments are nested inside the container ticket and changes are done for the appointment itself, rather than the ticket.
- Appointments will show in the Timeline, referencing the container ticket number.
- Container tickets cannot be moved back to the Ticket Pool.
- Drag & Drop is disabled for container tickets (Ticket Pool->Timeline, Timeline->Timeline, Timeline->Ticket Pool).
- Each appointment inside the container ticket has dedicated workflow buttons.
They apply only to the appointment – not the container ticket. - Changes applied to a ticket apply to all appointments.
We rather suggest you to make necessary ticket changes before the appointment gets scheduled to avoid potential data inconsistencies. - The container ticket moves to the next proposed status (eg. PENDING WAIT ONSITE) when all appointments are fixed!
- The container ticket stays on the current status until all appointments are either canceled or reported
- If at least one appointment of the container ticket is PUBLISHED the EDIT and CANCEL TICKET workflow buttons are disabled.
The ticket stays in its current status. - If all appointments are UNPUBLISHED the EDIT and CANCEL TICKET workflow buttons are enabled.
The ticket moves back to the previous status.
Limitations
A container ticket can include a maximum of 500 appointments.
- Project assignment remains a purely manual action done by the dispatcher.
- It is not possible to optimize container tickets.
- Container tickets cannot be moved back to the Ticket Pool.
- Drag & Drop is disabled for container tickets.
- Handling parts inside container tickets is currently not advised, but possible.
- Automated actions always take the last appointment as a reference, therefore we currently advise you to exclude container tickets from automated actions. Please check the workaround further below.
- Conditions for container ticket take the last appointment as a reference, therefore we advise you not to use the appointment fields in conditions for container tickets. If you still decide to use them, they will always take the last appointment of the interventions tab as a trigger.
Affected monitored fields: Dispatch appointment start time, Dispatch appointment end time, Fixed appointment start time, Fixed appointment end time.
What would that mean for my condition?
Let’s say you have a container ticket with three appointments (01.01.; 06.01.; 12.01.)
If you use an condition here, the condition would only alert you at the last appointment. - Indications always take the last appointment as a reference, therefore we advise you not to use the appointment fields in indications for container tickets.
Affected indication: Too many unsuccessful attempts to repair!
If you still decide to use them, they will always take the last appointment of the interventions tab as a trigger.
What would that mean for my indication?
Let’s say you have a container ticket with three appointments (01.01.; 06.01.; 12.01.). If you use an indication here, it would only indicate/alert you at the last appointment.
5 out of 5 stars
1 rating
| 5 Stars | 100% | |
| 4 Stars | 0% | |
| 3 Stars | 0% | |
| 2 Stars | 0% | |
| 1 Stars | 0% |