Tip: You can use filters for better results
-
Latest News
-
Getting Started
-
Work Place
-
-
-
- About Buttons
- Action Buttons
- Schedule Tickets
- Ticket Info and COMS Buttons
- Add Parts
- Assign Partners
- Remove Tickets from the Ticket Clipboard
- Inline Skill Editing
- Create Intervention Info
- Create Intervention Reports
- Cancel Tickets
- Cancel Appointments
- Clone Tickets
- Edit Ticket Details
- Edit Privat Notes
- Report Tickets
- Close Tickets
-
Admin Panel
-
FMA 2 App
-
Customer Portal
About Users
In Fieldcode, a user is anyone who has access to the system. Users can be internal team members, external partners, or support personnel. This guide explains how to manage users, assign roles, and configure user-specific settings.
- Users have to be assigned a role or multiple roles. This can be achieved inside the Roles tab.
- In case the default roles don’t fulfill your business requirements, you can create custom roles inside Permissions.
- A user must have at least one role assigned, otherwise, the user cannot be added.
If you have created a new Fieldcode Account (after March 2025), you will find a so-called "support user" in the user list. This account information can be used by our support team to troubleshoot your account if you encounter problems or want to make special adjustments to your account.
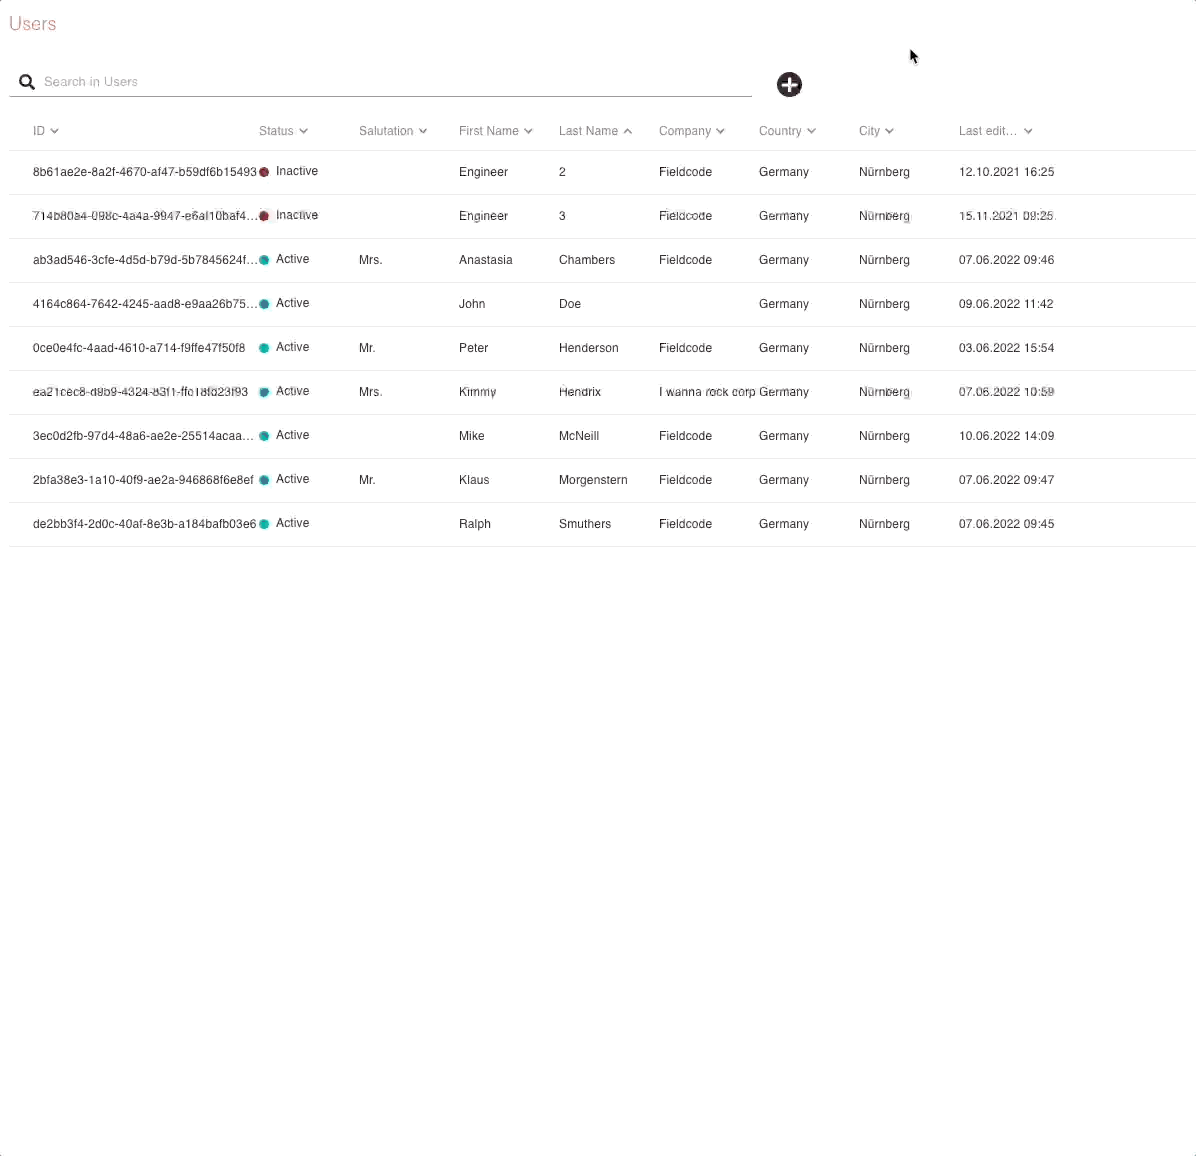
Accessing the Users Page
Navigate to Projects and More → Users to view and manage all users in your environment.
Searching for Users
Fieldcode provides a built-in search feature to help you quickly locate users within your environment.
How to search:
- Navigate to Projects and More → Users.
- Use the search bar at the top of the user list.
- Enter any of the following:
- Username
- Email address
- Role
- Status (e.g., active, inactive)
-
As you type, the list will automatically filter to match your query.
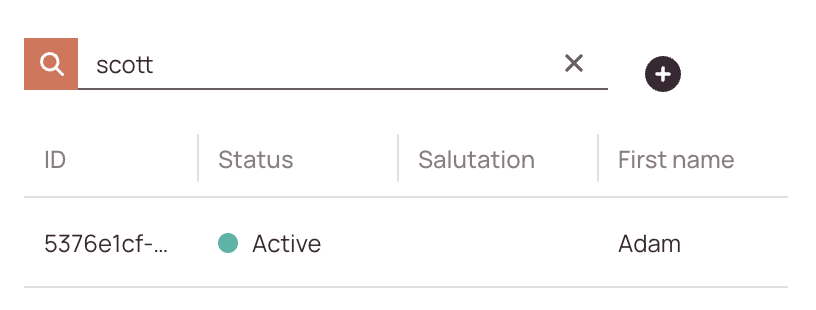
- Partial matches work! Typing “john” will show all users with “john” in their name or email.
- Combine filters with sorting options (e.g., sort by role or status) for more precise results.
- If no results appear, double-check spelling or try a broader term.
Creating Users
- Inside the Admin panel go to Projects and More-> Users
- Click on the Plus button to open the New User form.
- Fill in or edit the following tabs: Contact, Location, Working Hours & Availability, Roles, and Skills.

Creating/Editing Users
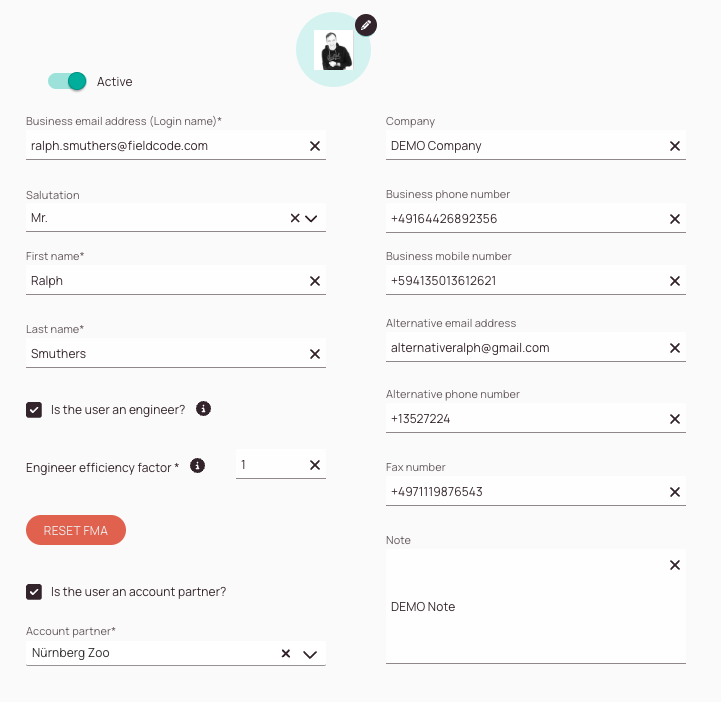
1. Contact tab
-
(Optional) – Click on the pencil button to upload a picture of your new or existing user.
-
(Optional) – Decide if your new or existing user should be set to active in the system.
-
Enter the business email address or Login name for your new or existing user.
-
(Optional) – Enter the company name of your new or existing user.
-
(Optional) – Select the salutation of your new or existing user.
-
(Optional) – Enter the business phone number of your new or existing user.
-
Enter the first name of your new or existing user.
-
(Optional) – Enter the business mobile number of your new or existing user.
-
Enter the last name of your new or existing user.
-
(Optional) – Enter an alternative email address of your new or existing user.
-
(Optional) – Check the “Is the user an engineer?” box if your new or existing user has the job role engineer/technician in your company.
You now also have the option to set an efficiency factor for the engineer. The default efficiency factor is 1. -
(Optional -> only visible on User Edits) – The Reset FMA button allows you to reset the Fieldcode FMA app database, which may resolve workflow issues.
Important: Please use this button only if the selected engineer is experiencing problems with the FMA application that are not easily resolved. -
(Optional) – Check the “Is the user an External Partner?” box if your new or existing user is under a subcontract.
Select the partner company from the dropdown. -
(Optional) – Enter an alternative phone number of your new or existing user.
-
(Optional) – Enter the fax number of your new or existing user.
-
(Optional) – Enter a note about your new or existing user which will be visible to other users of the system.
(Optional) - Engineer Efficiency Factor
If engineer A has an efficiency factor of 1.2 assigned, it means this engineer needs 20% longer to perform a task. If engineer B has an efficiency factor of 0.8 assigned, it means this engineer is 20% faster than normal/default. Therefore you could say, the lower the factor, the more efficient the engineer is.
Ticket duration * Engineer efficiency factor = Updated Appointment time
The ticket duration meanwhile doesn’t update because of the factor, this is expected behavior.
- If you drag & drop a ticket from the Ticket Pool to the Timeline.
You will see that the ticket length will change according to the engineer efficiency factor. The ticket duration remains the same. This is expected behavior. - If you schedule a ticket via the Scheduling Assistant.
You will see that the ticket length will change according to the engineer efficiency factor. The ticket duration remains the same. This is expected behavior. - The Customer Portal will also take the Engineer efficiency factor into account for arranging appointments.
Yes, you do not lose control for manual re-adjustments, just because the Engineer efficiency applies before.
Yes, it is.
You can check the Engineer Efficiency tab inside the Analytics to understand more about engineer performance.
You have two types of engineers in your company. Younger engineers who are still learning and adapting fast, and older engineers who work slower, but steadily.
You want to enter this knowledge about your technicians into the system so that more or fewer tickets are distributed accordingly.
This allows the system to distribute the same number of tickets more efficiently on the Timeline without losing unnecessary time.
(Optional) - Account Partners
Partner accounts typically assist the regular account with ticket services on the field (usually under a subcontract agreement).
They can be either Fieldcode users themselves or can be account partners that use a different interface to receive tickets (Email) and provide reports (Partner Portal). They both count as Partner Accounts, they just use different interfaces.
To learn more about how partners are utilized inside the Work Place check out the Big Picture: Partners topic.
Account Partner: Connection inside the same account!
-> Account Partners can either rely on the Fieldcode system OR
-> Account Partners can alternatively rely on receiving tickets via email and doing the reporting via the Partner Portal
Cooperation Partner: Connection between different Fieldcode Accounts!
System Connection: Connection between Fieldcode system and third-party system!
Account Partners have the following characteristics:
- They login into the same Fieldcode Account as the contractor company
- The tickets are the same tickets as for the contractor company, the main difference is that partners have only view rights for assigned partner tickets
- They can work on tickets in the same way a contractor company would work on the ticket
Cooperation Partners have the following characteristics:
- They login into a different Fieldcode Account as the contractor company
- The tickets are the same tickets as for the contractor company, the rights are self-determined, tickets get synchronized, when work on the ticket starts
- The cooperation requestor sends a cooperation request to the potential partner via the Partner configuration menu inside Fieldcode Admin Panel
- The cooperation partner provides the partner business key to the requestor, which can be found below the header inside the Partner configuration menu
- The cooperation requestor receives an email with a 7-digit PIN code, that code must be entered inside the corresponding Partner configuration menu item
- They can work on tickets in the same way a contractor company would work on the ticket
- The system connection requestor uses a third-party accounting system
- The Fieldcode system and Account is the contractor system
- The third-party account system is the subcontractor system
- The purpose of a system connection is to establish a connection from an external system and your Fieldcode Account to pass data between the two systems
- After a system connection is created it needs to be mapped out so that data gets sent to the correct endpoint.
- Solution engineers can easily help you with arranging the system connection, NO CODING IS REQUIRED.
Partner Account users are created in the same way as regular users. You have to go to the Fieldcode Admin Panel -> Access -> Users and create the user as usual.
While creating the partner user you just check the checkbox “Is the user an External Partner?” in addition. Select the partner company afterwards.
The Partner company has to be created first inside Fieldcode Admin Panel -> Access -> Partners
Yes, that’s possible.
Select the user you want to convert inside Fieldcode Admin Panel -> Users and check the checkbox “Is the user an external partner?”.
Select the partner company afterwards.
Inside the Fieldcode Admin Panel go to Interfaces -> Cooperations.
You can view your own business key there and share it with potential cooperation partners. The business key is located under the heading in the list view.
From there you can also request a cooperation with another partner.
You can also confirm cooperations by entering a special partner PIN, which you would receive by email.
Partners are a group of partner engineers or partner dispatchers that assist regular dispatch groups or engineers
in fulfilling their service (eg. sub-contractors).
- Partners are able to use and utilize the Fieldcode software.
- Partners have specific view rights inside Fieldcode that ensure privacy:
A partner can be part of a dispatch group, but a partner itself will only see his tickets (not the tickets of the whole group!). - Partners are always a part of a customer account (roof company).
- Partners can be assigned from the Ticket Pool and Ticket Details.
- Partner engineers can be identified in the Timeline by their names written in: italic typography.
- A partner has to belong to a specific partner company that needs to be configured inside the Fieldcode Admin Panel
- Partners are not able to use the Optimizer.
- Partner users can only view partner engineers of a Dispatch group in the Timeline.
- Unassigning a partner results in tickets being moved back to the Ticket Pool.
The partner selection is limited to matching partners who are actually inside the area of the dispatch group.
Partner areas are configured inside the Partner configuration menu inside Fieldcode Admin Panel to make the partner selection for the dispatcher easier.
If you do not define a partner area for the partner it will remain selectable for every dispatch group.
Another reason why groups do not show up could also be related due to wrong configured filters.
Partner areas can be defined inside the Partner configuration menu when you select the Account Partner item and assign an area from there.
It is not done inside the Partners menu. The partner menu only lets you configure the general location of the partner company.
If you define partner areas inside the Partner configuration menu, only location-relevant partners will be displayed to dispatchers.
This will make the partner selection easier for dispatchers.
Partner company location = General definition of partner company, can be assigned to every engineer in the dispatch group
Partner company area (or other filters, eg. project) = Precise definition or partner operation circumstances, can be eg. assigned to overlapping dispatch group areas.
Let’s assume you have Account Partners, Account Partners without Fieldcode system, Cooperation Partners and system connections. Not only is your service network absolutely incredible in this case, but with all those types of “partners” it can be confusing to know what to configure where and how what affects what.
Therefore we would like to give you a brief summary over here:
- A user can be converted to a account partner user inside Access -> Users -> by switching the “External Partner” toggle to the right.
- Account Partners are configured under Access -> Account Partners.
- Account Partners that do not use the Fieldcode system are configured under Access -> Account Partners -> by switching the “Partner Portal” toggle to the right.
- Cooperation Partners are configured under Access -> Cooperation Partners.
- Direct connections (=System connections) are configured under Interfaces -> System Connection.
- Partner areas are configured inside Partners -> Partners configuration.
Important: Partner locations are not the same as Partner areas. - The Partner configuration menu also has the purpose to list and edit all your different partners (which can differ by partner type) one-by-one.
2. Location tab
If the user's location is changed, it will take until the next day for the updated location to be visible on the map.
-
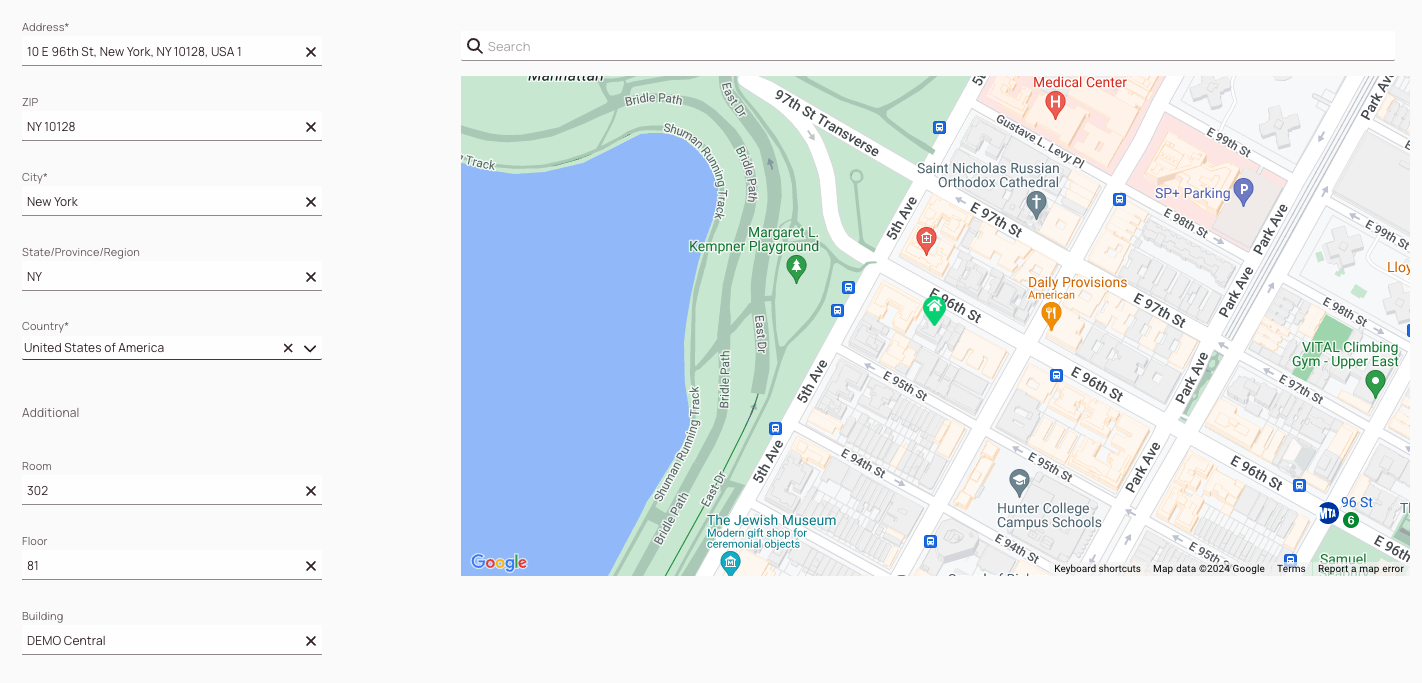
Enter the address of your new or existing user automatically or manually.
Automatically means that you for example just copy the whole address from somewhere else and the system auto-fills some necessary fields smartly.
Manually means that you enter all the fields one by one.
In the example above we just copied the address from a popular map tool into the system and the system smartly populated some of the location fields. -
(Optional) – Enter the ZIP of your new or existing user.
-
Enter the city of your new or existing user.
-
(Optional)- Enter the state/region of your new or existing user.
-
Select a country from the drop-down for your new or existing user.
-
(Optional) – Enter a room for your new or existing user.
-
(Optional) – Enter a floor for your new or existing user.
-
(Optional) – Enter a building for your new or existing user.
-
Quick Tip: You can also pin your target directly on the map by first entering a location keyword and then setting a pin on the map.
Some of the fields will then smartly auto-populate making the insertion of the location more straight forward and simple.
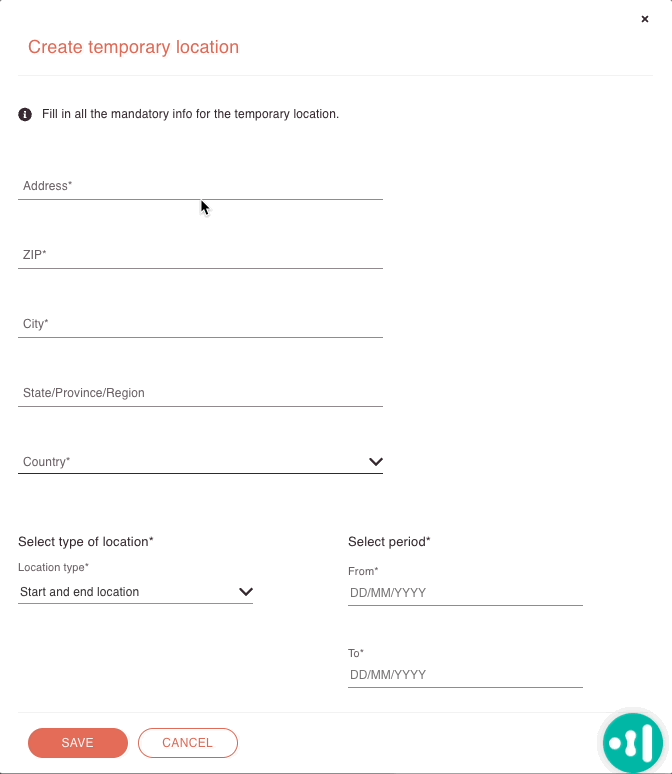
3. (Optional) - Temporary locations tab
Temporary locations are useful if your engineer works from another location than his usual location. You can temporarily configure a start and end location so the system assigns tickets for this temporary location. After the period has passed the default location will be taken into account by the system again.
If you create a temporary location inside a different time zone, you will also need to manually adjust the user's work hours to align with the new time zone!
One day must pass before the changes in the temporary locations are active in the system.
- Click the plus button in the Temporary locations tab.
- Enter the address of the temporary location.
- (Optional) – Enter the ZIP of the temporary location.
- Enter the city name of the temporary location.
- (Optional) – Enter the state name of the temporary location.
- Select the country of the temporary location.
- Select the location type. You can choose between the start location, the end location, and the start and end location.
- Enter the start date for the time period.
- Enter the end date for the time period.
For example, the temporary start location could be different from your temporary end location because the engineer utilizes two locations.
This could be because, for example, the technician doesn't want to drive back after a long day of work because he has a place to stay at a second point.
In this case, you configure the start location and end location individually.
If both locations are the same you will select Start and end location.
4. Working hours tab
By default, there will be working hours set from 08:00 AM to 16:00 PM from Monday to Friday. However, you are free to change the working hours for your existing or new users. On the right side, you will find a preview of the working hours you configured.
If you create a temporary location inside a different time zone, you will also need to manually adjust the user's work hours to align with the new time zone!
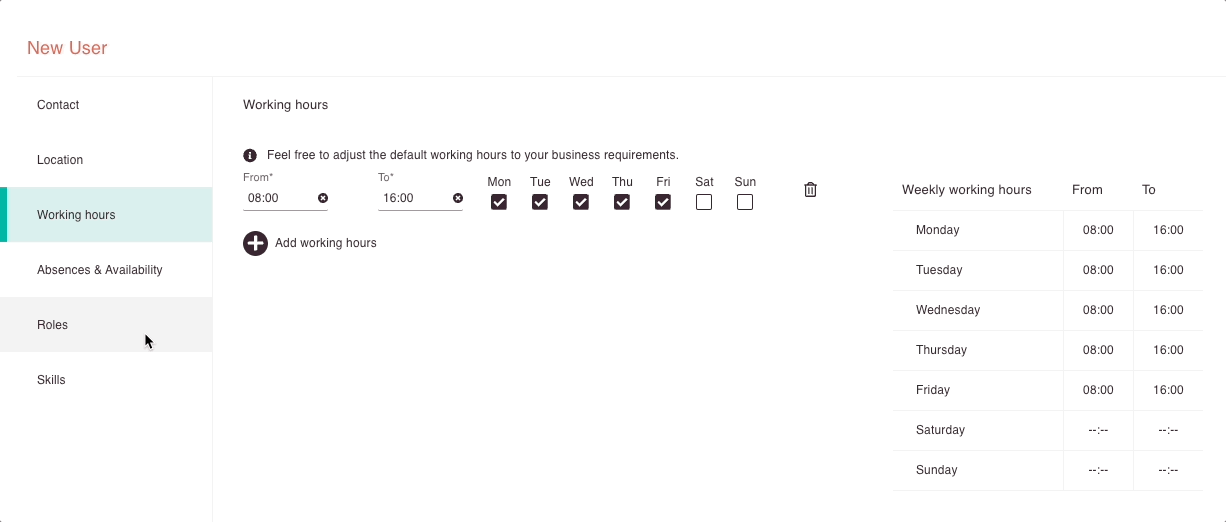
Configuring Working Hours
Your goal when defining working hours for your user is to cover all your working hours that the user needs to fulfill:
- Set the time in the from field to 08:00 and in the to field to 17:00.
- Click on Save.
- Set the time from 08:00 to 12:00 for Monday to Friday.
- Remove the checkbox Thursday and Friday.
- Click on Add working hours.
- Set the time from 08:00 to 17:00.
- Turn on checkboxes for Thursday and Friday.
- Click on Save.
If your user has different working hours for different days, the way above is the proper way to configure this, so all eventualities are covered.
- Set the time from 06:00 to 15:00 for Monday to Friday.
- Click on Add working hours.
- Set the time from 18:00 to 19:00.
- Turn on the checkbox for Saturday.
- Click on Save.
- Click on Add working hours.
- Set the time from 08:00 to 08:00 on Monday.
- Click on Save.
This way you wouldn't have to select two checkboxes (which you could still do, though).
(Optional) - Configuring Night Shifts
- Set the time from 23:00 to 05:00 for Monday to Friday.
- You will get an information prompt that selected time periods to affect two working days, but that is fine, as we want it that way in our case.
- Click on Save.
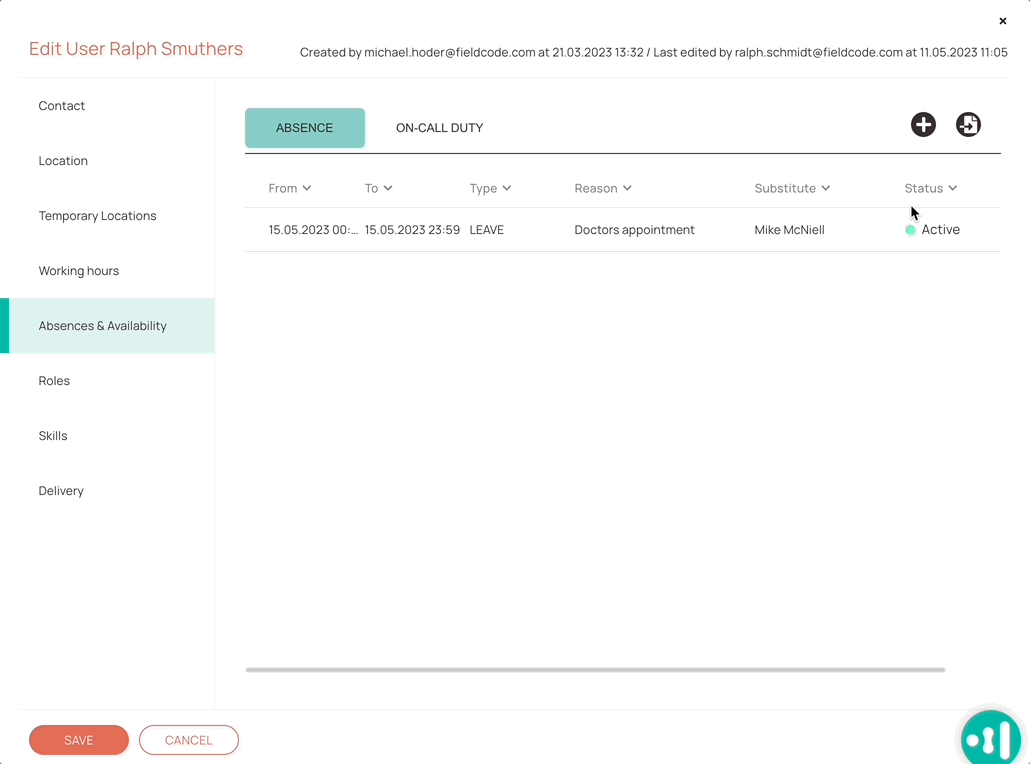
5. Absences & availability tab
In the absences and availability tab, you can configure planned and unplanned absences and configure on-call duty for your new or existing user. You can also import public holidays into the system (currently USA only!).
You can either manage availabilities for your users from Admin Panel -> Users -> Absences & Availability tab or inside Work Place inside the Timeline.
(Optional) - Configuring Absences
The absence buttons will therefore be grayed out when creating a new user.
- Click on the plus button in the Absence tab.
- Enter a date from where the Absence starts and insert it in the From field.
- Enter a time from where the Absence starts and insert it in the time field.
- Enter a substitute who should be in charge of the work instead from the drop-down.
- Select a reason for the absence from the drop-down.
- Enter a description for the absence, where the reason you selected is described.
- Click Save.
- The absence will be displayed inside the Work place in the Timeline.
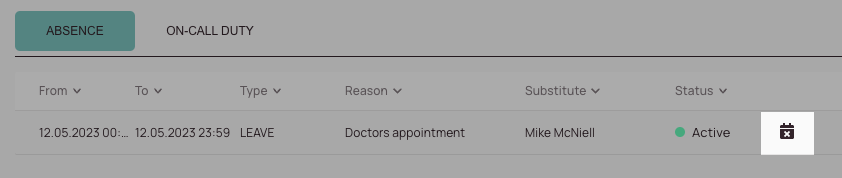
(Optional) - Deleting Absences
- Search for an item in the list that you want to delete.
- Scroll to the right to find the trash button.
- Click on the cancel absence (crossed calendar).
- Confirm the upcoming prompt with Yes, Cancel.
- The absence should now be removed from the list.
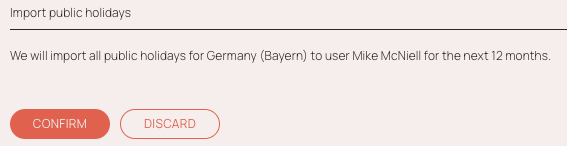
(Optional) - Importing Public Holidays
You can import local bank holidays for a user which saves you the hassle of entering those days manually. Importing bank holidays for a user is beneficial for the smartness of the system (eg. the Optimizer will not plan on bank holidays for this user if the bank holidays are imported for this user).

- Click on the Import public holiday button.
- You will be asked if you want to import the public holidays for your location for the next 12 months.
- Confirm the prompt.
- The bank holidays should now appear in the absence list.
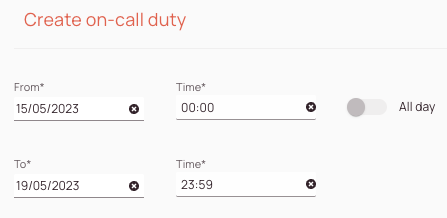
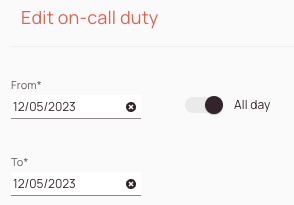
(Optional) - Configuring On-Call Duties
You can configure on-call duties for your engineers by clicking on the On-Call duty tab inside Absence & Availabilities tab. On-call duties for your engineers will be visible inside the Timeline inside Work place.
- Inside the On-call-duty tab click on the plus button.
- Enter a date in the From field from where the on-call duty starts.
- Enter a time in the From field from where the on-call duty starts.
- Enter a date in the To field from where the on-call duty ends.
- Enter a time in the To field from where the on-call duty ends.
- (Optional)—Select a day for on-call duty within a certain time span. The engineer in question will be available for on-call duty on all the selected days.
- Important: Click Save in the bottom-left of the menu.
- You can reload the workspace by pushing the Reload button inside the Work place header or pushing CRTL + F5.
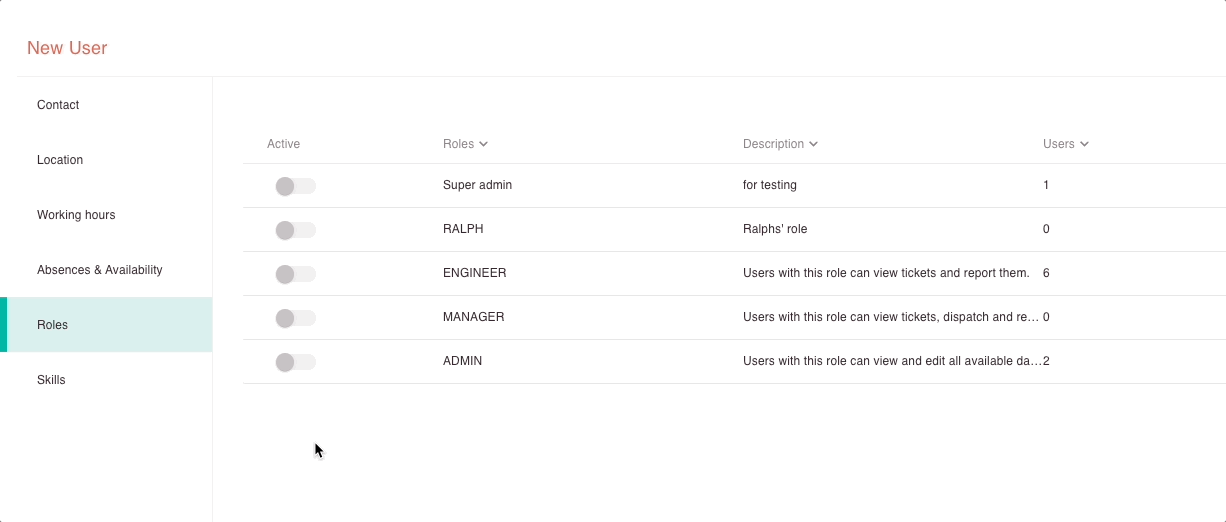
6. Roles tab
In the roles tab, you can decide what users are allowed to do inside the applications. Currently, by default, we have three roles available for you. Just toggle the role you want to apply for your user to the right in order to decide, what the user can do.
Users with this role can view and edit all available data of the account and additionally can configure all system settings.
Users with this role can view tickets, and dispatch, and report them for all dispatch groups.
Users with this role can view tickets and report them.
(Optional) - Skills tab
If you have Skills enabled, you can assign them to your engineer under Users. Skills ensure tickets are solved with the best suitable engineer in mind to delight the customer. You are also flexible to decide if skills should be able to expire after a particular date has passed.
Expiration date configuration is done on a user level and not globally configured inside the Skills menu.
- Set the skills you want to assign to your engineer to active.
- Select a level of importance from the drop-down of a skill. Level 1 is the lowest, while Level 3 is the highest skill level.
- Click on Save.
If you cannot find the skill, feel free to use the keyword search at the top of the list to find the matching skill in the list.
If you cannot find the skill, because it wasn’t created yet, feel free to create it under Dispatch -> Skills.
You can add expiration dates to certain skills if you want specific skills to turn inactive after a certain amount of time.
- Make sure the skill is active as it otherwise cannot have an expiration date.
If you do not add any expiration date, the selected skill will not expire and will remain active indefinitely. - Click on the calendar inside the expiration date column of the skill item.
- Add the expiration date.
- Click Save.
Inactive skills will not be considered for smart calculations anymore and will not be displayed as an existing skill for an engineer anymore as soon as the set expiration date is due.
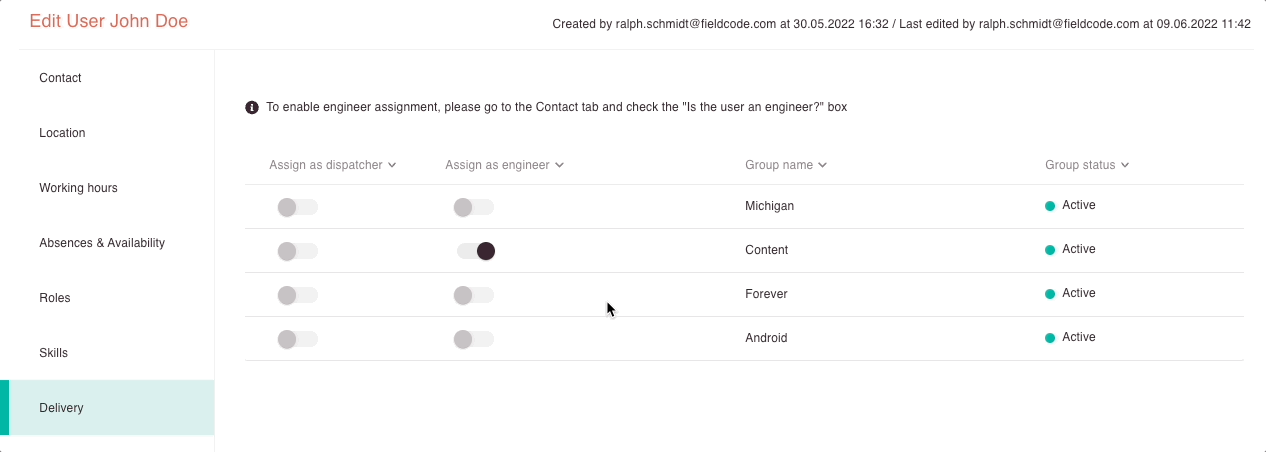
(Optional) - Delivery tab
The delivery tab is only visible when editing users, not when creating new users.
The delivery tab gives you an easy option to quickly assign users as dispatchers or engineers.
Be advised that engineer assignment only works if the toggle “Is the user an engineer?” is enabled in the Contact tab.
- Change the toggles according to your requirements.
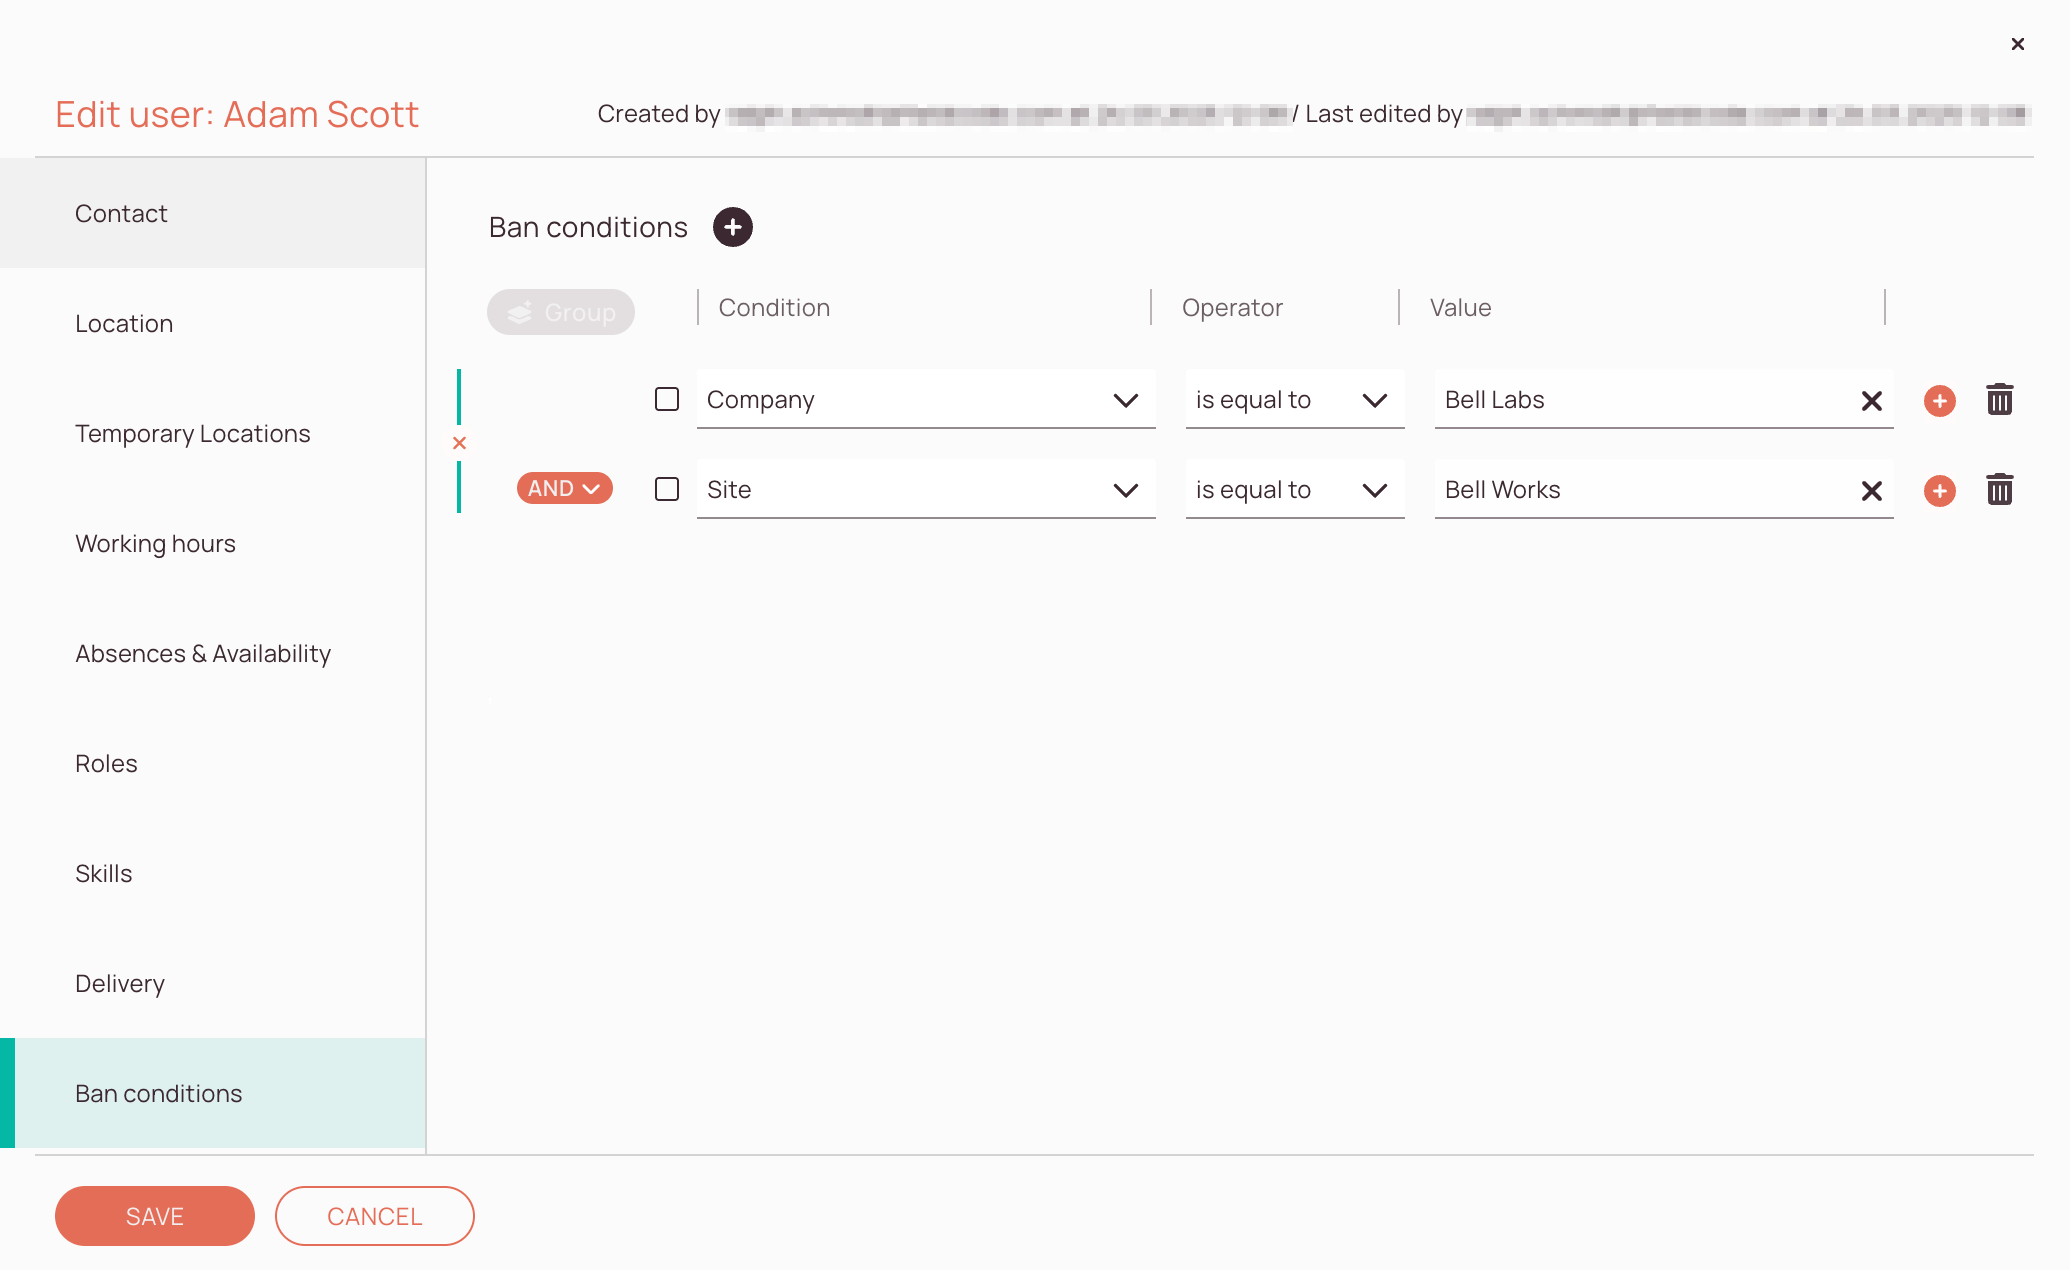
(Optional) - Ban conditions tab
The ban condition tab gives you the option to exclude certain engineers from certain tickets. You may want to exclude certain tickets from certain engineers, because the customer demands it or for other various reasons.
Ban conditions are configured using filters.
How to use filters correctly is explained in more detail in the Filters topic.
- Click on the plus button to add a filter condition.
- Apply filters as desired.
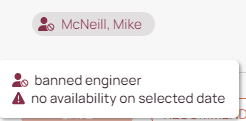
- Work place: If you try to assign a ticket to an engineer with the ban condition, a warning message will be displayed in the Work place in general, and you will also see an icon on the engineer in the Scheduling Assistant when you try to schedule a ticket to the engineer with the ban condition.
The Optimizer, Scheduling Assistant, and Customer Portal will take the ban conditions into account and will not schedule tickets to those engineers. It is still possible to manually schedule tickets for these engineers, but it is not recommended, and you will receive a warning if you do so.
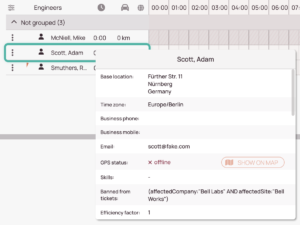
You can check if a user has banning conditions applied, by hovering over the engineer inside the Timeline and checking the engineer details popover. The applied filter conditions will be displayed there as well.
Deactivating Users
You are able to deactivate users by toggling the Active toggle of a user to the Off state.
- Inside the Admin panel go to Access -> Users.
- Select the user you want to deactivate from the list.
- In the Contact tab toggle the Active toggle to Off state.
- The user will not be able to log in anymore
- Users will not be able to access the applications anymore
- The user will be displayed in the user's list as inactive
- User history input will still be available
- The user can be reactivated in the future
- The deactivated user shouldn't have tickets assigned, if the user has tickets assigned you will be prompted to reschedule tickets to other engineers
- The deactivated user will not be able to access the applications anymore (neither web and mobile)
- Any history content/notes/comments of the deactivated user will remain accessible
- Inactive users are still considered license holders
- Inactive users are not displayed on the map anymore beginning from the day of activation
- Once a deactivated user gets permitted to log back into the applications, then the account remains valid to be reset to an active state
0 out of 5 stars
| 5 Stars | 0% | |
| 4 Stars | 0% | |
| 3 Stars | 0% | |
| 2 Stars | 0% | |
| 1 Stars | 0% |