Tip: You can use filters for better results
-
Latest News
-
Getting Started
-
Work Place
-
-
-
- About Buttons
- Action Buttons
- Schedule Tickets
- Ticket Info and COMS Buttons
- Add Parts
- Assign Partners
- Remove Tickets from the Ticket Clipboard
- Inline Skill Editing
- Create Intervention Info
- Create Intervention Reports
- Cancel Tickets
- Cancel Appointments
- Clone Tickets
- Edit Ticket Details
- Edit Privat Notes
- Report Tickets
- Close Tickets
-
Admin Panel
-
FMA 2 App
-
Customer Portal
About Ticket Scores
Ticket scoring allows you to give tickets a prioritization that should be paid attention to by the optimizer. Dependent on the score points certain categories of a ticket can have many points or fewer points and are treated by the optimizer differently. E.g. tickets with more points will be scheduled more prioritized, than tickets with a low points score. Finding the right balance here can help you achieve your company goals better, tailored to your specific business needs. The optimizer works out of the box, but giving him additional input from the Admin panel, helps to optimize even better.
Accessing the Ticket Scores Page
Navigate to Dispatch → Ticket Scoring to add/edit ticket scores.
Searching for Ticket Scores
How to search:
- Navigate to Dispatch → Ticket Scoring.
- Use the search bar at the top of the score list.
- Enter any of the following:
- Description
- Creator
- Status (e.g., active, inactive)
-
As you type, the list will automatically filter to match your query.

Creating Scoring Rules
The more scores you create, the smarter the system decides for you because it has more data points from which to make decisions.
If dynamic ticket scores are utilized the ticket score will adjust based on the rules changing (true to false/false to true).
Recalculations are triggered automatically with no additional user interaction required.
- Static conditions have a common ticket score if selected static conditions apply.
- You require at least one static condition in order to create a rule successfully.
- Dynamic conditions stack up on the static conditions score, if the dynamic condition comes true.
- Dynamic conditions adjust the score based on the selected condition(s). Dynamic conditions each have an independent score that only applies if the dynamic condition is true.
- Dynamic conditions give you the flexibility to take full advantage of date and time values.
- For example, you could create a rule where an individual ticket could have different dynamic scores depending on the LSDT as a factor.
- You could create a rule where if a ticket's LSDT exceeds a certain amount of time, the ticket could receive higher scores in the system and therefore be selected faster by the optimizer because this ticket has higher scores after the time passes.
- Good to know: Static and dynamic conditions also work combined together.
We generally suggest you to use the "equal" operators for number values and use the "is like" operator for text values.
- Click on the Plus button to open the New rule form.
- Fill in the New rule tab.
- Decide first if your new rule should be set to active in the system.
- Enter a name for your new rule.
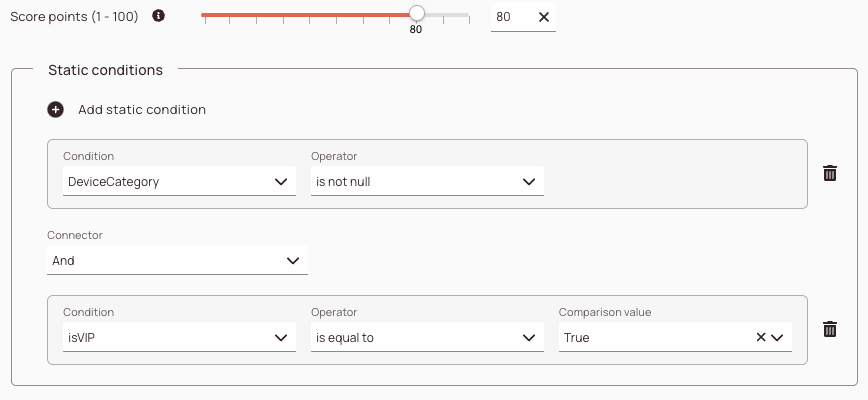
- In the next step, you can select a score value from 1 to 100 for your static conditions.
- Configuring static conditions will be explained in the next section.
Configuring dynamic conditions will be explained in the second next section.
Configuring Static Conditions
- Decide how many points should be assigned for all static condition(s) by moving the slider to the corresponding number or typing the number into the number field.
- Click on the Add static condition button.
- Select your first static condition from the condition dropdown, select an operator, and (optional) select a comparison value.
Condition: Defines the condition for your scoring criteria.
Operator: Compares the condition with the comparison (IS EQUAL TO, IS NOT EQUAL TO, IS LIKE, IS NOT LIKE, IN).
Comparison Value: Defines with which value the condition is compared. - (Optional) – Add another static condition that must occur for your rule to apply. You can either use the And or Or connector to connect static conditions.
- (Optional) – If you are not happy with your condition, you can always click the trash button on the right side to delete a static condition in order to retry.
- (Optional) – Configure dynamic conditions (explained in the next section) if you want to make your new rule time-sensitive or date-sensitive.
- Click Save if you want to save only the static conditions for now. After clicking Save you will be prompted that processing may take up some time.
- Confirm with clicking Acknowledge.

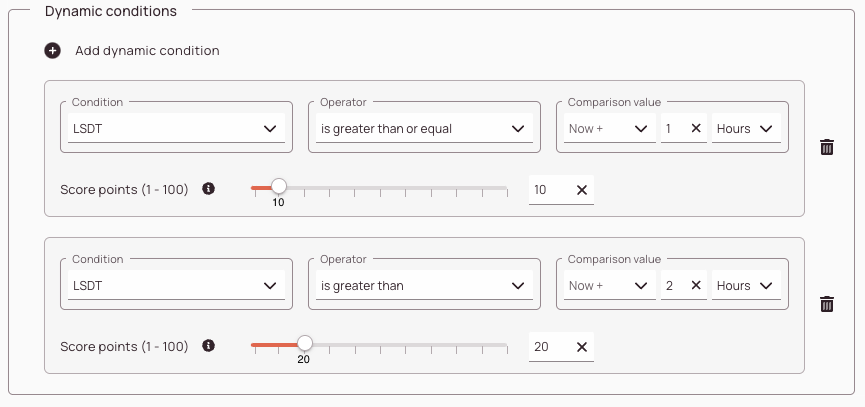
(Optional) - Configuring Dynamic Conditions
- Click on the Add dynamic condition button.
- Select your first dynamic condition from the condition dropdown, select an operator, and (optional) select a comparison value.
Condition: Defines the condition for your scoring criteria.
Operator: Compares the condition with the comparison (IS EQUAL TO, IS NOT EQUAL TO, IS LIKE, IS NOT LIKE, IN).
Comparison Value: Defines with which value the condition is compared.
You can for example configure Now, Now+, and Now- values. The now values consider the time and date as a basis.
Alternatively you can also configure Today, Today+, and Today- values. The today values considers only the date as a basis. - Decide how many points should be assigned for the dynamic condition by moving the slider to the corresponding number or typing the number into the number field.
- (Optional) – Add another dynamic condition that can occur.
Dynamic conditions work independent from each other and add up to the static condition(s) score of the rule, if they occur.
They therefore don’t require an connector. - (Optional) – If you are not happy with your condition, you can always click the trash button on the right side to delete a static condition in order to retry.
- Click Save. After clicking Save you will be prompted that processing may take up some time.
- Confirm with clicking Acknowledge.
Example: You want that all tickets that will be created tomorrow to get a score of 50 points.
TicketCreationTime is greater than TODAY + 1 day -> The condition will begin to display on the 2nd May at 00:00
Example: You want that all tickets that will be created tomorrow to get a score of 50 points. But the ticket should not get the 50 points before 13:00 passes.
TicketCreationTime is greater than NOW + 1 day ->The condition will begin to display on the 2nd May at 13:00
About Score Calculation
The higher the number of points, the higher the priority of the optimizer.
Condition: Defines the condition for your scoring criteria.
Operator: Compares the condition with the comparison (IS EQUAL TO, IS NOT EQUAL TO, IS LIKE, IS NOT LIKE, IN).
Comparison Value: Defines with which value the condition is compared.
Generally spoken all tickets start with a score of 0 points if you do not do not configure anything inside Ticket scoring.
Let's assume you have configured three different ticket score rules in the ticket score list:
isVIP is equal to True -> 40 Points assigned
isEscalated is equal to True -> 20 points assigned
projectName is equal to "Example project" -> 30 points assigned
If a ticket matches the third condition only the ticket score would calculate as follows:
30 points assigned -> The ticket score would be 30.
If a ticket matches all conditions the ticket score would calculate as follows:
40 points + 20 points + 30 points -> The ticket score would be 90 points.
Calculation formula if multiple rules apply on one ticket:
The sum of points of all matching ticket score rules.
What is the maximum score a ticket can have?
999 points.
What is the minimum score a ticket score rule can have?
One point.
What happens with dynamic conditions?
Dynamic conditions simply just stack up on the static conditions score.
The above-explained calculation still applies. Or formulated in other words:
Dynamic conditions are an additional layer on top of the static conditions.
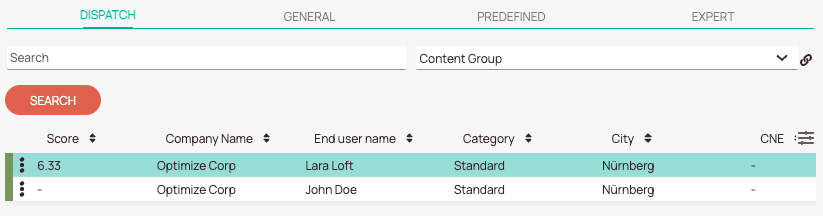
The ticket scores are displayed inside Ticket Pool if you have the Score column enabled. If you cannot see the Score column you can learn here how to customize rows inside the Ticket Pool.
0 out of 5 stars
| 5 Stars | 0% | |
| 4 Stars | 0% | |
| 3 Stars | 0% | |
| 2 Stars | 0% | |
| 1 Stars | 0% |