Tip: You can use filters for better results
-
Latest News
-
Getting Started
-
Work Place
-
-
-
- Add Parts
- Assign Partners
- Interaction Buttons
- Workflow Buttons
- Ticket Info and COMS Buttons
- Schedule Tickets
- Edit Ticket Details
- Cancel Tickets
- Remove Tickets from the Ticket Clipboard
- Report Tickets
- Create Intervention Info
- Create Intervention Reports
- Cancel Appointments
- Clone Tickets
- Edit Privat Notes
- Inline Skill Editing
-
Admin Panel
-
Fieldcode FMA app
-
Customer Portal
Customer Portal - Initial Setup
Live tracking can be enabled for end users inside the Admin panel -> Automated Actions -> Preconfigured Automated Actions.
You can choose between two different activation methods.
You can either give end users the option to only track the ticket progress or the option to track the ticket progress and book appointments on their own.
After the Live tracking is activated by using one of the above methods inside the Fieldcode Admin Panel end users will be able to track the ticket progress by opening a tracking link in their email program. We will go through how to get this achieved inside the dedicated topic: How to configure the Customer Portal.
In the beginning you have to decide what range of options you want to give to your end customers.
Currently, we have a range of two options that will activate the Customer Portal functionality, which are both described further below.
The first thing important to know is that the Customer Portal functionality is enabled via Automated Actions inside the Fieldcode Admin Panel.
You can configure the Customer Portal in two different ways:
- You can give the end user the option to follow a tracking link.
- You can give the end user the ability to follow a tracking link and book appointments on their own.
Which appointment windows are available for the user can also be defined by administrators (e.g. through the configuration of SLA profiles).
- Dispatchers need to create tickets with a valid and correct end-user email address.
- Dispatchers are not allowed to leave the email address field empty when creating tickets.
- The matching Automated Action for the Customer Portal functionality has to be activated.
How to activate link tracing for your end users
This option will activate the link tracing for end users (without appointment booking option).
Inside the Admin panel go to Process -> Automated Actions.
Let’s have a look on how to configure it:
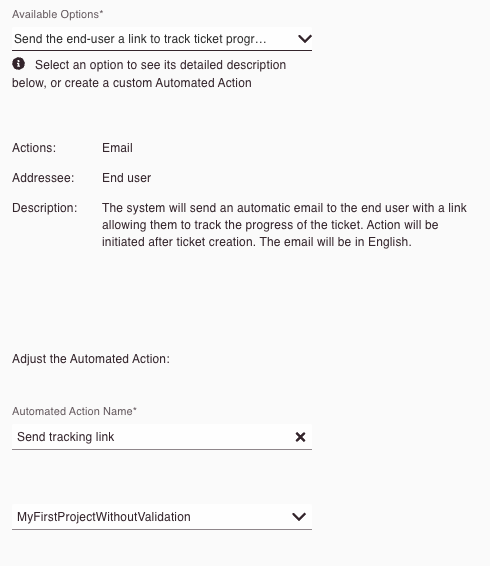
- Click on the Plus button to open the Automated Action form.
- Select Send the end user a link to track ticket progress (either SMS or Email) or
Send the end user a link to track ticket progress and book appointments (either SMS or Email) from the Available Options dropdown. - Fill in the Adjust the Automated Action fields.
- Enter a name for your Automated Action.
- Select for which project for which this Automated Action should apply.
- Select for which ticket types this Automated Action should apply.
You can choose between All tickets, Cooperation Partner tickets, and internal tickets. - Click Save.
- (Optional) – Customize the email content.
How to activate link tracing and appointment booking for your end users
This option will activate the link tracing for end users with the option for the end user to book and change appointments.
Inside the Admin panel go to Process -> Automated Actions.
Let’s have a look on how to configure it:
- Click on the plus button to open the Automated Action form.
- Select Send the end-user a link to schedule an appointment and track ticket progress from the Available Options drop-down.
- Fill in the Adjust the Automated Action fields.
- Enter a name for your Automated Action.
- Select for which project for which this Automated Action should apply.
- Click Save.
- (Optional) – Customize the email content.
How to customize the Customer Portal SMS/Email
After you have activated one of the above-automated actions to activate the Customer Portal you are also able to customize the SMS/email content that end-users will receive. This is a great option to represent your company when end-users receive the tracking link.
You are a small Printer repair company that provides printer maintenance for end customers called Easy Printer Solution GmbH. You want to represent your easy-going company values by providing individual emails that engage users to use your tracking links. You are proud of your fast service delivery windows which outshine other competitors and you want to show this off in your email that is sent out to end users.
Let's have a look at how the Easy Printer Solution GmbH could customize the email with the booking link that will be sent out to end users.
Inside the Admin panel go to Process -> Automated Actions.
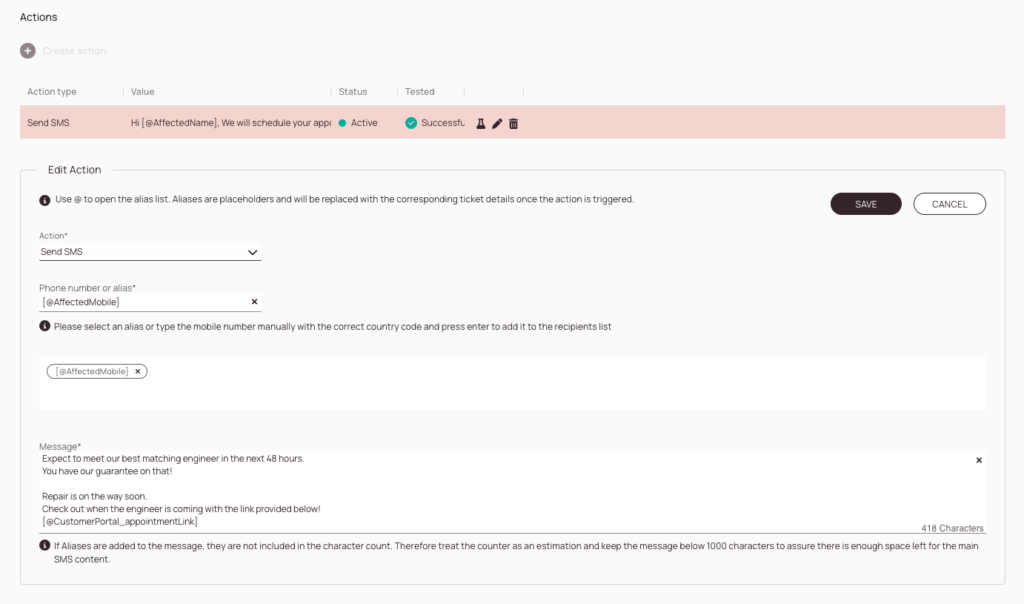
- Left-click on the automated action list item regarding the Customer Portal.
- Click on the Actions tab.
- Select the Generate Customer Portal Link action.
- Click on the pencil button to edit the action.
- In the To field enter the @ symbol to reveal the alias list.
Select the [AffectedMobile] alias.
This alias will automatically insert the email address of the affected person that is clicking the ticket link. - (Optional) – Enter CC address(es).
- (Optional) – Enter BCC address(es).
- Enter a subject for the email. In our case we want our end users to click on the link, therefore we decide to write a catchy and memorable subject:
Wohoo! Your repair-super man is already on the way to fix your printer! - Check the appointment booking option if customers should be able to book appointments on their own.
- Customize the email content. As we want to sound engaging we decide to use the following:
Hey @[AffectedFirstName],
Good News! We received your request and are therefore sending out our best forces to quickly fix your printer issue.
Expect to meet our best matching engineer in the next 48 hours.
You have our guarantee on that!Repair is on the way soon.Check out when the engineer is coming with the link provided below![@CustomerPortal_appointmentLink]
Best RegardsEasy Printer Solution Company GmbH - Click on the black ADD button.
- Click Save.
- You can now test if your action works by creating a test ticket with a valid email address.
If you need more specialized help regarding Automated Actions, feel free to always contact our Support team.
5 out of 5 stars
1 rating
| 5 Stars | 100% | |
| 4 Stars | 0% | |
| 3 Stars | 0% | |
| 2 Stars | 0% | |
| 1 Stars | 0% |