Tip: You can use filters for better results
-
Latest News
-
Getting Started
-
Work Place
-
-
-
- About Buttons
- Action Buttons
- Schedule Tickets
- Ticket Info and COMS Buttons
- Add Parts
- Assign Partners
- Remove Tickets from the Ticket Clipboard
- Inline Skill Editing
- Create Intervention Info
- Create Intervention Reports
- Cancel Tickets
- Cancel Appointments
- Clone Tickets
- Edit Ticket Details
- Edit Privat Notes
- Report Tickets
- Close Tickets
-
Admin Panel
-
FMA 2 App
-
Customer Portal
About Partners
Partners can be divided into different main groups: Account Partners, Cooperation Partners, and System Connection Partners.
- Account partners are a group of partner engineers or partner dispatchers that assist dispatch groups or engineers in fulfilling service within the same account.
Those partner engineers or dispatchers are usually subcontractors and can either rely on the Fieldcode system or alternatively rely on the option of receiving tickets via email and doing the reporting via the Partner Portal. - Cooperation partners are a group of partner engineers or partner dispatchers that cooperate with dispatch groups or engineers in fulfilling service with a separate Fieldcode Account.
- System connections are used to connect to a third-party application.
With Account partners configured, you can assign tickets to your partner engineers/partner dispatchers in an easy manner.
Partner engineers or partner dispatchers are usually a part of partner companies, therefore they need to have a partner company configured which is done inside Admin panel -> Projects and More -> Partner Accounts.
After that, you can assign users to the partner company under Access -> Users -> and check the user as a partner inside the Contact tab.
Account partner: Connection inside the same account!
-> Account partners can either rely on the Fieldcode system OR
-> Account partners can alternatively rely on receiving tickets via email and doing the reporting via the Partner Portal
Cooperation partner: Connection between different Fieldcode Accounts!
System connection: Connection between Fieldcode system and third-party system!
Account partners have the following characteristics:
- They login into the same Fieldcode Account as the contractor company
- The tickets are the same tickets as for the contractor company, the main difference is that partners have only view rights for assigned partner tickets
- They can work on tickets in the same way a contractor company would work on the ticket
Cooperation partners have the following characteristics:
- They login into a different Fieldcode Account as the contractor company
- The tickets are the same tickets as for the contractor company, the rights are self-determined, tickets get synchronized, when work on the ticket starts
- The cooperation requestor sends a cooperation request to the potential partner via the Partner configuration menu inside the Admin panel
- The cooperation partner provides the partner business key to the requestor, which can be found below the header inside the Partner configuration menu
- The cooperation requestor receives an email with a 7-digit PIN code, that code must be entered inside the corresponding Partner configuration menu item
- They can work on tickets in the same way a contractor company would work on the ticket
- The system connection requestor uses a third-party accounting system
- The Fieldcode system and Account is the contractor system
- The third-party account system is the subcontractor system
- The purpose of a system connection is to establish a connection from an external system and your Fieldcode Account to pass data between the two systems
- After a system connection is created it needs to be mapped out so that data gets sent to the correct endpoint.
- Solution engineers can easily help you with arranging the system connection, NO CODING IS REQUIRED.
Partner account users are created in the same way as regular users. You have to go to the Admin panel -> Access -> Users and create the user as usual.
While creating the partner user you just check the checkbox “Is the user an External Partner?” in addition. You select the partner company afterward.
Important side note: The Partner company has to be created first inside the Admin panel -> Access -> Partners
Yes, that’s possible.
Select the user you want to convert inside the Admin panel -> Users and check the checkbox “Is the user an external partner?”.
Select the partner company for the engineer afterwards.
Inside the Admin panel go to Interfaces -> Cooperations.
You can view your business key there and share it with potential cooperation partners.
The business key is located under the heading in the list view.
From there you can also request cooperation with another partner.
You can also confirm cooperation by entering a special partner PIN, which you will receive by email.
Partners are a group of partner engineers or partner dispatchers that assist regular dispatch groups or engineers
in fulfilling their service (eg. sub-contractors).
- Partners are able to use and utilize the Fieldcode software.
- Partners have specific view rights inside Fieldcode that ensure privacy:
A partner can be part of a dispatch group, but a partner itself will only see his tickets (not the tickets of the whole group!). - Partners are always a part of a customer account (roof company).
- Partners can be assigned from the Ticket Pool and Ticket Details.
- Partner engineers can be identified in the Timeline by their names written in: italic typography.
- A partner has to belong to a specific partner company that needs to be configured inside the Fieldcode Admin Panel
- Partners are not able to use the Optimizer.
- Partner users can only view partner engineers of a Dispatch group in the Timeline.
- Unassigning a partner results in tickets being moved back to the Ticket Pool.
The partner selection is limited to matching partners who are actually inside the area of the dispatch group.
Partner areas are configured inside the Partner configuration menu inside the Admin panel to make the partner selection for the dispatcher easier.
If you do not define a partner area for the partner it will remain selectable for every dispatch group.
Another reason why groups do not show up could also be related due to wrong configured filters.
Let’s assume you have Account partners, Account partners without Fieldcode system, cooperation partners and system connections. Not only is your service network absolutely incredible in this case, but with all those types of “partners” it can be confusing to know what to configure where and how what affects what.
Therefore we would like to give you a brief summary over here:
- A user can be converted to a account partner user inside Access -> Users -> by switching the “External Partner” toggle to the right.
- Account partners are configured under Access -> Account partners.
- Account partners that do not use the Fieldcode system are configured under Access -> Account partners -> by switching the “Partner Portal” toggle to the right.
- Cooperation partners are configured under Access -> Cooperation Partners.
- System connections are configured under Interfaces -> System Connection.
- Partner areas are configured inside Partners -> Partner configuration.
Important: Partner locations are not the same as Partner areas. - The Partner configuration menu also has the purpose to list and edit all your different partners (which can differ by partner type) one-by-one.
Accessing the Partner Settings Page
Navigate to Access -> Partner Settings to add/edit partners.
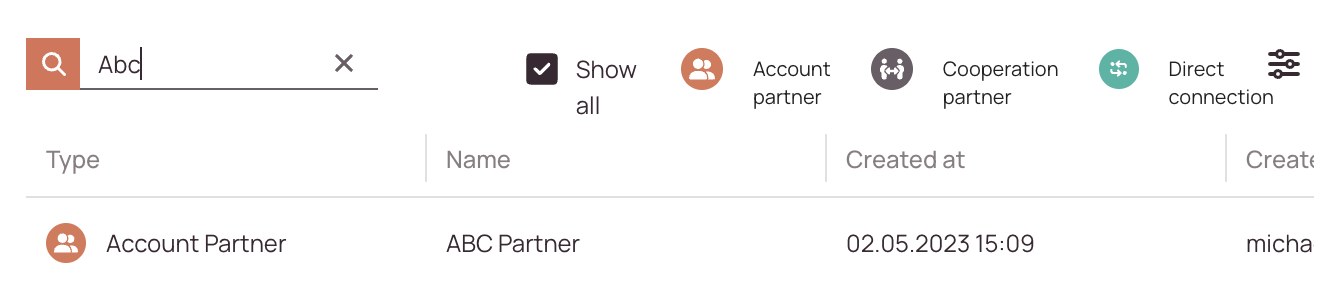
Searching for Partners
How to search:
- Navigate to Access → Partner Configuration.
- Use the search bar at the top of the partner list.
- Enter any of the following:
- Partner Name
- Email address
- Status (e.g., active, inactive)
- Additionally you can filter for different partner types by checking the matching filter.
As you type, the list will automatically filter to match your query.
About Partner Areas
The partner menu is there to configure a partner main location (eg. HQ).
Partner areas can be defined inside the Partner configuration menu when you select the Account partner item and assign an area from there.
If you define partner areas inside the Partner configuration menu, only location-relevant partners will be displayed to dispatchers. This will make the partner selection easier for the dispatchers.
Partner company location = Fixed location (eg. HQ) of the partner company.
Partner company area (or other filters, eg. project) = Operational zone of the partner company.
Dispatchers will get matching partner suggestions, if an area is configured.
Overlapping areas are also considered for the partner suggestions .
Filtering Partner Types
If you have multiple partners and system connections it might be difficult to keep track of all of them at once. The Partner configuration menu can assist you with this task.
You can easily filter for one or more partner types by using the partner type filters. Let’s have a look at how to do it:
- Uncheck the Show All checkbox to limit your view.
- Filter for the partner type you need by clicking on the corresponding partner type. Uncheck all other partner types to display only that partner type.
- (Optional) – You can also show two different partner types at once, just uncheck the one that isn’t needed in the list view.
Editing Partners
You can edit basic details like the partner company’s general location, the operational partner area, and other filters in order to create perfect partner matches for your dispatch groups. Editing is done inside Partners -> Partner Configuration and explained here. Adding different partner types is done inside the matching sections:
Account Partners are created under Access -> Account Partners
Cooperation Partners are created under Access -> Cooperation Partners
System connections are created under Interfaces -> System connection
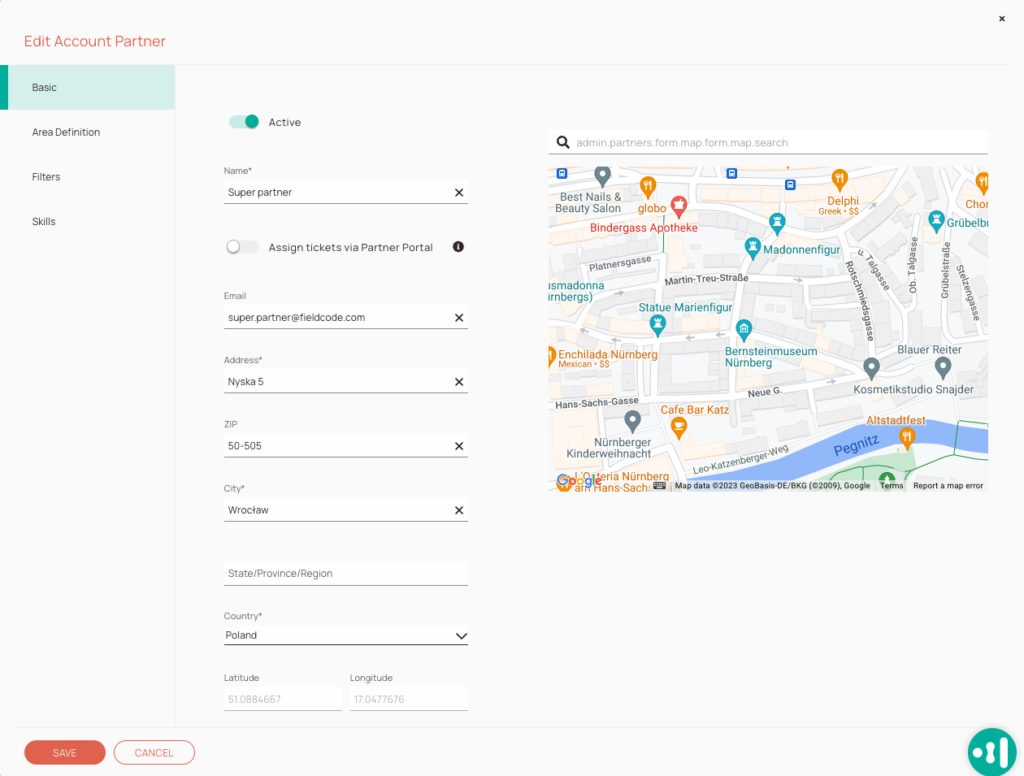
1. Basic Tab
In the Basic tab, you are able to add and edit the partner company name, email address, and the exact partner company location.
- Enter the Partner name.
- Enter the Partner email address.
- Enter the address of the partner company.
Alternative insertion of the address: Search a location with the search glass and click on a spot on the map to pin the location and the address details
should be filled in automatically! - (Optional) – Enter the ZIP of the partner company.
- Enter the city, where the partner company is located.
- (Optional) – Enter the State/Province/Region of the partner company location.
- Select the country of the partner location from the dropdown.
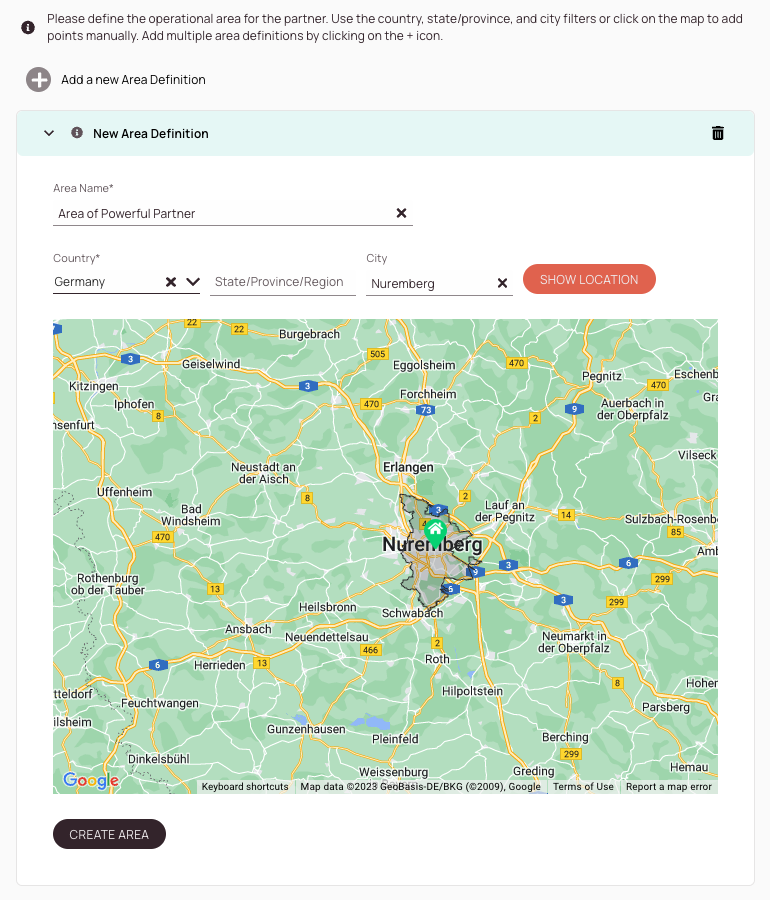
2. Area Definition Tab
In the Area definition tab, you are able to add and edit the operational area or areas for your partner company.
- Enter the Area Name.
- Select the country of the area.
- (Optional) – Enter the State/Province/Region of the area.
- Enter the city of the area.
- Click on the SHOW LOCATION button.
- Click on the CREATE AREA button.
Please do not forget this step, as otherwise your location won’t be taken over!
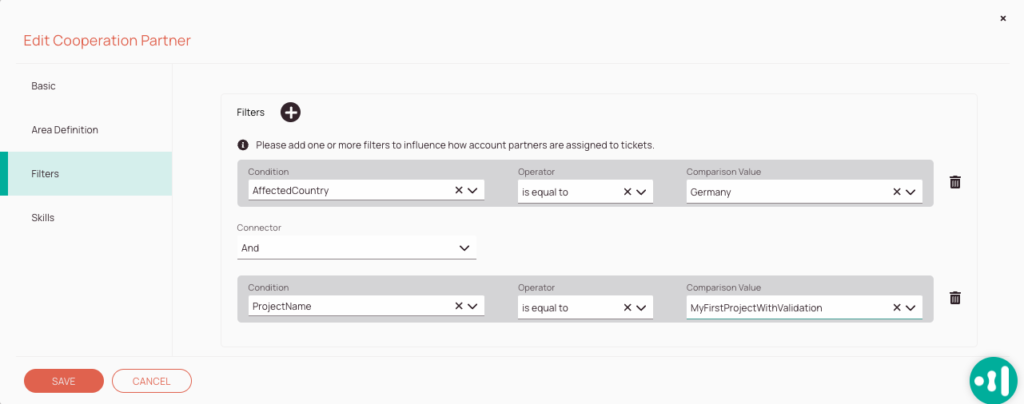
3. (Optional) - Filters Tab
Fill in the Filters tab to determine additional filters for the ticket(s) that should be included inside the partner company range. You can add filters (eg. status, project, country, etc.) to further customize which tickets are displayed for the partner company. The trash symbol right next to a filter lets you delete a filter.
Click on the plus button to add a filter.
Filters: Allows fine-tuning criteria for dispatch groups with the use of comparison and logical operators.
Condition: Defines a condition for your filter criteria.
Operator: Compares the condition with the comparison.
(IS EQUAL TO, IS NOT EQUAL TO, IS LIKE, IS NOT LIKE, IN, IS NULL, IS NOT NULL)
Comparison Value: Defines with which value the condition is compared.
Connector: Allows you to combine a monitored field with another monitored field (AND, OR)
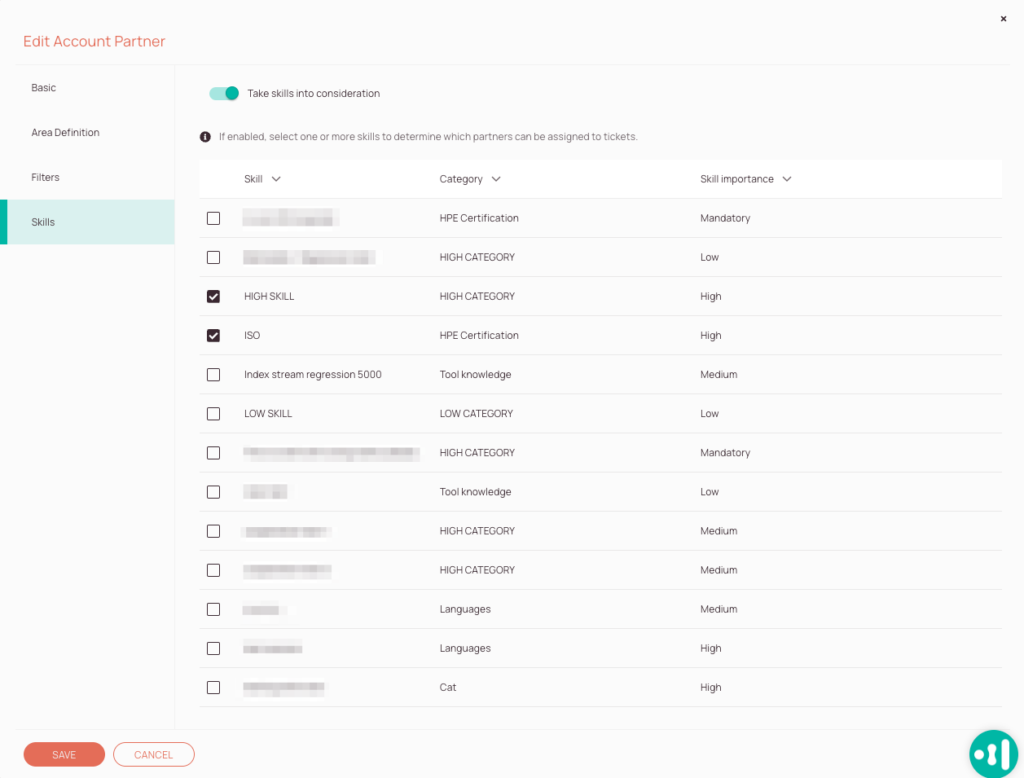
4. (Optional) - Skills Tab
When assigning skills to partners, it should be noted that partners are only recommended if all skills match a ticket. If not all skills match, this partner will not be recommended by partner recommendations. You can read more about partner recommendations here.
Skills can be assigned to Account and System connection partners.
The Take Skills into consideration toggle has to be enabled to assign skills.
To select specific skills for your partners, you must first create them.
- Activate the Take Skills into consideration toggle.
- Enable skills individually by clicking the skill checkboxes for the skills that should be considered when planning tickets for partners.
- Click Save.
0 out of 5 stars
| 5 Stars | 0% | |
| 4 Stars | 0% | |
| 3 Stars | 0% | |
| 2 Stars | 0% | |
| 1 Stars | 0% |