Tip: You can use filters for better results
-
Latest News
-
Getting Started
-
Work Place
-
-
-
- About Buttons
- Action Buttons
- Schedule Tickets
- Ticket Info and COMS Buttons
- Add Parts
- Assign Partners
- Remove Tickets from the Ticket Clipboard
- Inline Skill Editing
- Create Intervention Info
- Create Intervention Reports
- Cancel Tickets
- Cancel Appointments
- Clone Tickets
- Edit Ticket Details
- Edit Privat Notes
- Report Tickets
- Close Tickets
-
Admin Panel
-
FMA 2 App
-
Customer Portal
About Cooperation Partners
Cooperation accounts typically assist the origin account with ticket services on the field (usually under a subcontract). Cooperation partners use a separate Fieldcode Account to fulfill the ticket service. To learn more about how partners can be utilized inside the Work place check out the Partner Settings topic.
Depending on your configuration you may see Outgoing or Incoming cooperations which are distinguishable as follows:
- The most important distinguishment is between the initiator and the confirmer.
- The initiator (Outgoing/Cooperation) is the account that requests connection.
- The confirmer (Incoming/Subcooperation) is the account that confirms the requested connection.
Cooperation partnership -> Connection between different Fieldcode Accounts!
Account partnership -> Connection inside the same account
Account Partner: Connection inside the same account!
-> Account Partners can either rely on the Fieldcode system OR
-> Account Partners can alternatively rely on receiving tickets via email and doing the reporting via the Partner Portal
Cooperation Partner: Connection between different Fieldcode Accounts!
System Connection: Connection between Fieldcode system and third-party system!
Account Partners have the following characteristics:
- They login into the same Fieldcode Account as the contractor company
- The tickets are the same tickets as for the contractor company, the main difference is that partners have only view rights for assigned partner tickets
- They can work on tickets in the same way a contractor company would work on the ticket
Cooperation Partners have the following characteristics:
- They login into a different Fieldcode Account as the contractor company
- The tickets are the same tickets as for the contractor company, the rights are self-determined, tickets get synchronized, when work on the ticket starts
- The cooperation requestor sends a cooperation request to the potential partner via the Partner configuration menu inside Fieldcode Admin Panel
- The cooperation partner provides the partner business key to the requestor, which can be found below the header inside the Partner configuration menu
- The cooperation requestor receives an email with a 7-digit PIN code, that code must be entered inside the corresponding Partner configuration menu item
- They can work on tickets in the same way a contractor company would work on the ticket
- The system connection requestor uses a third-party accounting system
- The Fieldcode system and Account is the contractor system
- The third-party account system is the subcontractor system
- The purpose of a system connection is to establish a connection from an external system and your Fieldcode Account to pass data between the two systems
- After a system connection is created it needs to be mapped out so that data gets sent to the correct endpoint.
- Solution engineers can easily help you with arranging the system connection, NO CODING IS REQUIRED.
Partner Account users are created in the same way as regular users. You have to go to the Fieldcode Admin Panel -> Access -> Users and create the user as usual.
While creating the partner user you just check the checkbox “Is the user an External Partner?” in addition. Select the partner company afterwards.
The Partner company has to be created first inside Fieldcode Admin Panel -> Access -> Partners
Yes, that’s possible.
Select the user you want to convert inside Fieldcode Admin Panel -> Users and check the checkbox “Is the user an external partner?”.
Select the partner company afterwards.
Inside the Fieldcode Admin Panel go to Interfaces -> Cooperations.
You can view your own business key there and share it with potential cooperation partners. The business key is located under the heading in the list view.
From there you can also request a cooperation with another partner.
You can also confirm cooperations by entering a special partner PIN, which you would receive by email.
Partners are a group of partner engineers or partner dispatchers that assist regular dispatch groups or engineers
in fulfilling their service (eg. sub-contractors).
- Partners are able to use and utilize the Fieldcode software.
- Partners have specific view rights inside Fieldcode that ensure privacy:
A partner can be part of a dispatch group, but a partner itself will only see his tickets (not the tickets of the whole group!). - Partners are always a part of a customer account (roof company).
- Partners can be assigned from the Ticket Pool and Ticket Details.
- Partner engineers can be identified in the Timeline by their names written in: italic typography.
- A partner has to belong to a specific partner company that needs to be configured inside the Fieldcode Admin Panel
- Partners are not able to use the Optimizer.
- Partner users can only view partner engineers of a Dispatch group in the Timeline.
- Unassigning a partner results in tickets being moved back to the Ticket Pool.
The partner selection is limited to matching partners who are actually inside the area of the dispatch group.
Partner areas are configured inside the Partner configuration menu inside Fieldcode Admin Panel to make the partner selection for the dispatcher easier.
If you do not define a partner area for the partner it will remain selectable for every dispatch group.
Another reason why groups do not show up could also be related due to wrong configured filters.
Partner areas can be defined inside the Partner configuration menu when you select the Account Partner item and assign an area from there.
It is not done inside the Partners menu. The partner menu only lets you configure the general location of the partner company.
If you define partner areas inside the Partner configuration menu, only location-relevant partners will be displayed to dispatchers.
This will make the partner selection easier for dispatchers.
Partner company location = General definition of partner company, can be assigned to every engineer in the dispatch group
Partner company area (or other filters, eg. project) = Precise definition or partner operation circumstances, can be eg. assigned to overlapping dispatch group areas.
Let’s assume you have Account Partners, Account Partners without Fieldcode system, Cooperation Partners and system connections. Not only is your service network absolutely incredible in this case, but with all those types of “partners” it can be confusing to know what to configure where and how what affects what.
Therefore we would like to give you a brief summary over here:
- A user can be converted to a account partner user inside Access -> Users -> by switching the “External Partner” toggle to the right.
- Account Partners are configured under Access -> Account Partners.
- Account Partners that do not use the Fieldcode system are configured under Access -> Account Partners -> by switching the “Partner Portal” toggle to the right.
- Cooperation Partners are configured under Access -> Cooperation Partners.
- Direct connections (=System connections) are configured under Interfaces -> System Connection.
- Partner areas are configured inside Partners -> Partners configuration.
Important: Partner locations are not the same as Partner areas. - The Partner configuration menu also has the purpose to list and edit all your different partners (which can differ by partner type) one-by-one.
Accessing the Cooperations Partner Page
Navigate to Access → Cooperation Partners to add/edit cooperation partners.
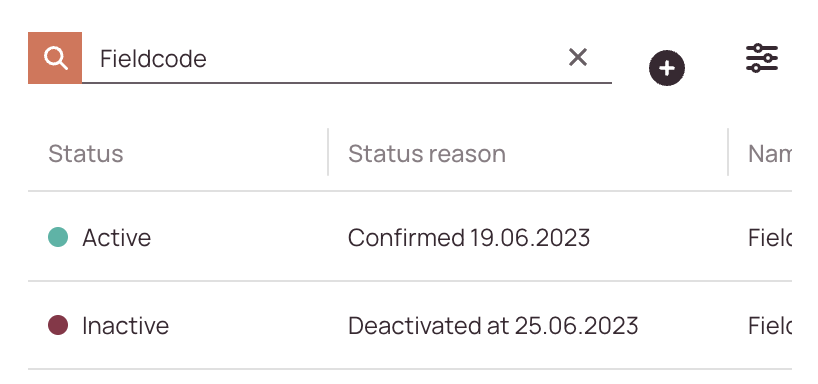
Searching for Cooperations Partners
How to search:
- Navigate to Access → Cooperation Partners.
- Use the search bar at the top of the cooperation partner list.
- Enter any of the following:
- Cooperation Partner Name
- Email address
- ID
- Status (e.g., active, inactive)
-
As you type, the list will automatically filter to match your query.
Initiator: How to successfully establish a cooperation partner connection
Cooperation partners are added by exchanging business keys between two partners.
One is the initiator (Cooperation) and the other is the confirmer (Sub cooperation).
- Inside the Admin panel, the initiator goes to the Cooperation Partners menu and clicks the plus button.
- Important: The confirmer needs to provide the business key to the initiator.
The business key can be found inside Cooperation Partners -> under the Cooperations Partner header (when in the list view). - The initiator clicks on the plus button.
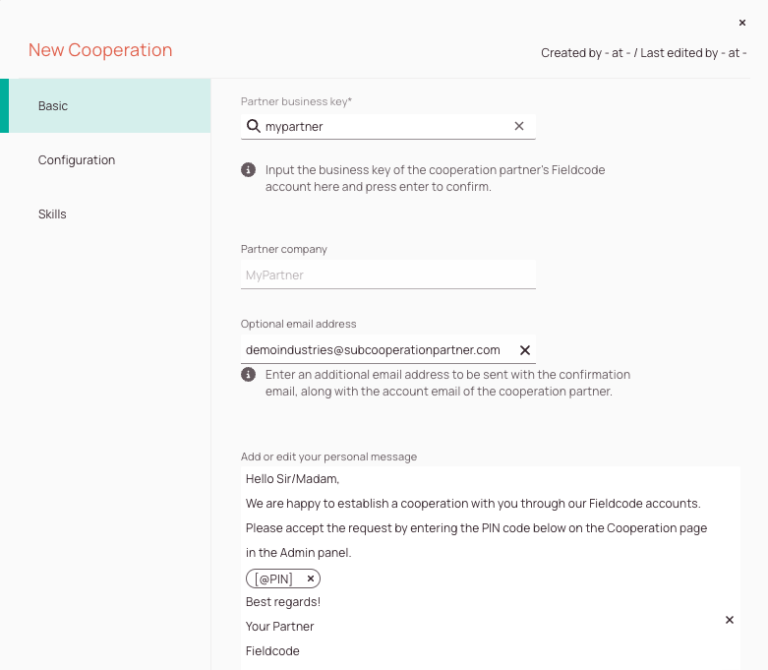
- Stay in the Basic tab.
- The initiator enters the business key in the business key field.
- (Optional) The initiator can enter an additional email address that should also receive the PIN code which is required to establish a cooperation connection.
- (Optional) You can customize the default PIN email with your own words.
- In the next step, you decide how ticket attachments should behave between the initiator and the confirmer. The following options are available:
Only send attachments to cooperation partner; Only receive attachments from cooperation partner; Only receive sign-off attachments; Receive and send attachments; Send all and receive only sign-off attachments; No sharing attachments.
Choose the option that matches your business requirements best. - (Optional) In the next step you can decide with the Take Skill into consideration toggle which skills your sub-cooperation partner is required to map.
- The initiator clicks on REQUEST COOPERATION.
- The confirmer will receive the email with the PIN Code.
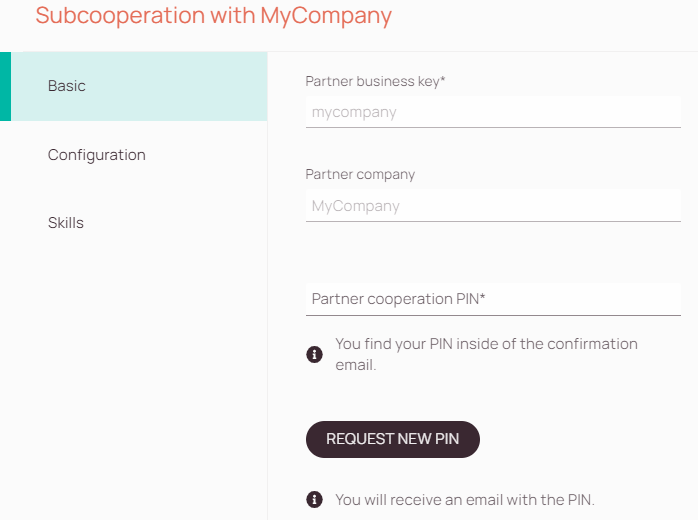
Confirmer: Steps to take to establish a connection
- Inside the Admin panel, the confirmer goes to the cooperation partners menu and checks for a new list item.
- The confirmer should see a summarizing item, indicating the new request, and indicating what type of cooperation the confirmer is about to confirm (type field).

- The confirmer clicks on the list item.
- The confirmer enters the received PIN inside the Partner cooperation PIN field in the Basic tab.
- The confirmer selects into which project the tickets should be imported in the Configuration tab.
Existing projects from the initiator will be added to the new ticket.
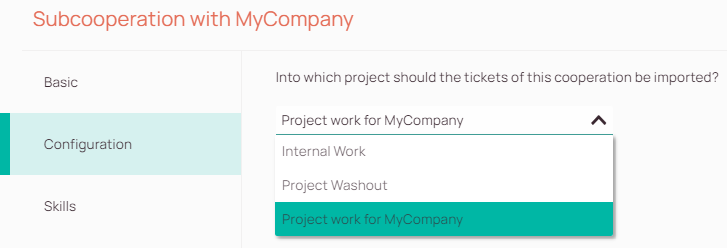
- The confirmer can map skills to already existing skills.
- The confirmer clicks on Save.
- The list item should change as follows:

Initiator: Steps to take to establish a connection
If the confirmer did all the above-mentioned steps the list item should change for the initiator as well. The type field helps to easily identify who is who in this relation.
- Inside the Admin panel, the initiator goes to the Cooperation partners menu and checks for a new list item.
- The initiator should see a confirmed cooperation.

Initiator: How to configure attachment behavior for your cooperation partner connection
A cooperation partner can decide how ticket attachments should behave inside the Configuration tab. As mentioned further above he can choose between the following five options which do exactly the thing that is described:
- Only send attachments to the cooperation partner
- Only receive attachments from the cooperation partner
- Only receive sign-off attachments
- Send all and receive only sign-off attachments
- No sharing attachments
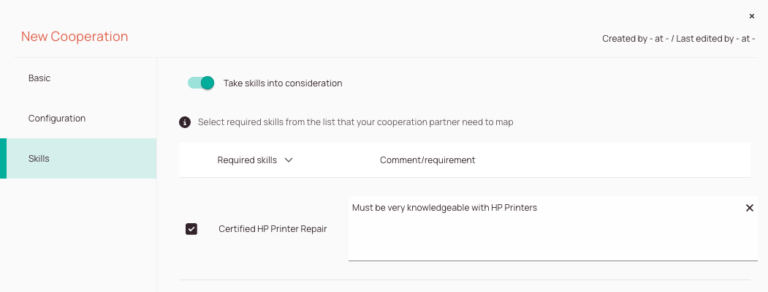
Initiator: How to request skills for your cooperation partner connection
A cooperation partner can request specific skills to be used between the cooperation, this is accomplished by the initiator requesting a specific set of skills and the confirmer mapping the requested skills to their account.
The skills are the same skills you already have on your account, you can choose to use any of your currently active skills or create more specific skills for your cooperation partners.
You can request skills from your cooperation partner at any time, however, during the skill mapping phase, the connection will be temporarily disconnected until all requested skills have been mapped on your cooperation partner's side.
- Click on the Skills tab
- Enable the Take skills into consideration switch
- Check the box for each of the skills that are required for the cooperation.
- (Optional) – Click the pencil button to leave a comment about the skill.
- Press the Save button to complete request
- An email will be sent to your cooperation partner informing them that they will need to map out the requested skills.
- Once your partner has finished mapping their skills, the connection will be re-established and available for use.
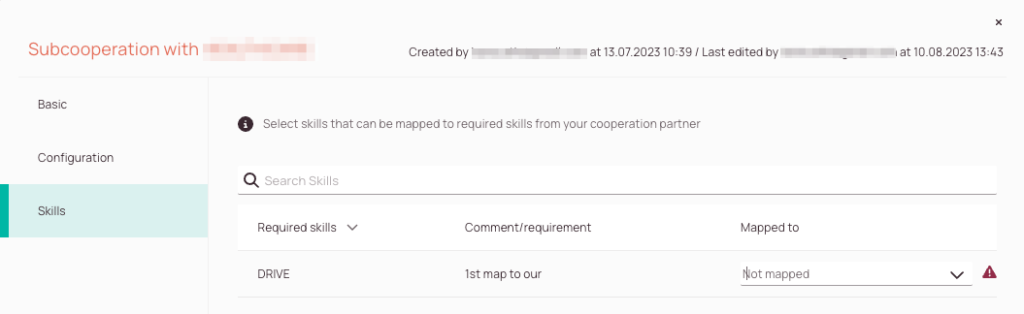
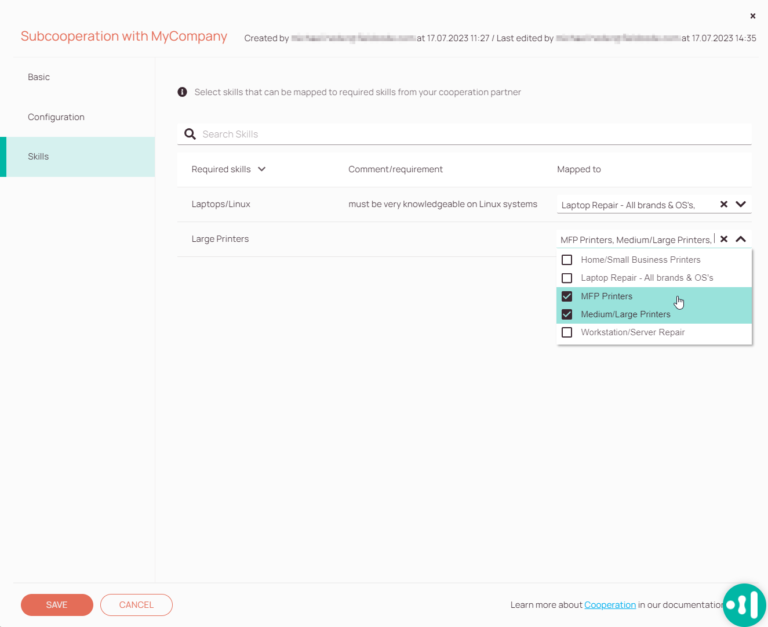
Confirmer: How to map skills to your cooperation partner connection
- Go to and open the cooperation partners configuration page
- Click on the Skills tab
- Review the required skills and their comments
- Map your skills to the requested skills. You can map one or more skills to a requested skill.
Important: If you don’t have matching skills, you’ll need to create the missing skills from the Skills page before completing the mapping. - Press the Save button to finish the skill mapping.
- The cooperation company starts to assign a ticket to a sub-cooperation partner via the Assign Partner button.
- The ticket will move to the "Outsourced" tab inside the "Ticket Clipboard" on the cooperation partner side.
- A new ticket appears on sub cooperation side.
- The workflow buttons should deactivate on the cooperation side since the sub-cooperation partner can work on the ticket normally meanwhile.
- The cooperation partner will see the status changes.
- PUDOS and Parts are carried over to the sub-cooperation partner side. The PUDO locations will be added automatically on the sub-cooperation side, so they are available for further usage later on the sub-cooperation partner side.
- Custom fields and checklists are currently not supported and will not be displayed on the sub-cooperation partner side.
- Depending on the project configuration that is selected tickets must be acknowledged on the cooperation partner side after being resolved. Otherwise, they close automatically, if no validation step is used.
- About bi-directional connections where one is a cooperation partner and sub-cooperation partner at the same time: Bi-directional connections are possible. Just request a cooperation partnership from the sub-cooperation partner side and confirm everything as described above.
0 out of 5 stars
| 5 Stars | 0% | |
| 4 Stars | 0% | |
| 3 Stars | 0% | |
| 2 Stars | 0% | |
| 1 Stars | 0% |