Tip: You can use filters for better results
-
Latest News
-
Getting Started
-
Work Place
-
-
-
- About Buttons
- Action Buttons
- Schedule Tickets
- Ticket Info and COMS Buttons
- Add Parts
- Assign Partners
- Remove Tickets from the Ticket Clipboard
- Inline Skill Editing
- Create Intervention Info
- Create Intervention Reports
- Cancel Tickets
- Cancel Appointments
- Clone Tickets
- Edit Ticket Details
- Edit Privat Notes
- Report Tickets
- Close Tickets
-
Admin Panel
-
FMA 2 App
-
Customer Portal
About Projects
Each ticket in your Work place belongs to one project, whereas you are allowed to create as many projects as required to display and structure your delivery. Projects can reflect contracts with different customers to split tickets by category or other features. That depends on your preferences and use cases. Nonetheless, splitting tickets by customer gives you the best way to analyze KPIs and keep Service Level Agreements in focus.
Accessing the Projects Page
Navigate to Projects and More -> Projects to add/edit projects.
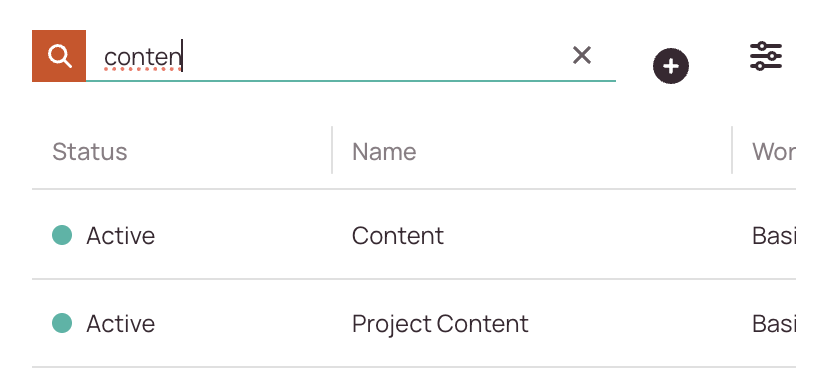
Searching for Projects
How to search:
- Navigate to Projects and more → Projects.
- Use the search bar at the top of the projects list.
- Enter any of the following:
- Project Name
- Email address
- Status (e.g., active, inactive)
-
As you type, the list will automatically filter to match your query.
Creating/Editing Projects
- Click the plus button right next to the search bar to add a new project.
- Fill in or edit the following tabs: Basic, Data security.
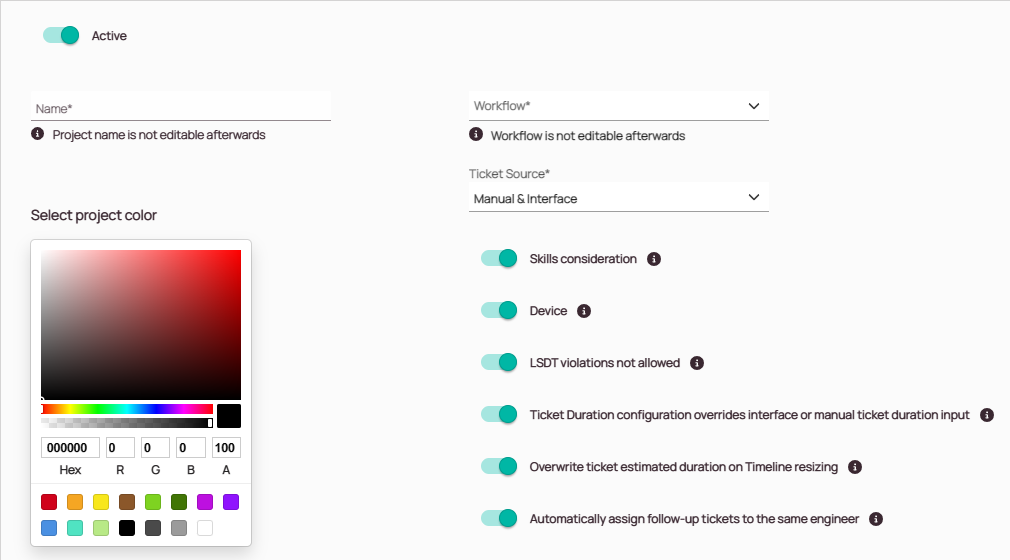
1. Basic tab
- Decide if your new or existing project should be set to active in the system.
- Enter a name for your new project. The name of existing projects cannot be changed afterward.
- Select a workflow from the drop-down that you want to use for your project.
By default, you can choose the Basic workflow.
Basic: Default ticket statuses + an additional report/validation step. - Select a Ticket source for your new or existing project.
By default, you can choose between Manual & Interface and Interface only
Interface + Manual (Recommended): Tickets can be created inside the Work Place and an external interface for having tickets delivered into the system can also be used.
Interface only: Tickets can only be created by an external interface. - Select if your new or existing project should consider a skill-based selection of engineers.
- Select if the Parts tab should be available for your new or existing project.
- Select if tickets for this project are not allowed to violate the LSDT.
If the LSDT violations not allowed toggle is activated it means that tickets with expired Latest Service delivery times can’t be scheduled by dispatchers without first updating the LSDT. - Select if ticket durations should be overwritten based on Ticket Duration settings.
- Select if you want dispatchers to be able to adjust the expected duration of a ticket by expanding or contracting it on the Timeline.
Expected duration can also be adjusted by using the Edit form on the Ticket Details component. - Select if follow-up tickets should automatically be assigned to the same engineer.
If this toggle is enabled, when a ticket is created and has the same CNE Parent as a previously scheduled ticket, it is considered as a follow-up ticket for the same case and the same engineer will be automatically assigned and locked to it. - Click Save
- Workflow: Basic I
- Ticket source: Manual & Interface
- All toggles enabled except the device toggle depending on your business branch
2. (Optional) - Data security tab
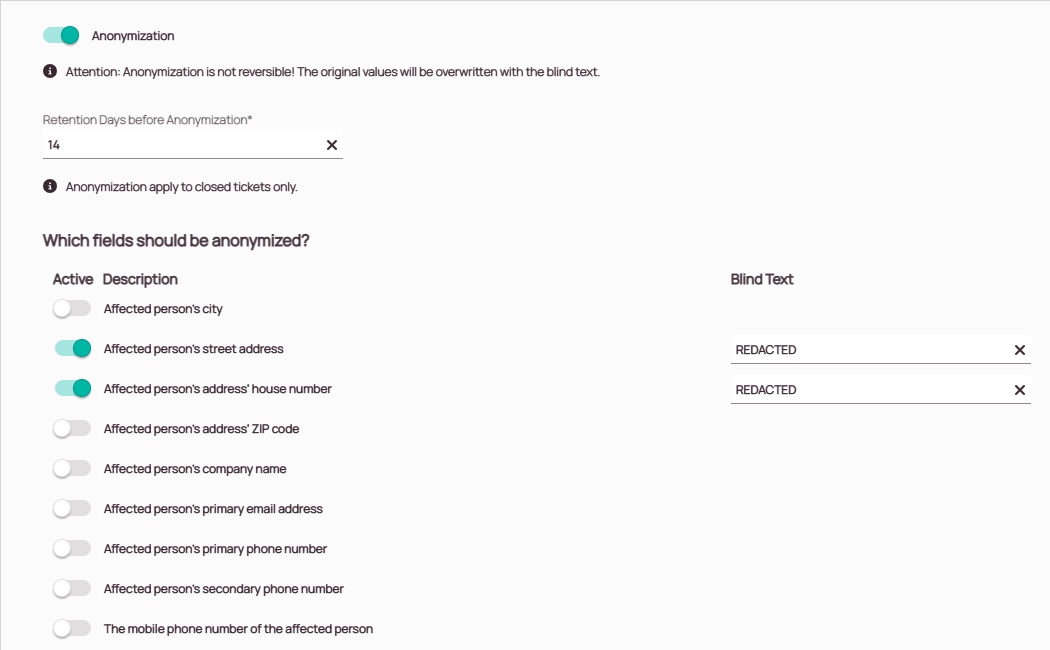
The anonymization functionality allows you to overwrite certain data fields inside Fieldcode work place after the retention days have passed to give you the option to comply with GDPR and data security regulations.
- Select if you want to enable data anonymization for this project by turning the toggle right.
- Insert a number of days in the retention days window if you want to set an offset of days until resolved tickets should get anonymized.
- Select the fields you want to anonymize by toggling the items you want to anonymize to the right.
In the example below, the street address details will be removed 14 days after the ticket is marked as CLOSED.
The Street Address and House Number field’s have been toggled.
“REDACTED” has been added for the fields being overwritten. Blind Text is not required can be left blank, if you prefer not to have a replacement text added.
3. (Optional) - Calllog settings tab
(Optional) – Enable Strike Count
The strike count assists you in applying business conformities into the system and perfectly assists dispatchers in their daily job. The strike alert is visible for the dispatcher while scheduling tickets and while clicking Callback Required, and while reaching the limit.
- Toggle the switch to the right.
- Enter the number of strikes (Default: 3) that should be applied for this project.
- (Optional) – Set a message that should appear for the dispatcher when the count reaches the limit.
- (Optional) – Translate this message into other languages.
- Click Save.
(Optional) – Enable Waiting Duration
The Waiting Duration is visible for the dispatcher while scheduling tickets and clicking End user not reached.
- Toggle the switch to the right.
- Enter a duration. You can set minutes, hours, and days.
- Click Save.
Effects of activated Callog Settings:
- When the dispatcher reaches the strike count, a message will be displayed that this ticket cannot be added to the Ticket Clipboard anymore. The dispatcher can then decide how to proceed further with this case.
- By setting up a waiting duration, you can control how long this ticket should stay in the Ticket Clipboard.
4. (Optional) - Value Sets tab
If your company uses custom values you have the option to activate and deactivate them from the Projects tab. This can also be done directly in the Value Sets and the functionality behaves the same.
- Activate or deactivate values to your specific project needs by flipping the Active toggle accordingly.
- Click Save.
5. (Optional) - Parts tab
The Parts tab gives you the option to automatically adjust the shipment type based on delivery location, enter an optional storage time, and the possibility that the Parts Estimated Time of Arrival should be taken preferably from the tracking data of the logistic company.
- (Optional) – Enable or disable the Automatically adjust shipment type based on delivery location switch.
If you enable the Automatically adjust shipment type based on delivery location switch the system will compare the ticket’s on-site location with the part(s) delivery location and automatically determine and set the shipment type. The shipment type is selected when adding a part and selecting something in the delivered to field. - (Optional) – Enter or don’t enter a storage time in the storage time (in days) field. The storage time affects PUDO deliveries only (not deliveries to end customers). The system calculates with calendar days. If you don’t enter any number, storage time will not be utilized from the system. If you enter a number in the storage time field the count of the storage time will start outgoing from the Parts ETA. The parts storage time indicates for how long a part is available for pick-up. You can enter a permanent storage interval by implementing it directly on the project page (global setting), or configure a temporary storage interval when entering the parts shipping details on the parts form (temporary setting).
Effects: Let’s assume a storage time for three days has been configured. The part will show up as available for three days after the Parts Estimated Time of Arrival in the Scheduling Assistant. - (Optional) – Enable or disable the Parts ETA should be taken from tracking data switch. If you enable the Parts ETA should be taken from tracking data switch the system will prefer the usage of tracking data from the logistics partner for calculating the Parts ETA, which may result in more accurate and more real-time updates in estimating, when a part will arrive, compared to the current shipping ETA. Enabling this switch may result in improved optimizing and scheduling suggestions, as the system can utilize an additional data point.
Technical background: If enabled, tracking API ETA will be stronger than the current shipping ETA and this tracking API ETA will be used as part (item) ETA in scheduling and optimizing.
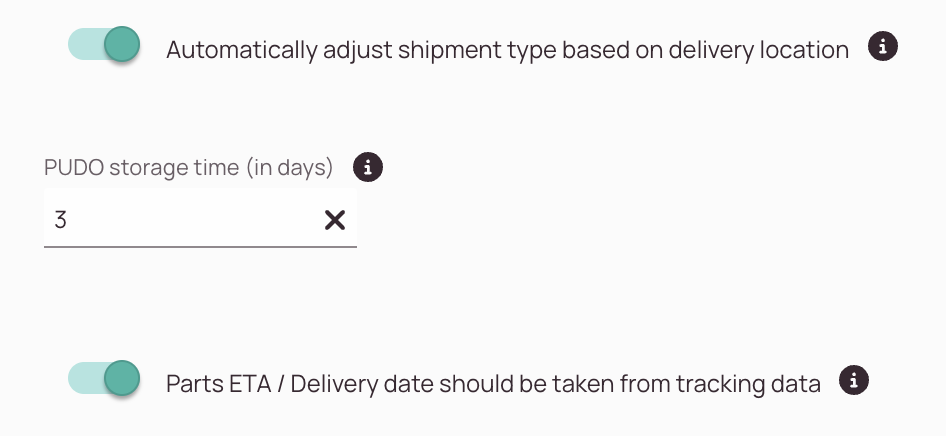
The system will automatically identify that the two locations match and set the delivery information type accordingly.
By entering the storage time you will help the system to understand to better schedule and optimize tickets as the system also considers the parts storage time as a decisive factor. The storage time doesn't apply if the part is sent directly to an affected user.
- Real-time ETA data from logistic companies may be more accurate than the provided project ETA data.
- By utilizing this additional data point, the system may schedule and optimize tickets smarter.
6.1. (Optional) - SMTP Email Settings tab
- In the Account Settings menu, you configure the SMTP email settings on a global level, which means that the email sender will default to your choice.
- If you want to configure SMTP email settings on a project level you have the option to do this inside Admin panel -> Projects -> SMTP Email Settings.
- Expected behavior if SMTP and global SMTP is configured -> Project SMTP will be taken for configured projects, global SMTP for not configured ones.
- Configuring a "Custom Sender" inside Custom Automated Actions is only possible if the SMTP is configured either on project or global level.
The SMTP Email Settings tab gives you the option to configure a different project-based email-sending address. When you send out emails to your customers you can for example send emails on behalf of your company. Which emails are sent out to customers can be for example configured inside Automated Actions.
6.1.1. Basic Authentication
Basic Authentication is the traditional method for connecting to SMTP servers using a username and password. This method is still supported for most providers, but please note that Microsoft will discontinue support for Basic Authentication in September 2025. If you’re using Microsoft Exchange or Office 365, we recommend switching to OAuth2 to ensure uninterrupted email delivery.
When Basic Authentication is selected, you’ll be asked to provide the following credentials:
- SMTP server address
- Port
- Username
- Password (hidden input)
This method remains the default for new configurations unless otherwise specified.

-
Active Toggle
-
Select the Basic Authentication Type.
-
Enter the user name that you use for login to the SMTP Account.
-
Enter the password that you use for login to the SMTP Account.
-
Enter the from email address. This email address will be later visible when sending out emails to customers.
-
Enter the from display name. This display name will be later visible when sending out emails to customers.
-
Enter the SMTP Host address. On the left, you can see what it might look like. You can find the SMTP host address for example by checking mail provider support pages.
-
Enter the SMTP Port. On the left, you can see what it might look like. You can find the SMTP host address for example by checking mail provider support pages.
-
Check if the SMTP connection works by clicking the Test Connection button.
6.1.2. OAuth2 Authentication
OAuth2 is a modern, secure authentication method that replaces Basic Authentication for many email providers, including Microsoft Exchange. Starting September 2025, OAuth2 will be required for all default mailboxes using Microsoft-hosted SMTP services.
When OAuth2 is selected, you can choose between two authentication flows:
- Client Credentials
- Password
Depending on the selected flow, you’ll be asked to provide the following information:
- Access Token URL
- Client ID
- Username
- Client Secret (hidden input)
- Password (only if Password flow is selected; hidden input)
- OAuth2 Scope (optional)
- Method (BASIC or POST)
OAuth2 ensures secure token-based access and is recommended for all Microsoft-based SMTP configurations.
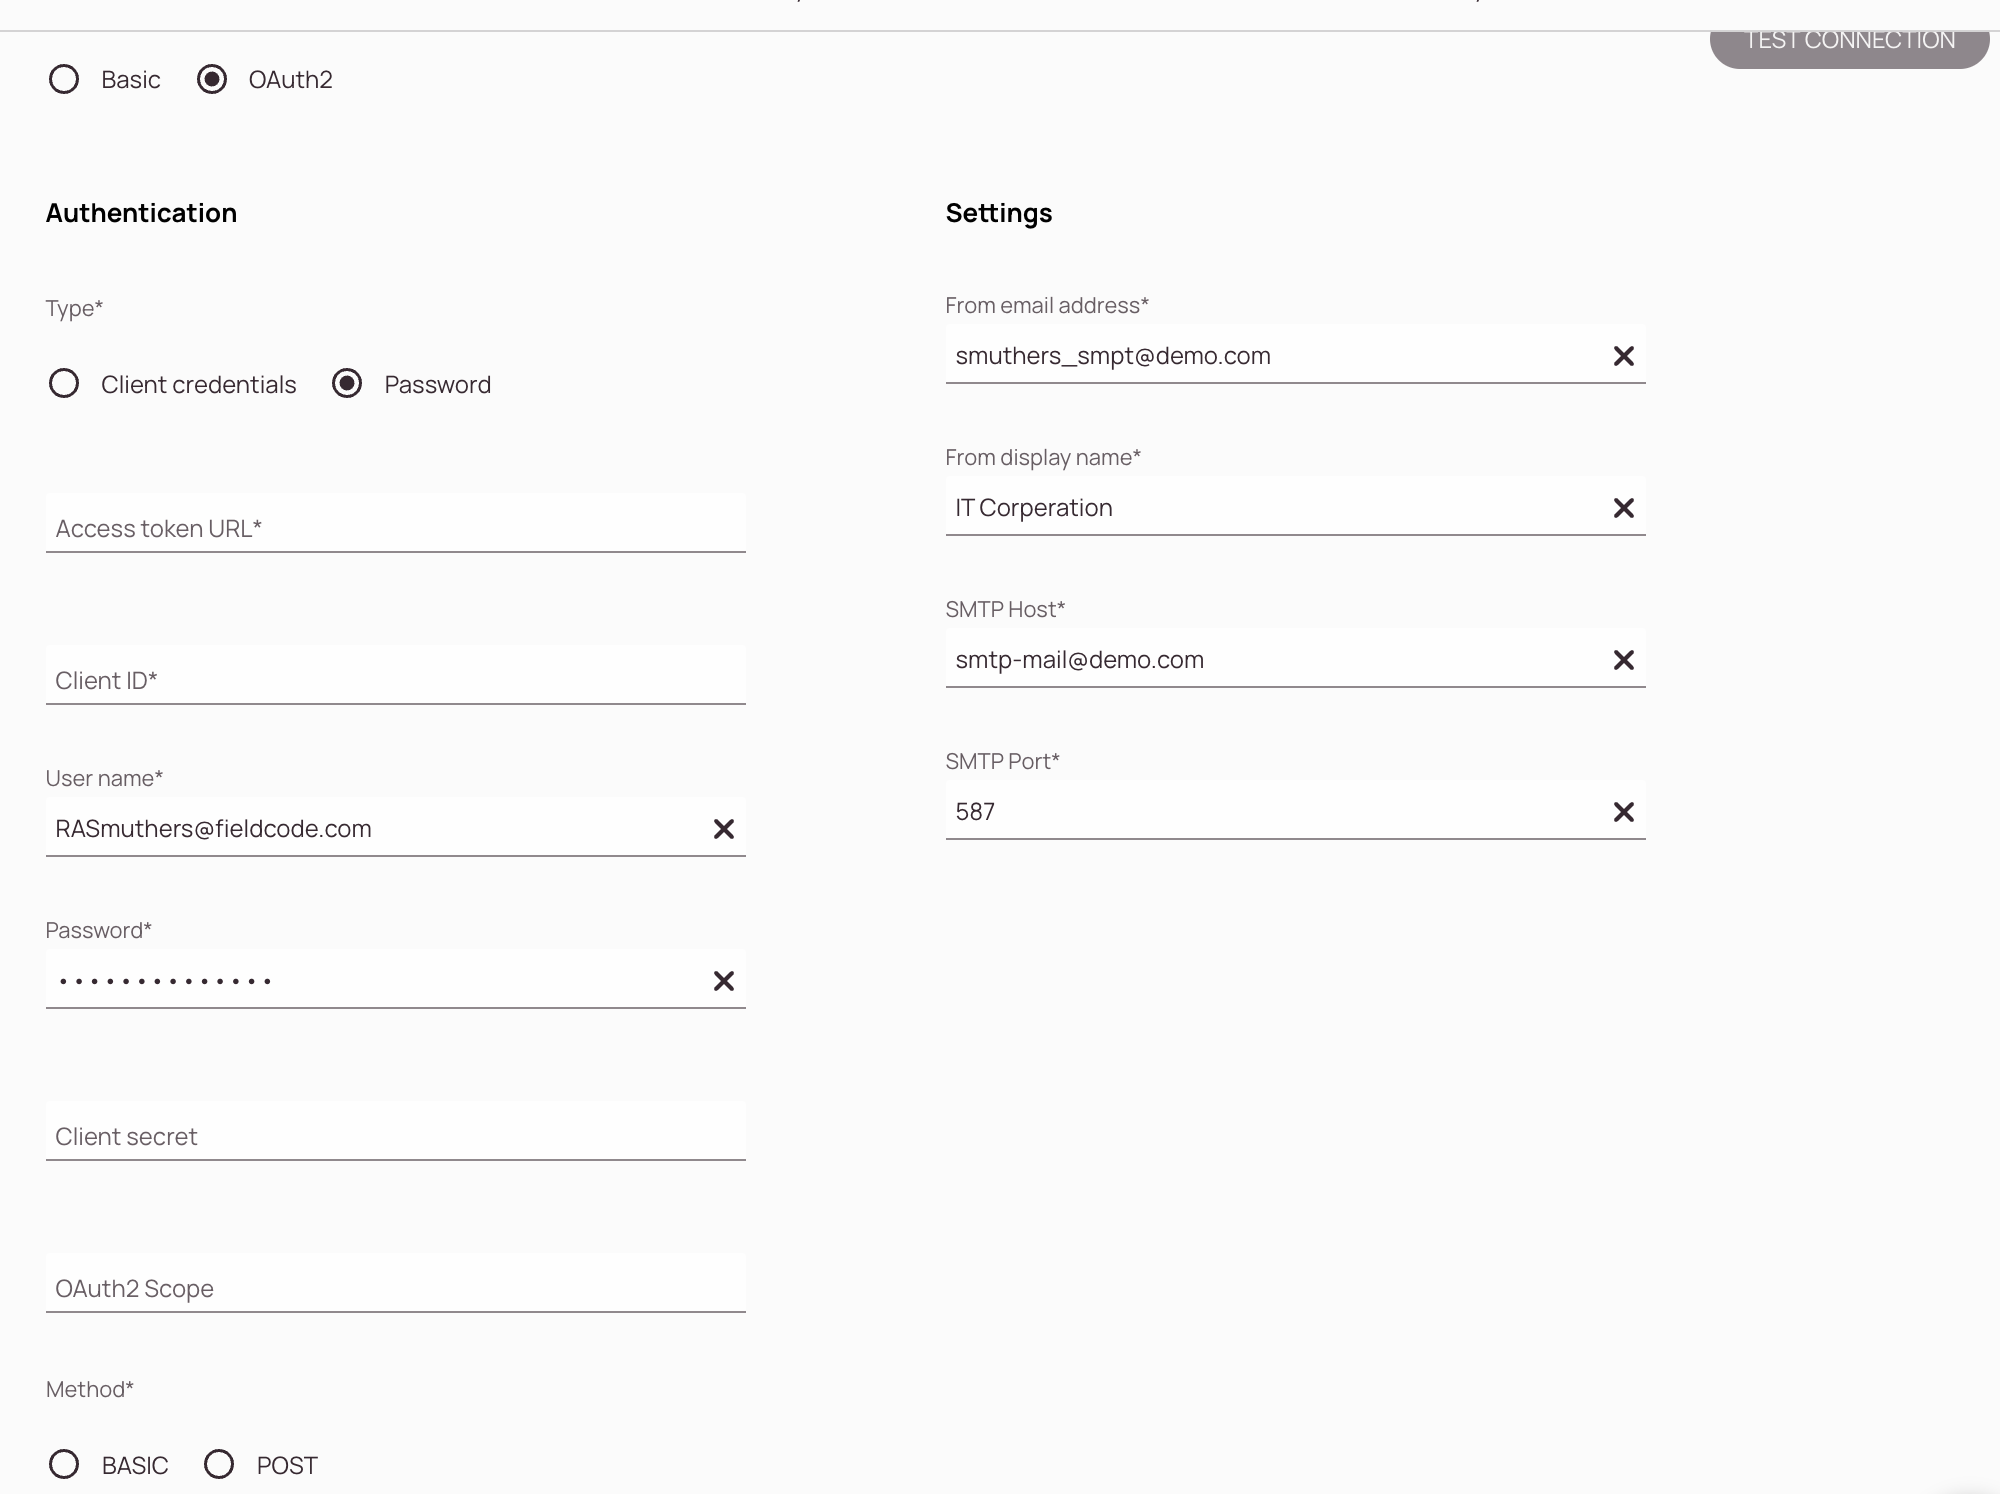
-
Active Toggle
-
Select the OAuth2 authentication method.
-
Select the Authentication type:
Client Credentials: Authentication is done via Client credentials
Password: Authentication is done via here set password. -
Enter the Access token URL.
-
Enter the Client ID.
-
Enter the User name.
-
Enter the Password (if Password is selected as Authentication type).
-
(Optional) – Enter the Client secret.
-
(Optional) – Enter the OAuth2 Scope.
-
Select the Method:
Basic: The BASIC method sends the client credentials (Client ID and Client Secret) using HTTP Basic Authentication. This means the credentials are encoded and included in the Authorization header of the request.
Use case: Preferred when the token endpoint expects credentials in the header.
Security: Credentials are not exposed in the request body, but still require HTTPS to ensure secure transmission.Post: The POST method sends the client credentials in the body of the HTTP request instead of the header. This is useful for endpoints that do not support Basic Authentication headers.
Use case: Required when the token endpoint expects credentials in the request body.
Security: Credentials are included in the body, so HTTPS is essential to protect sensitive data.💡 If you’re unsure which method to use, check the documentation of your SMTP provider or test both using the “Test Connection” button.
-
Enter the from email address. This email address will be later visible when sending out emails to customers.
-
Enter the from display name. This display name will be later visible when sending out emails to customers.
-
Enter the SMTP Host address. On the left, you can see what it might look like. You can find the SMTP host address for example by checking mail provider support pages.
-
Enter the SMTP Port. On the left, you can see what it might look like. You can find the SMTP host address for example by checking mail provider support pages.
-
Check if the SMTP connection works by clicking the Test Connection button.
5 out of 5 stars
1 rating
| 5 Stars | 100% | |
| 4 Stars | 0% | |
| 3 Stars | 0% | |
| 2 Stars | 0% | |
| 1 Stars | 0% |