Tip: You can use filters for better results
-
Latest News
-
Getting Started
-
Work Place
-
-
-
- About Buttons
- Action Buttons
- Schedule Tickets
- Ticket Info and COMS Buttons
- Add Parts
- Assign Partners
- Remove Tickets from the Ticket Clipboard
- Inline Skill Editing
- Create Intervention Info
- Create Intervention Reports
- Cancel Tickets
- Cancel Appointments
- Clone Tickets
- Edit Ticket Details
- Edit Privat Notes
- Report Tickets
- Close Tickets
-
Admin Panel
-
FMA 2 App
-
Customer Portal
- Conditions are mainly used for time-based events of tickets.
Example: Display a warning condition, when the due date is coming closer. - Indications are mainly used for identifying duplicated ticket events.
Example: Display an info indication on new tickets with the same CNE.
About Conditions
Conditions can be set up and determined according to the project’s requirements. When a ticket reaches a defined condition (status) that you have configured with the help of the monitored field, warning signs and/or critical signs can be triggered for the ticket inside Work place. To decide when a condition should trigger, you configure so-called thresholds.
Accessing the Conditions Page
Navigate to Automations → Conditions to add/edit conditions.
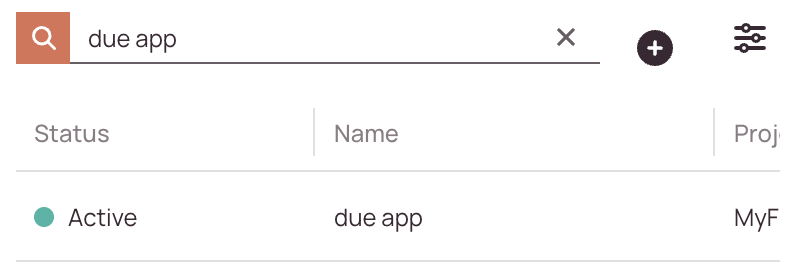
Searching for Conditions
How to search:
- Navigate to Automations → Conditions.
- Use the search bar at the top of the conditions list.
- Enter any of the following:
- Description
- Creator
- Status (e.g., active, inactive)
-
As you type, the list will automatically filter to match your query.
Where and when are conditions displayed?
Conditions are used for highlighting tickets. Therefore they are displayed as warnings and critical alerts inside the Ticket Pool in the Info/Alert/Part column. Configured conditions are also visible in the header of Ticket details, in the Condition tab (under the Overview tab in the Ticket details).


If user-defined work hours are configured for the calculation (Users -> Working Hours tab) the user-defined work hours will be the basis for calculations.
Example: User John McNeill works from 09:30 to 17:30 from Monday to Friday. The condition (eg. warning/critical) is set to 720 minutes (12 hours). The ticket is placed at 10:00. 17:30 is the "cut-off" time. The pre-calculations continue from the next day on to reach the 12 hours. The ticket displays the condition (eg. warning/critical) at 10:30 the next day. Bank holidays are considered in the calculation (if configured), and so are the weekend days (if configured).
If the admin has an SLA Profile configured (Process -> SLA Profiles) the SLA Profile will be the basis for calculations.
Example: Warning timer 15 minutes, Critical timer 30 minutes. The warning is due on Friday at 14:50 and the Critical is due at 15:05. As the Critical timer exceeds the SLA Profile operational time, the critical warning will be displayed on Monday at 07:05 instead of 15:05.
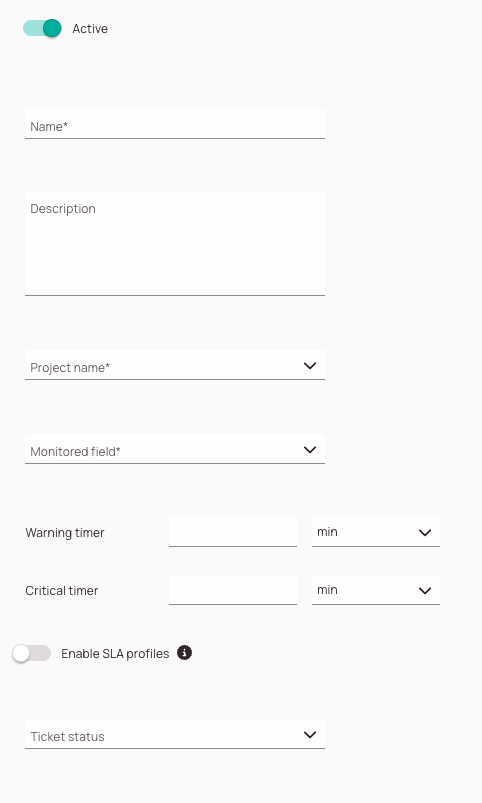
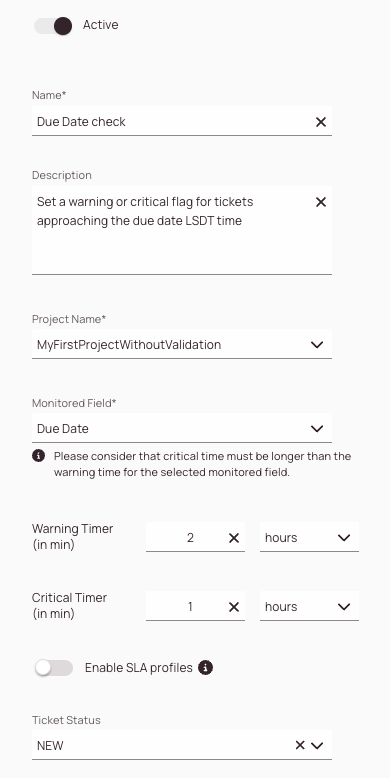
Understanding the condition form
-
Active toggle: Gives you the option if your new condition should be already active in the system after creation or not.
-
Name field: Enter a name for your new condition.
-
Description field: Try to enter a description which describes what your condition will do. Try to be as precise as possible.
-
Project name dropdown: Select the project for which this condition should be active.
-
Monitored field dropdown: The condition time frame starts from this selected time event. The “Understanding the monitored fields” section explains all the time events.
-
Warning timer field: Insert a time frame after which the warning alert should trigger.
-
Time unit dropdown: Gives you the option to switch between minutes, hours, and days.
-
Critical timer field: Insert a time frame after which the critical alert should trigger.
-
Time unit field: Gives you the option to switch between minutes, hours, and days.
-
Enable SLA Profiles toggle: If enabled, the warning and critical timer are calculated based on the business hours of the SLA Profile. By default calendar das are used.
-
Ticket status dropdown: Gives you the option to make your newly created condition dependent on ticket status.
Understanding the monitored fields
| Monitored field name | Explanation |
|---|---|
| Fixed appointment end time | Eg. 24th Dec. 2020 17:00 - Time stamp of fixed ending appointment time. (Agreement with the customer!) |
| Fixed appointment start time | Eg. 24th Dec. 2020 08:00 - Time stamp of fixed beginning appointment time. (Agreement with the customer!) |
| Due date | Eg. 24th Dec. 2020 23:59 - Time stamp of ticket's due date. The ticket should be solved before this time. |
| Ticket creation time | Eg. 24th Dec. 2020 10:01 - Time stamp of when the ticket was created |
| Ticket status entry time | Eg. 24th Dec. 2020 10:03 - Time stamp of when a ticket has entered a selected status |
| Dispatch appointment end time | Eg. 24th Dec. 2020 13:15 - Time stamp of dispatch appointment end time. (Agreement with the engineer!) |
| Dispatch appointment start time | Eg. 24th Dec. 2020 12:15 - Time stamp of dispatch appointment start time. (Agreement with the engineer!) |
Understanding the condition behavior
| Monitored field | Illustration | Explanation |
|---|---|---|
| Ticket creation time |  | Counts outgoing from the creation time. To make the warning condition appear first, set the critical time higher than the warning time. |
| Ticket status entry time | 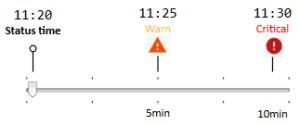 | Counts outgoing from the status time. To make the warning condition appear first, set the critical time higher than the warning time. |
| Fixed appointment start time | 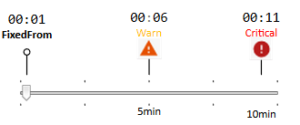 | Counts outgoing from the fixed appointment start time. To make the warning condition appear first, set the critical time higher than the warning time. |
| Fixed appointment end time | 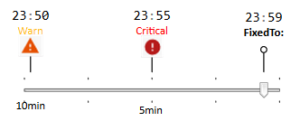 | Counts towards the fixed appointment end time. To make the warning condition appear first, set the warning time higher than the critical time. |
| Dispatch appointment start time | 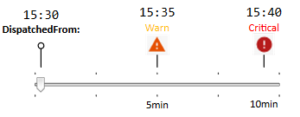 | Counts outgoing from the dispatch appointment start time. To make the warning condition appear first, set the critical time higher than the warning time. |
| Dispatch appointment end time | 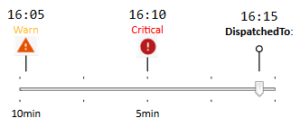 | Counts towards the dispatch appointment end time. To make the warning condition appear first, set the warning time higher than the critical time. |
| Due date | 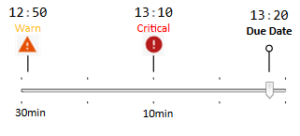 | Counts towards the due date. To make the warning condition appear first, set the warning higher than critical. |
Creating/Editing Conditions
- Click on the Plus button to open the New Condition form (or click on an item in the list to edit it).
- Decide if your new or existing condition should be set to active in the system.
- Enter a name for your new or existing condition.
- (Optional) – Enter a description for your new or existing condition.
- Select a project from the drop-down for which the condition should be applied.
- Enter a time in minutes, hours, or days in the Warning timer field.
- Enter a time in minutes, hours, or days in the Critical timer field.
- Decide if you want to apply the SLA Profile calculation for your condition.
Please note that you can apply the SLA Profile calculation for each condition individually. - Select a Monitored Field from the drop-down. The timers will use this field as a reference.
Please understand the monitored fields first and how conditions behave, before configuring your condition. - (Optional) – You can make your condition dependent on ticket status by selecting a status in the Ticket status field.
- Click Save.
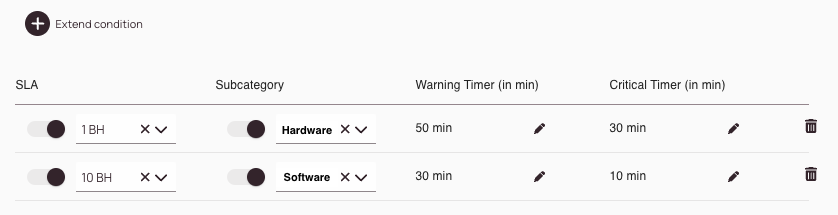
Extending Conditions
You can extend conditions with additional checks by using the Advanced tab inside the Condition editing form. Extending a condition means giving it more/other triggers to actually initiate. For example, you can run additional checks to monitor the SLA field and/or Subcategory field with personalized warnings and critical timers.
- Open an existing condition from the list by clicking on the condition itself.
- Go to the Advanced tab.
- Add one or more extensions according to your use case.
You can use minutes, hours, or days as timer values.
Please attend the condition behavior rules when configuring the values.
You have a condition that gives out warning and critical alerts in Work Place when a ticket sits too long in Appointment status. You now want to extend that condition for tickets of a certain project to also consider Service Level Agreements like being worked on after one business day at the latest. Therefore you would add that condition by toggling the SLA switch on and selecting 1BH. Then you set the warning timer and the critical time to your wished thresholds. You could also narrow that particular condition down to also consider only a certain subcategory. With this precise configuration, your condition would trigger with the settings in the Basic as a base always and also in case the conditions of the Advanced tab are met.
5 out of 5 stars
1 rating
| 5 Stars | 100% | |
| 4 Stars | 0% | |
| 3 Stars | 0% | |
| 2 Stars | 0% | |
| 1 Stars | 0% |