Tip: You can use filters for better results
-
Latest News
-
Getting Started
-
Work Place
-
-
-
- About Buttons
- Action Buttons
- Schedule Tickets
- Ticket Info and COMS Buttons
- Add Parts
- Assign Partners
- Remove Tickets from the Ticket Clipboard
- Inline Skill Editing
- Create Intervention Info
- Create Intervention Reports
- Cancel Tickets
- Cancel Appointments
- Clone Tickets
- Edit Ticket Details
- Edit Privat Notes
- Report Tickets
- Close Tickets
-
Admin Panel
-
FMA 2 App
-
Customer Portal
About Workflows
Workflows in Fieldcode help guide users through ticket-related processes using buttons, conditions, and automation. They’re designed to standardize operations, reduce manual effort, and ensure consistent communication across your organization.
▶️ Accessing the Workflows Page:
- Navigate to Automations -> Workflows to design workflows and more.
👤 Free Users:
- Free users can edit workflows in a limited way.
- Free users can edit nodes in a limited way.
- Free users can add new buttons.
- Basic Automated Actions can be added.
💼 Business/Enterprise Users:
- Create/delete nodes
- Clone workflows
- Fully edit workflows
- Fully adjust workflow settings
- No limitations
- You can configure the permissions for the Workflow Page via:
Permissions/Select Role/Security Resource/Admin panel/Navigation menu: Automations/Page: Workflows
📝 Column Customization:
- By default, not all information is displayed inside the workflow table because not every user may require it. Therefore, if you want to invest in a deeper understanding of workflows, we recommend turning all columns on.
- You can adjust the columns to your needs by clicking on the column button inside the Workflows list.
🔎 Searching for Workflows:
- Use the search bar at the top of the Workflows list.
- Enter any of the following:
- Description
- Creator
- Status (e.g., active, inactive)
As you type, the list will automatically filter to match your query.
- Click on the Trace button in the upper-right corner of the workflows list.
- Select a object.
- Enter a object reference.
- This way you can troubleshoot individual tickets.
What are Workflows?
- We call an ticket’s or an object’s lifecycle the workflow.
- The workflow reflects all possible steps for an object and determines which actions are available.
- When you start off with Fieldcode for example, we provide you with a basic workflow that covers general Field Service scenarios
- A workflow is a customizable sequence of actions that users can trigger within a ticket or appointment.
- These actions are typically represented by buttons and can include status changes, automated messages, or data updates.
Typical Workflow Processes:
- Dispatchers managing ticket lifecycles
- Engineers reporting work progress
- Back-office teams automating repetitive tasks
Common Use Cases:
- Engineer complets a task
- Workflow Action: Button triggers status change and sends report
- Customer cancels appointment
- Workflow Action: Button triggers cancellation and automated email
- Dispatcher reschedules ticket
- Workflow Action: Button updates appointment and sends new information
Workflow Designer Overview:
The Workflow Designer is your workspace for building and editing workflows. It’s divided into three main panels:
- Left Panel: Set parameters, validations, and project assignments.
- Middle Panel: Build the workflow structure using buttons and conditions.
- Right Panel: Configure object details and button behavior.
About Workflow Versioning
Fieldcode supports workflow versioning, allowing you to safely test and update workflows without affecting live operations.
- Draft Version: Editable and not yet active.
- Published Version: Active and visible to users.
- Cloning: Create a new version based on an existing one.
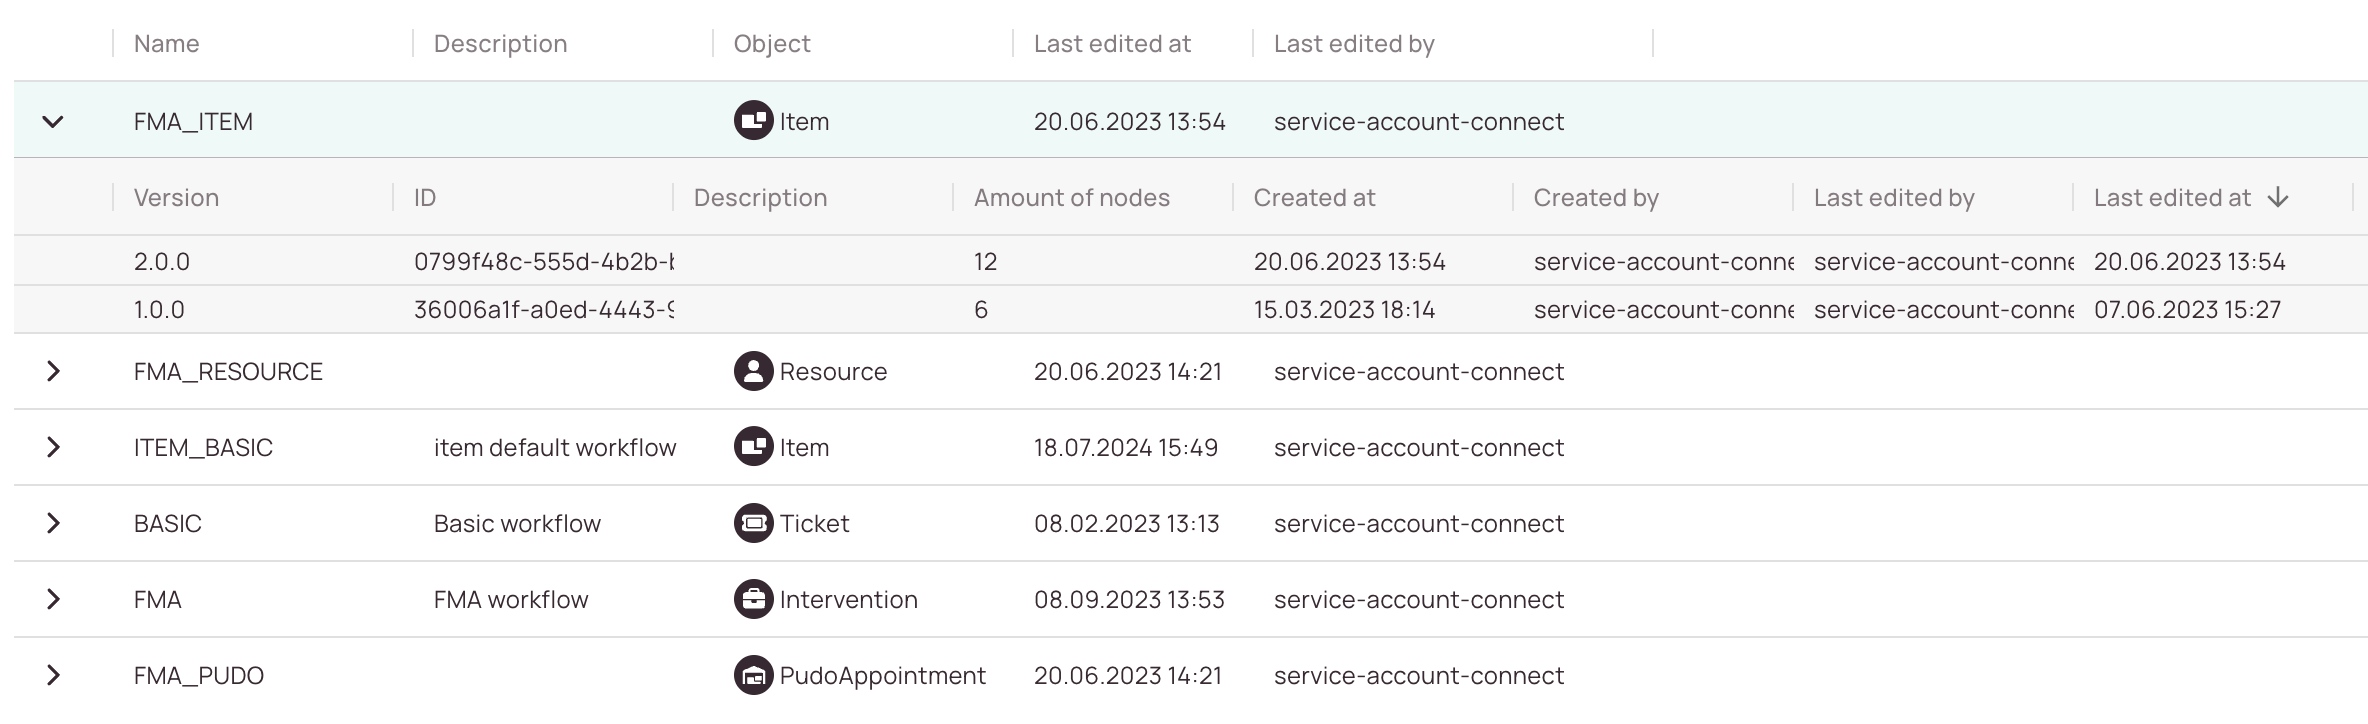
The workflow table displays all default workflow objects inside a table, including all their consecutive versions:
The first thing you see when you open the Workflow menu is all the currently configured workflows for your account.
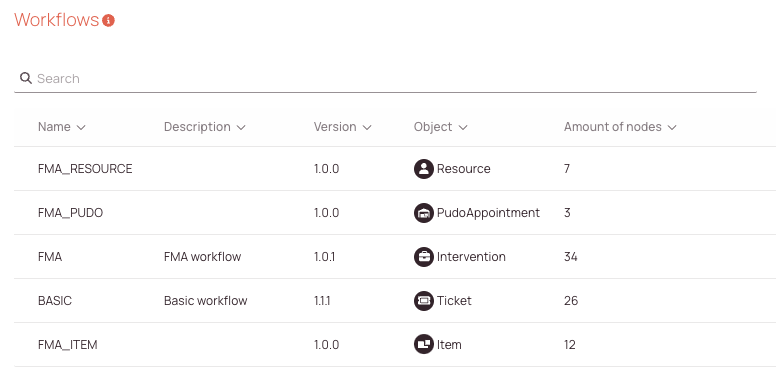
Once you expand on a workflow by clicking the expand arrow button, you will see further version and node details.
Let's take a look at the FMA_Item workflow for example. Version jumps always increment in 1.0.0 steps if you or someone else does edits.
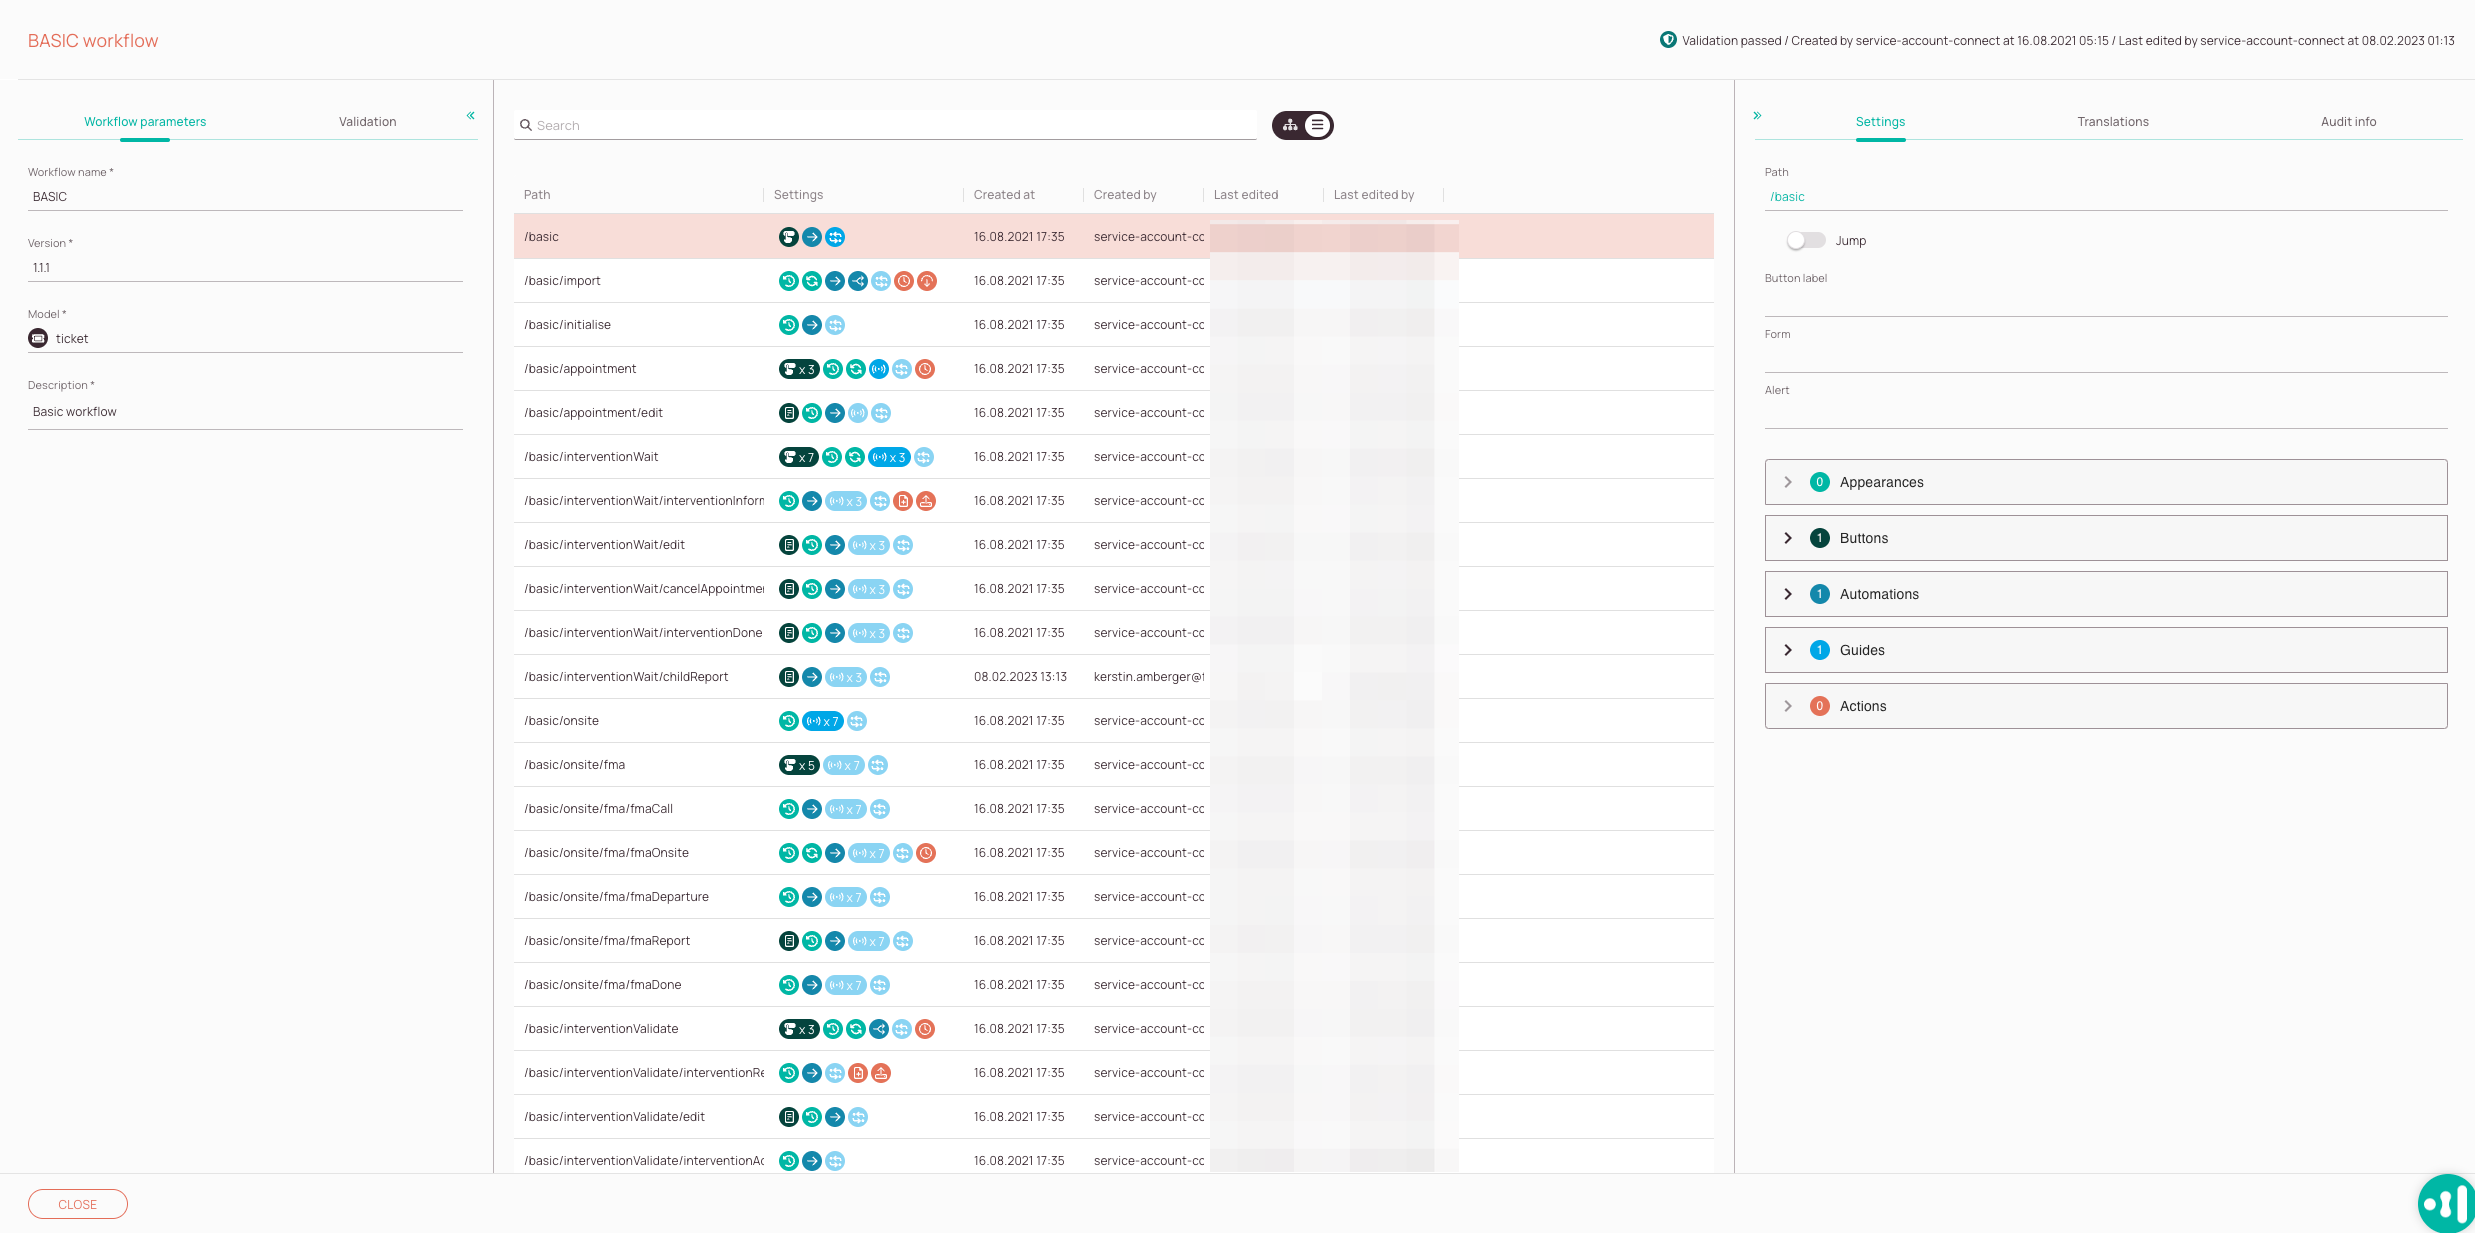
About the Workflow Designer
- The Workflow Designer contains all currently configured workflow steps for a workflow.
- The Workflow Designer is clustered in a three-pane layout.
-
Workflow Parameters tab: The parameters tab allows you to set basic options, such as the name, displays the version, the object type and a detail description.
-
Validations tab: The validations tab allows you to identify issues with your workflow and helps you to troubleshoot. Use the Validations tab to catch common issues like:
- Missing objects or fields
- Invalid conditions
- Unassigned buttons
Always validate before publishing to avoid runtime errors.
-
Workflow node search: Gives you to the option to search for a specific node by entering a search keyword.
-
View changer: Gives you the option to change between a workflow hierarchy view and list view. The Workflow path hierarchy view gives you a better understanding of how a selected workflow can move around by displaying children, siblings etc.
-
Workflow node view: You can check all the paths of a selected workflow, configured settings for each node, node creation dates, node creators, node last edit date and times, and which user last edited a certain workflow node in this section.
-
Validations Notifications: This notification gives you a hint of whether your selected workflow is performing flawlessly.
-
Settings tab: You can check Appearances, Buttons, Automations, Guides, and Actions of a particular workflow node.
-
Translations tab: The translation tab gives you the option to edit workflow path localizations for different languages. What you can do with it for example, is to add translations for the history tab as when a workflow changes in some way it is always displayed inside the History tab.
-
Audit info tab: The audit info tab summarizes by whom a workflow path was created initially and who last edited it.
Default Workflow Objects
These are the default workflow objects:
| Identifying icon | Object name | Workflow Name | Description |
|---|---|---|---|
| Intervention | FMA | FMA appointment related workflow object is containing the default FMA appointment flow. | |
| Item | FMA_ITEM | FMA Parts related workflow object, is containing the FMA parts flow. | |
| PUDO Appointment | FMA_PUDO | PUDO related workflow object, is containing the the PUDO appointment flow + FMA Settings. | |
 | Resource | FMA_RESOURCE | FMA User related workflow object, is containing the My Day flow + FMA settings. |
| Ticket | BASIC | The default ticket related workflow object is containing the default ticket workflow. |
FAQ - Workflows
Our solution engineers can help you design workflows tailored to your business needs. Contact Fieldcode Support for assistance.
Yes, workflows can be assigned to one or more projects.
- Use the draft version and test it in a staging environment (if possible).
- Test it against objects (can be done inside the Workflows Designer directly).
The button or action will not be shown or executed.
5 out of 5 stars
1 rating
| 5 Stars | 100% | |
| 4 Stars | 0% | |
| 3 Stars | 0% | |
| 2 Stars | 0% | |
| 1 Stars | 0% |