
Tip: You can use filters for better results
-
Latest News
-
Getting Started
-
Work Place
-
-
-
-
- About Buttons
- Action Buttons
- Schedule Tickets
- Ticket Info and COMS Buttons
- Add Parts
- Assign Partners
- Remove Tickets from the Ticket Clipboard
- Inline Skill Editing
- Create Intervention Info
- Create Intervention Reports
- Cancel Tickets
- Cancel Appointments
- Clone Tickets
- Edit Ticket Details
- Edit Privat Notes
- Report Tickets
- Close Tickets
-
-
Admin Panel
-
FMA 2 App
-
Customer Portal
About Workflows
Every ticket and appointment in Fieldcode follows a workflow. Fieldcode provides a default workflow, so you only need to configure this page if you want to change the actions available to users or automate tasks that are currently performed manually.
At each step of the workflow, the system determines which actions are available and displays them as buttons. For example, a dispatcher working with a new ticket may see the Schedule button, while an engineer who has arrived on site may see Start Work and Complete. Selecting an action moves the ticket or appointment to the next step and can also trigger automatic actions, such as changing a status, sending an email to the customer, or updating a field.
Because the workflow controls which buttons appear and when, everyone follows the same process, and the routine steps happen on their own.
Access to Fieldcode features depends on your pricing plan. See the plan comparison for a full overview of what each plan includes.
You can configure the permissions for the Workflow Page via:
Permissions/Select Role/Security Resource/Admin panel/Navigation menu: Automations/Page: Workflows
Column Customization:
- By default, not all information is displayed inside the workflow table because not every user may require it. Therefore, if you want to invest in a deeper understanding of workflows, we recommend turning all columns on.
- You can adjust the columns to your needs by clicking on the column button inside the Workflows list.
- Click on the Trace button in the upper-right corner of the workflows list.
- Select a object.
- Enter a object reference. For example, this could be the CNI of a ticket. The information found will be displayed as shown in the screenshot below.
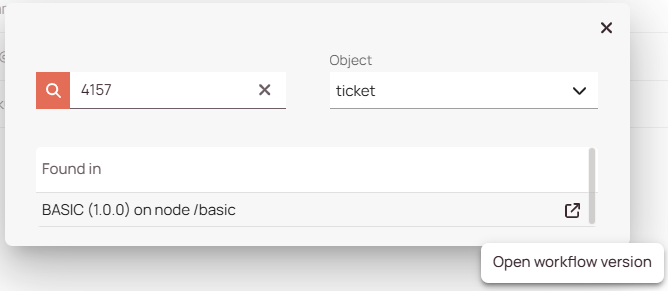
- This way, you can troubleshoot individual tickets.
Default Workflow Objects
These are the default workflow objects:
| Identifying icon | Object name | Workflow Name | Description |
|---|---|---|---|
 | Intervention | FMA | FMA appointment related workflow object is containing the default FMA appointment flow. |
 | Item | FMA_ITEM | FMA Parts related workflow object, is containing the FMA parts flow. |
 | PUDO Appointment | FMA_PUDO | PUDO related workflow object, is containing the the PUDO appointment flow + FMA Settings. |
 | Resource | FMA_RESOURCE | FMA User related workflow object, is containing the My Day flow + FMA settings. |
 | Ticket | BASIC | The default ticket related workflow object is containing the default ticket workflow. |
FAQ - Workflows
Our solution engineers can help you design workflows tailored to your business needs. Contact Fieldcode Support for assistance.
Yes, a workflow can be assigned to more than one project.
- Use the draft version and test it in a staging environment (if possible).
- Test it against objects (can be done inside the Workflows Designer directly).
The button or action will not be shown or executed.
5 out of 5 stars
1 rating
| 5 Stars | 100% | |
| 4 Stars | 0% | |
| 3 Stars | 0% | |
| 2 Stars | 0% | |
| 1 Stars | 0% |