Tip: You can use filters for better results
-
Latest News
-
Quick Start
-
Work Place
-
-
-
- Manage Parts
- Assign Partners
- Interaction Buttons
- Workflow Buttons
- Communications Usage
- Schedule Tickets
- Edit Ticket Details
- Cancel Tickets
- Remove Tickets from the Ticket Clipboard
- Report Tickets
- Create Intervention Info
- Create Intervention Reports
- Cancel Appointments
- Clone Tickets
- Edit Privat Notes
- Inline Skill Editing
-
Admin Panel
-
- Process Menu Explained
- Workflows Usage
- What are Appearances in context of workflows?
- What are Buttons in context of workflows?
- What are Automations in context of workflows?
- What are Guides in context of workflows?
- What are Actions in context of workflows?
- Projects Configuration
- Custom Forms Creation
- Lists Configuration
- Customer Portal Customization
- Automated Actions
- Conditions Configuration
- Indications Configuration
- Template Configuration
- Ticket Durations Configuration
- Custom Fields Configuration
- Value Sets Configuration
- SLA Profile Configuration
- Ticket Repair
-
Fieldcode FMA app
-
Customer Portal
We are currently in the process of updating our pricing plans, so please be patient until we have updated everything to reflect our new pricing plans.
How to upgrade your plan
If you exceed the limit of 10 users you will be prompted to upgrade your subscription plan.
You have the option to upgrade your account at any given time.
Please check out our innovative pricing plans to learn more about unleashing the full power and potential of Fieldcode.
Inside the Fieldcode Admin Panel go to Access -> Account
Expand the menu by clicking the expand arrow in the navigation ![]() OR click directly on the Account button to reveal all options of Access.
OR click directly on the Account button to reveal all options of Access.
- When this limit is reached you are prompted to change to either to the business or enterprise plan.
- You can check our pricing plans on the Fieldcode website.
- By submitting your credit card information, you are automatically enrolled in the business pricing plan.
- After entering our business plan you will be charged per event.
If you do changes in the payment method tab, you need to click the Submit button before Save in order to first validate your payment method changes.
- The Upgrade can be initiated by going to Access → Account → Pricing Plan → UPGRADE NOW
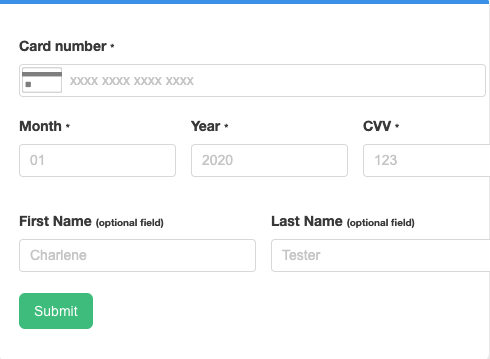
- Insert your credit card number.
- Insert the month.
- Insert the year.
- Insert the CVV of your card.
- (Optional) Insert the first name of the cardholder.
- (Optional) Insert the last name of the cardholder.
- Click Submit first.
- Click Save afterward.
Feel free to check out our different plans either on the pricing plan tab or the Fieldcode website. You can also find our terms & conditions there.

0 out of 5 stars
| 5 Stars | 0% | |
| 4 Stars | 0% | |
| 3 Stars | 0% | |
| 2 Stars | 0% | |
| 1 Stars | 0% |