Tip: You can use filters for better results
-
Latest News
-
Getting Started
-
Work Place
-
-
-
- Add Parts
- Assign Partners
- Interaction Buttons
- Workflow Buttons
- Ticket Info and COMS Buttons
- Schedule Tickets
- Edit Ticket Details
- Cancel Tickets
- Remove Tickets from the Ticket Clipboard
- Report Tickets
- Create Intervention Info
- Create Intervention Reports
- Cancel Appointments
- Clone Tickets
- Edit Privat Notes
- Inline Skill Editing
-
Admin Panel
-
Fieldcode FMA app
-
Customer Portal
How to use communications
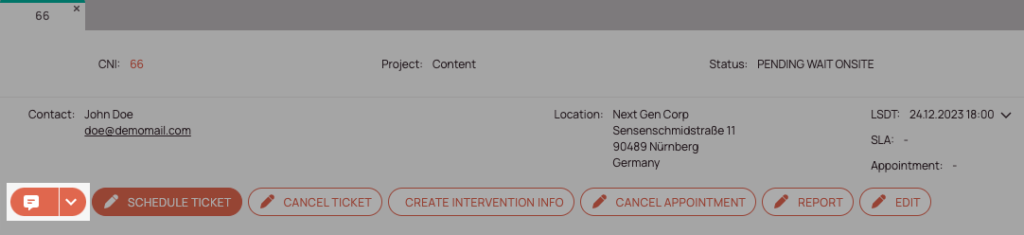
The communications workflow button inside the Ticket Details gives you the option to communicate with your target audience in different ways. The communications workflow button contains the Info button, the email button, and the SMS button (only Enterprise).
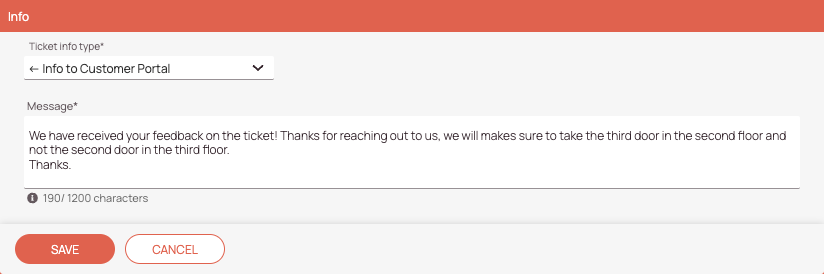
How to use the Ticket Info button
The Info button (which can be triggered after using the communications workflow button) allows you to set a Ticket Info, which will be visible under Ticket Info and in the Ticket header of Ticket Details to inform cross-platform about special on-goings of a particular ticket.
All these options help to inform a special target audience about important on-goings of a particular ticket.
Depending on which one you select the ticket info is addressed differently.
Almost every ticket info type can be configured as acknowledgeable inside Work place (generally spoken).
Every ticket info type will be visible inside the Ticket History tab.
Please do not confuse “ticket info” with “Attachment Notes”.
- Click on the communications workflow button.
- Select Info from the context menu.
- (Optional) – Use a template to pre-fill the content for the info.
- In the Ticket info type field, select one of the following ticket info reasons, each serving a different purpose and having a different audience.
| Ticket info reason <- : Outgoing -> : Incoming | Where is the ticket info displayed? | Where can it be created? | Acknowledgement from Work Place required? | Who is the usual recipient? |
|---|---|---|---|---|
| - Engineer delay | FMA, Work Place | FMA, Work Place | YES | Engineers, Work Place users |
| - Info from dispatcher to engineer | Work Place, FMA | Work Place | YES | Engineers |
| - Info from engineer to dispatcher | FMA, Work Place | FMA, Work Place | YES | Work Place users |
| - Internal info | FMA, Work Place | Work Place, FMA | NO | Work Place users, Engineers |
| - Internal info (with acknowledge) | FMA, Work Place | Work Place, FMA | YES | Work Place users, Engineers |
| <- Info to connected system | Connected system, Work Place | Work Place | YES | Connected system users |
| <- Info to Customer Portal | Customer Portal, Work Place | Work Place, FMA | YES | End users |
| -> Info from connected system | Work Place, Connected System | Connected System, Work Place | YES | Work Place users |
| -> Info from Customer Portal | Work Place, Customer Portal | Customer Portal | YES | Work Place users |
| Custom Ticket Info | Work Place | Work Place | NO | Work Place users |
How to use the Email button
If you want to send emails via the ticket details, you must first configure your SMTP email settings for your account.
You can use aliases when creating and sending emails by typing the "@" command inside a field. This will reveal an alias dropdown.
HTML formatting is supported inside COMS and email templates.
You may not be able to see a "Preview" with the HTML formatting for now, however, when emails are sent out the HTML formatting will be visible to end customers.
Please pay attention to use the correct HTML declaration and scheme for emails in the body field:
				<!DOCTYPE html>

<html lang="en" xmlns="http://www.w3.org/1999/xhtml" xmlns:o="urn:schemas-microsoft-com:office:office">
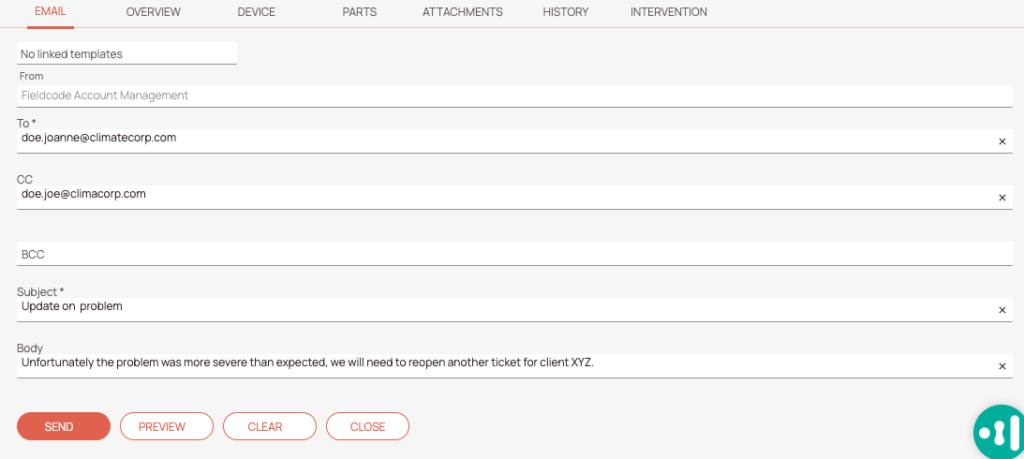
The email interaction (which can be activated by using the COMS interaction button) allows you to send mail or bulk emails to customers. Email templates that were configured by using email templates in the Fieldcode Admin Panel can also be used in this tab for communicating with your customers.
- Click on the COMS button.
- Select Email from the list.
- (Optional) Select a template.
Email templates can be created inside Admin Panel -> Process -> Email templates. - If you have selected a template fields should be already pre-filled and only small manual changes might be still required.
- Enter a recipient email address in the To field.
You can also enter multiple recipients by using a semi-colon. - (Optional) Enter a Carbon Copy recipient.
You can also enter multiple recipients by using a semi-colon. - (Optional) Enter a Blind Carbon Copy recipient.
You can also enter multiple recipients by using a semi-colon. - Enter a email subject in the subject field.
- Enter the email content in the body field.
- (Optional) Click on the preview button to check how your final result will look.
- (Optional) Clear all fields by clicking the clear button. This may come in handy if you mess up some fields.
- Click on Send to send out the email from within the Fieldcode Work Place.
How to use the SMS button

This specific feature is only available for customers with an Business or Enterprise plan.
The SMS button (which can be activated by using the COMS button inside the Ticket Details) allows you to directly send out SMS from Work Place. SMSes are mostly useful for external communication.
- Click on the COMS button.
- Select SMS from the list.
- Enter a valid phone number or alias into the phone number or alias field.
You can enter multiple phone numbers or aliases by using a comma. - Enter a message into the message field.
You are also able to use aliases in the message field and test them with the Preview button. - (Optional) – Click the Preview button to double check if the SMS behaves correctly.
- Click Send to directly send out the SMS.
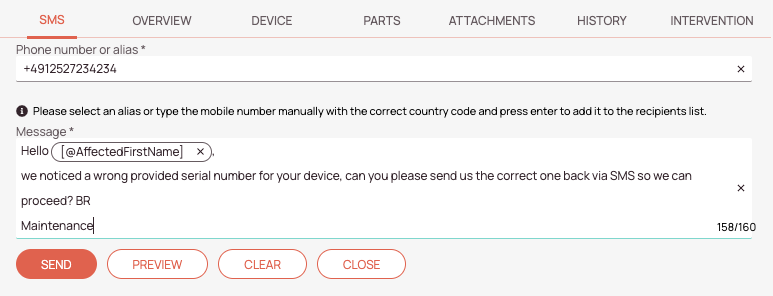
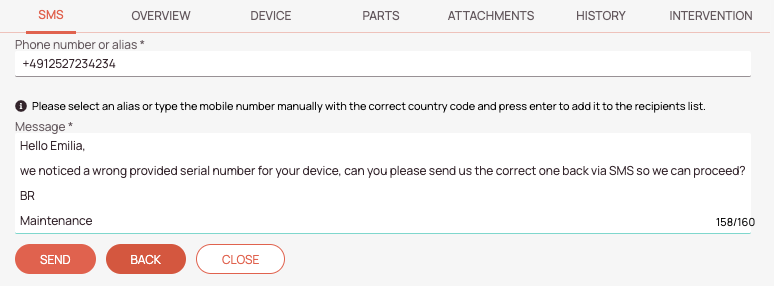
Please note, that additional charges are applied per each SMS sent and will be invoiced to your account.
Where can templates be created?
Templates are created inside the Admin panel -> Process -> Templates.
Please check out the matching topic: How to set up templates
5 out of 5 stars
2 ratings
| 5 Stars | 100% | |
| 4 Stars | 0% | |
| 3 Stars | 0% | |
| 2 Stars | 0% | |
| 1 Stars | 0% |