Tip: You can use filters for better results
-
Latest News
-
Getting Started
-
Work Place
-
-
-
- About Buttons
- Action Buttons
- Schedule Tickets
- Ticket Info and COMS Buttons
- Add Parts
- Assign Partners
- Remove Tickets from the Ticket Clipboard
- Inline Skill Editing
- Create Intervention Info
- Create Intervention Reports
- Cancel Tickets
- Cancel Appointments
- Clone Tickets
- Edit Ticket Details
- Edit Privat Notes
- Report Tickets
- Close Tickets
-
Admin Panel
-
FMA 2 App
-
Customer Portal
About the Ticket Clipboard
In the Ticket Clipboard, tickets can be temporarily stored that either still require a callback to the end customer or that need to be moved there due to not reaching the customer. Tickets that are assigned to a cooperation partner or tickets that are connected to another system will also be moved there.
Inside the Work place click on the expand arrow to open the Ticket Clipboard tab in the Ticket Pool component.
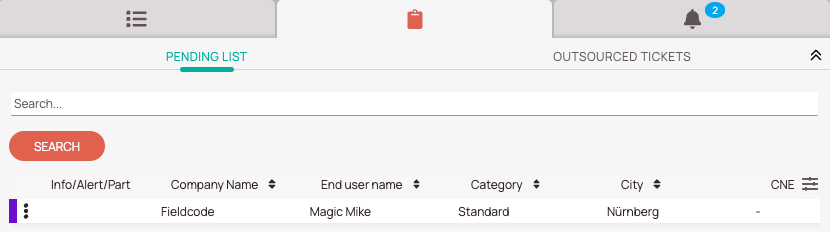
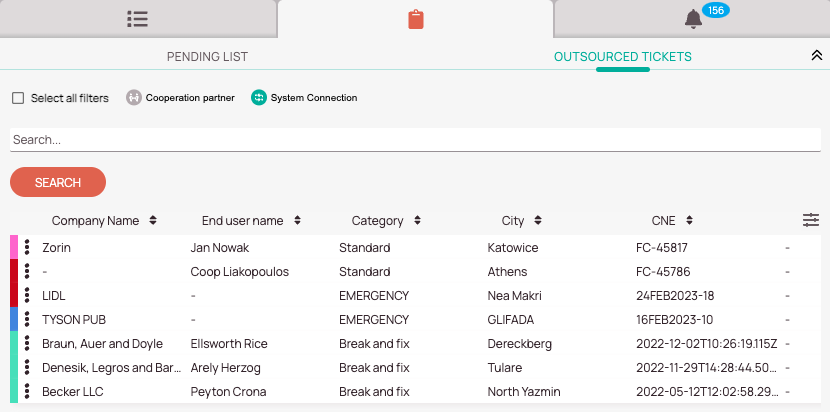
The Ticket Clipboard is split into two different tabs:
- Pending tab: Contains end user not reached and callback required tickets.
- Outsourced tab: Contains outsourced tickets for the following two partner types: Cooperation partners and System connections.
You can still manually move the entire ticket to the Pending list tab in the Ticket Clipboard by clicking "Move to Clipboard" if needed.
If you utilize value sets, you can manually define how long a ticket remains in the Ticket Clipboard.
Ticket Clipboard FAQ
- In case you can’t reach the end user and therefore want the ticket out of sight from the Dispatch tab.
- In case there is a callback required with the customer and therefore you want the ticket out of sight from the Dispatch tab.
- In case you want the ticket out of sight from the Dispatch tab for other reasons.
- Tickets that have been outsourced to Cooperation Partners or system-connected tickets will automatically move to the Ticket Clipboard.
- Open the context menu by right-clicking on a ticket in the Ticket Pool and click Move to Ticket Clipboard.
- Inside the Move to clipboard popup click on either Callback required or Enduser not reached.
Callback required: The enduser wants to be called back. It is mandatory to enter to whom you talked to. You can then pick either a time duration (time that a ticket should stay inside the Clipboard) or alternatively configure a custom end date & time (time when a ticket should move out of the Ticket Clipboard automatically). You can also enter a comment if you want.
End user not reached: In case you couldn’t reach the enduser you can pick this option. Please note that based on the project settings the ticket might not be moved to the clipboard, because it is configured by your admins that way.
You can also enter a comment if you want. - Click Save.
- Callback Required selected:
If “Callback required” has been selected, the period of time for which tickets remain on the Ticket Clipboard can be determined manually for each individual ticket. Either a “Time duration” can be set (how long the ticket is to remain in the Ticket Clipboard from the moment you confirm) or, alternatively, a “Custom end date & time” can be selected (time from which the ticket is automatically moved from the Ticket Clipboard back into the Ticket Pool).
Example: Time duration: The customer tells you he wants to be called back in around 15 minutes. Therefore you set 15 minutes in the time duration field. After this time has passed, the ticket will move back to the Ticket Pool again, so you can process the ticket again as usual.
Custom end date & time: Your customer is currently not at home, therefore you want to try it again on the next day at the same hour. You therefore select tomorrow’s date in the custom end date & enter 15:00 in the time field.
Calculation base: 24/7 - Enduser not reached selected: You can either define yourself in the project settings how long a ticket stays in the Ticket Clipboard or forbid it in the project settings completely instead.
Example: Project “Q&D” has 15 minutes configured inside the Callog settings tab inside the Project tab inside the Admin panel. After 15 minutes the ticket will be moved back to the Ticket Pool automatically.
Project “ZY” has disabled the Enable waiting duration toggle inside the Calllog settings tab inside the Project tab inside the Admin Panel. Therefore the ticket will not move to the Ticket Clipboard at all.
Calculation base: 24/7 by default or SLA times with SLA Profile.
- SLA Profile active: SLA-profile-defined work hours are used for the calculation.
Example: An SLA Profile is active where the business hours are set from 06:00 to 18:00 from Monday to Sunday. The time duration is set to 720 minutes (12 hours). The ticket is placed at 10:00. 18:00 is the “cut-off” time. The pre-calculations continue from the next day on to reach the 12 hours. The ticket is moved back to the Ticket Pool at 14:00 the next day. Bank holidays are considered in the calculation (if configured), and so are the weekend days (if configured). - SLA Profile inactive: User-defined work hours are used for the calculation (Users -> Working Hours tab).
Example: User John McNeill works from 09:30 to 17:30 from Monday to Friday. The time duration is set to 720 minutes (12 hours). The ticket is placed at 10:00. 17:30 is the “cut-off” time. The pre-calculations continue from the next day on to reach the 12 hours. The ticket is moved back to the Ticket Pool at 10:30 the next day. Bank holidays are considered in the calculation (if configured), and so are the weekend days (if configured).
5 out of 5 stars
2 ratings
| 5 Stars | 100% | |
| 4 Stars | 0% | |
| 3 Stars | 0% | |
| 2 Stars | 0% | |
| 1 Stars | 0% |