Tip: You can use filters for better results
-
Latest News
-
Getting Started
-
Work Place
-
-
-
- Add Parts
- Assign Partners
- Interaction Buttons
- Workflow Buttons
- Ticket Info and COMS Buttons
- Schedule Tickets
- Edit Ticket Details
- Cancel Tickets
- Remove Tickets from the Ticket Clipboard
- Report Tickets
- Create Intervention Info
- Create Intervention Reports
- Cancel Appointments
- Clone Tickets
- Edit Privat Notes
- Inline Skill Editing
-
Admin Panel
-
Fieldcode FMA app
-
Customer Portal
About the Assistant
The Scheduling Assistant helps dispatchers to schedule ticket appointments. It assists dispatchers in finding the best possible appointment for the customer and ensures efficient scheduling of engineers at the same time. The main goal of the Scheduling Assistant is to ease up the process of appointment planning by suggesting the best matching appointments with recommended routes.
Since making an appointment isn’t always straightforward, many scenarios can happen while trying to find the best appointment with the customer.
The Scheduling Assistant is capable of dealing with every aspect of a customer call and scheduling an appointment can have many different outcomes. The below listed and described ones are possible outcomes of an assisted schedule process to help you better understand the manual planning of an appointment. The outcome of the Scheduling Assistant can vary, so the below usage scenarios will help you to understand how to handle different situations in the best possible way.
When a dispatcher calls the customer for an appointment the goal is to find the right compromise between customer availability and engineers’ flexibility. The Scheduling Assistant can help with that by giving appropriate suggestions right at the moment the dispatcher does the customer call.
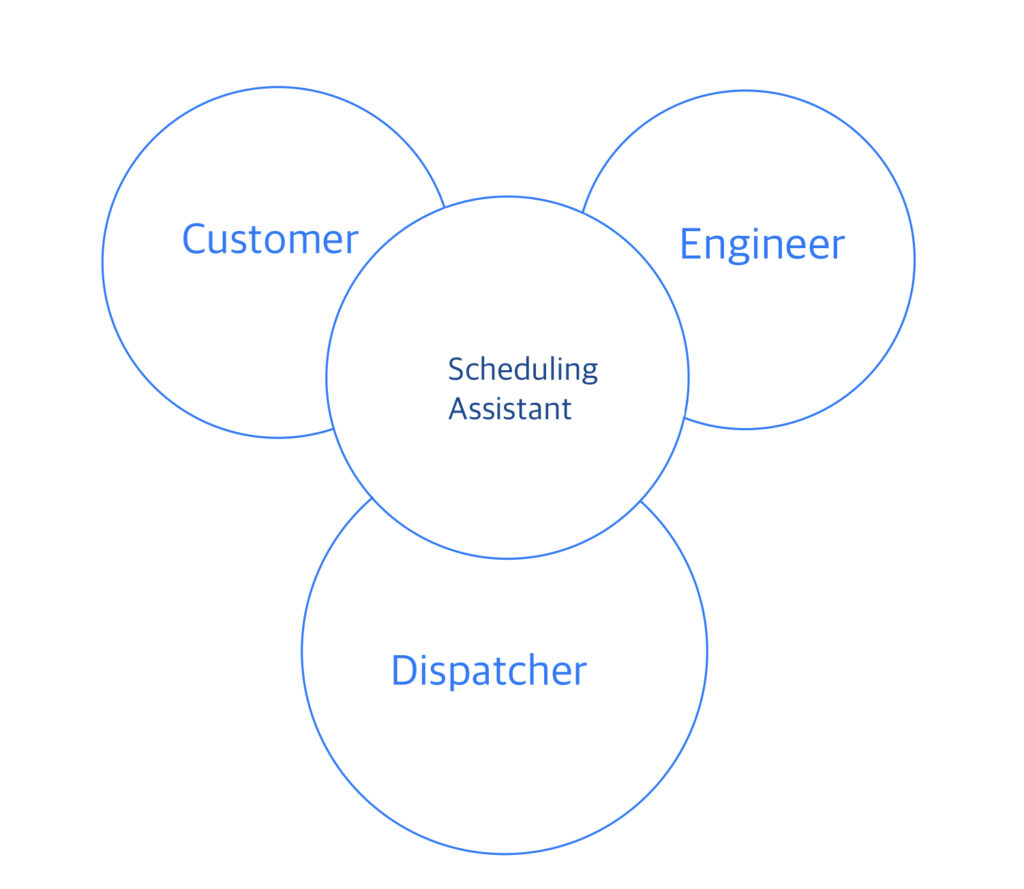
By giving the customer a big free window for the appointment, while also ensuring the optimal route is planned for the engineer, the Scheduling Assistant ensures the best possible outcome for dispatchers, customers, and engineers.
You can move the Scheduling Assistant window freely via drag & drop since the Scheduling Assistant component is not fixed inside a view.
Dragging & Dropping compared to Assistant
Dragging & Dropping tickets to the Timeline will always result in tickets getting locked and therefore not being touched by optimizer capabilities. Scheduling tickets from the Scheduling Assistant however will already assist you in finding the right appointment through real-time recommendations.
Therefore if you want to schedule tickets smartly, the scheduling assistant should be your preferred way of scheduling tickets.
Real-time recommendations assist dispatchers in finding the best appointments on-the-fly, and dispatchers, therefore, instantly benefit.
Availability checks are performed for five days in the past and five days in the future.
Yes, as soon as spare parts have not yet arrived at the destination, no suitable technicians will be available for the appointment. So if you are wondering why no technicians are available today, this may be due to spare parts stored in the ticket.
About Field Service Dynamics
Field Service Management is one of the most dynamic fields when it comes to planning. There are many hurdles to overcome, such as eg. high-priority tickets and adjustments should be made as consistently as possible to ensure the best business outcome. Real-time recommendations therefore constantly assist dispatchers in finding the best solutions in this highly-dynamic work environment. Those real-time recommendations can only benefit and perform best if the setup inside the Admin panel has been done smartly by administrators of the system.
A good practice for example is to define SLA profiles.
A Service Level Agreement (SLA) is a contract with an outsourcing and technology provider that specifies the level of service a vendor promises to deliver to the customer.
Service Level Agreements help to keep a high and fast service quality. The Scheduling Assistant/Optimizer will assist you in reaching this level of high and fast service quality by for example considering SLA profiles and much more. If you want to benefit from SLA profiles, you have to configure them first.
If you want to learn how to benefit from SLA Profiles fully, please check out the following topic: SLA Profile Scenarios
About Time Windows
Optimizer capabilities are constantly assisting in finding the best routes. Optimizer capabilities work most efficiently when the fixed from/to (end user-agreed-time) is big and the dispatched from/to (engineer-agreed-time) is small.
- The fixed from/to time describes the agreed time window with a customer.
- In the event of an end-user booking an appointment only the fixed from/to time is set in the system.
- The dispatched from/to time window describes the agreed repair time by the engineer and is identical to the adjustable ticket duration.
About Engineer Checks
Real-time recommendations constantly check for the closest engineer available for the ticket. The moment you open the Scheduling Assistant the engineer checks for the closest engineer and indicates the completed engineer check with a checkmark. The engineer check also rechecks if you pick another date in the calendar. Thanks to this intelligent check, the proposal of the closest engineer is always as up-to-date as possible.

About Scheduling Options
Option 1: By double-clicking on a particular ticket in the Ticket Pool.
Option 2: From the context menu of a ticket in the Ticket Pool in the Dispatch view.
Option 3: From the Timeline by right-clicking (opening the context menu) on Schedule ticket.
Option 4: From the Ticket details by clicking on the matching workflow button.
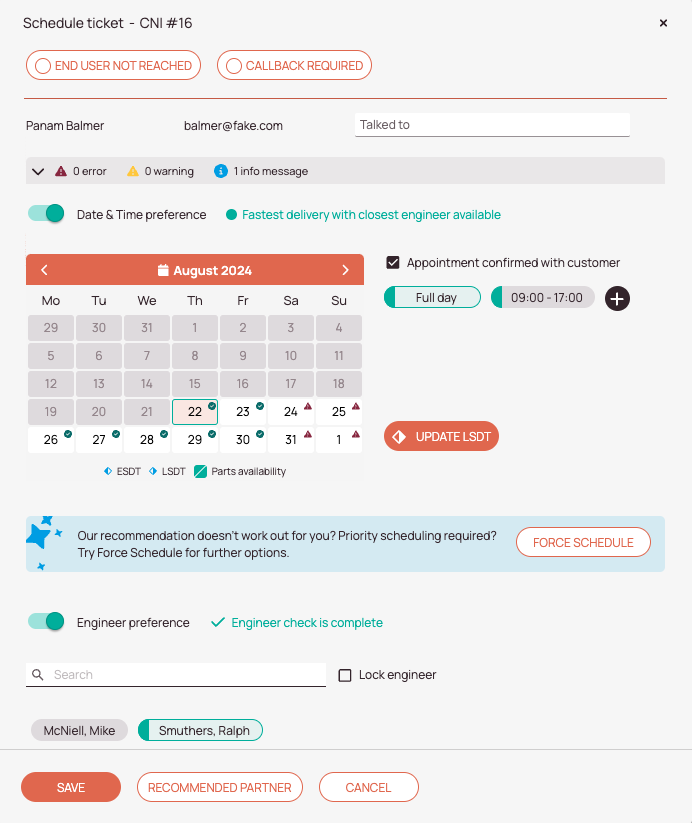
The popover of the Scheduling Assistant opens and you have a variety of options for scheduling the ticket (eg. while you are on the call with a customer). You can drag the popover to other locations with by holding left-click.
-
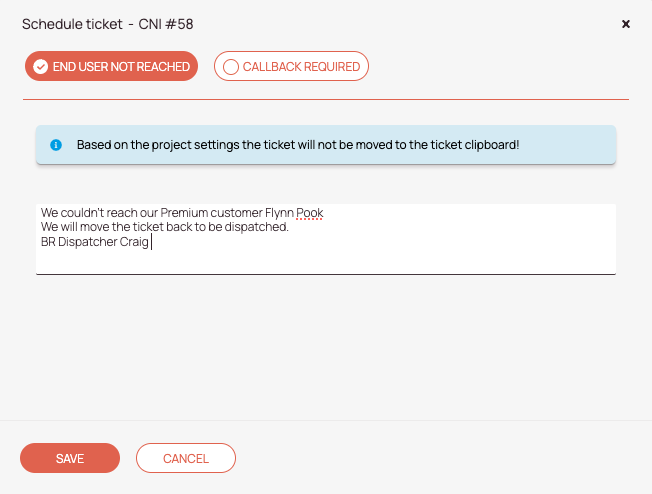
This button should be utilized if the end user couldn’t be reached directly.
Section: You couldn’t reach the customer? -
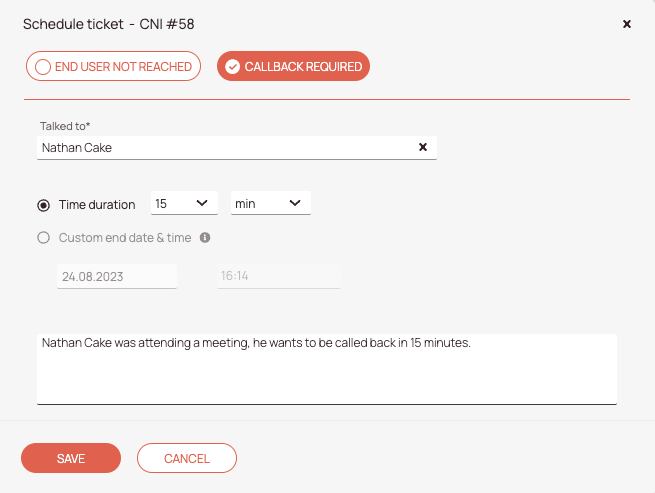
This button should be utilized if the end-user requests a later callback. The ticket will then move to the Ticket Clipboard. Please also note that the Ticket Clipboard behavior is configurable.
Section: Your customer wants to call you back later? -
In the Talked to field, you can enter the name of the person you have called because of the ticket. The Talked to field gets also filled out if you push the Callback required button and enter a name
-
Scheduling Assistant Notifications: The Scheduling Assistant notifications are clustered by error, warnings, and info messages and are supposed to give you insights about the scheduling behavior. The expand arrow lets you expand and detail-view the notifications
-
The Date & Time preference toggle gives you the option to set a particular date & time preference for the ticket/object.
-
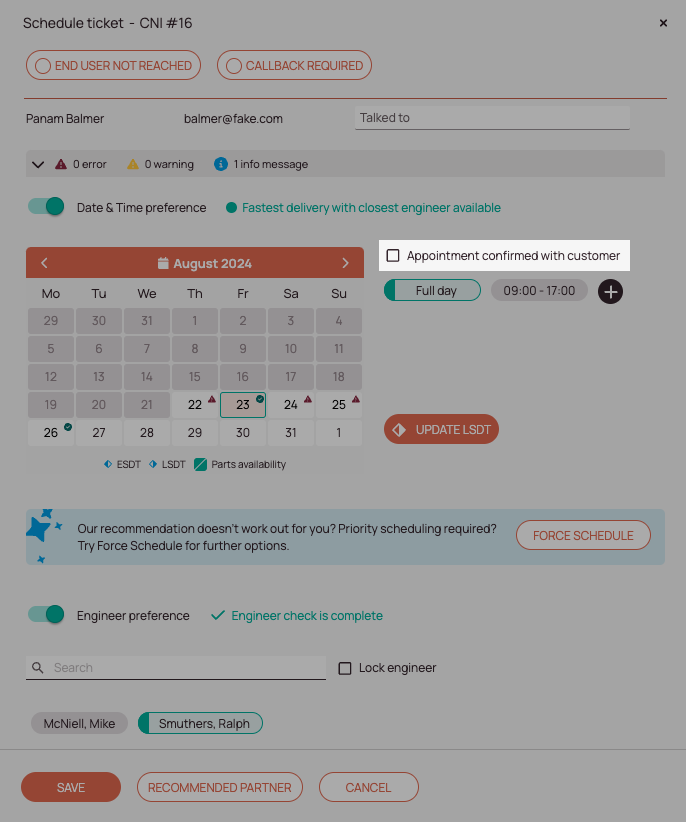
This checkmark lets you switch between the option to enter fixed appointments (where enduser input has been received) and proposed appointments (where customer input has not been received). If the customer didn’t give input, it is smart to choose the proposed appointment option, because the time window is bigger and allows the optimizer to arrange the ticket more freely.
-
You can enter a custom time preference for the ticket by clicking on the plus button.
-
You can pick a date for the ticket in the calendar. The arrows in the upper row of the calendar allow you to switch the month.
-
This button gives you the option to update the Latest Service Delivery time for this appointment.
Learn More: You need/want to update the LSDT? -
The Force Schedule option is useful for urgent tickets that require prioritization for various reasons.
Learn More: You want to prioritize a ticket (Force Schedule)? -
The engineer preference toggle gives you the option to pick the engineer for the ticket. You also can benefit from engineer suggestions from the Optimizer if you turn this toggle on.
-
The search field gives you the option to search for a specific engineer who should process this ticket
-
This checkmark gives you the option to lock/tie a particular engineer to the ticket. Please select an engineer (number 12) first, before clicking the “Lock engineer” button. If an engineer is locked to a ticket, the optimizer will not change the engineer for this ticket anymore.
-
You can pick an particular engineer for this ticket. If the button is highlighted in red, a particular engineer is smartly suggested by the system. This engineer might for example have the right skill-set to successfully resolve this particular ticket. If you see a warning icon it means that the selectable engineer has no availabilities for the particular job. If you see a toolbox icon it means that the engineer has a missing skill/missing skill for this job and is not suitable for this particular job.
-
Save, Cancel, and Recommended Partner buttons. The Save button allows you to save all your set settings for the appointment, while the Cancel button skips back to the selected Work place view. The recommended partner button pops up a choice of potential outsourcing partners, that could work on the ticket instead of your engineers. Partner recommendations are based on cooperation partner/account partner scores. Partner recommendations are sorted by best score first/best recommendation first.
Typical Scheduling Scenarios
You need/want to update the LSDT? (Link)
Fastest delivery with closest engineer available? (Link)
No optimal result available? (Link)
You couldn’t reach the customer? (Link)
Your customer wants to call you back later? (Link)
You want to set a proposed appointment? (Link)
You want to prioritize a ticket (Force Schedule)? (Link)
You want to only assign an engineer? (Link)
A particular engineer should handle the ticket? (Link)
You need to cancel the ticket? (Link)
Your customer proposed you an appointment? (Link)
You need/want to update the LSDT?
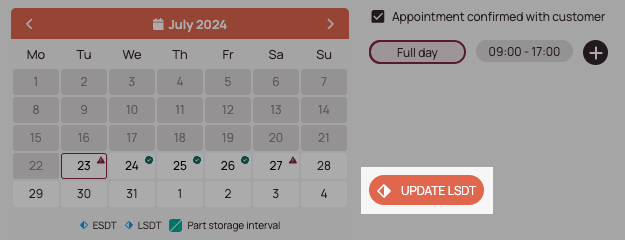
With the Update LSDT button, you can change the LSDT for this particular ticket anytime in case the circumstances of the ticket change.
- Click on the Update LSDT button inside the scheduling assistant.
- You will see the existing LSDT date in gray and the LSDT time in gray and you can configure the new LSDT date and time in the second row.
- Click on the calendar in the second row and select a new date from the calendar (LSDT date field).
- Enter a time in the second cell of the second row (LSDT time field).
- Select a reason from the LSDT update reason drop-down.
- Describe why you updated the LSDT in the LSDT comment field.
- Click Save.
Fastest delivery with closest engineer available?
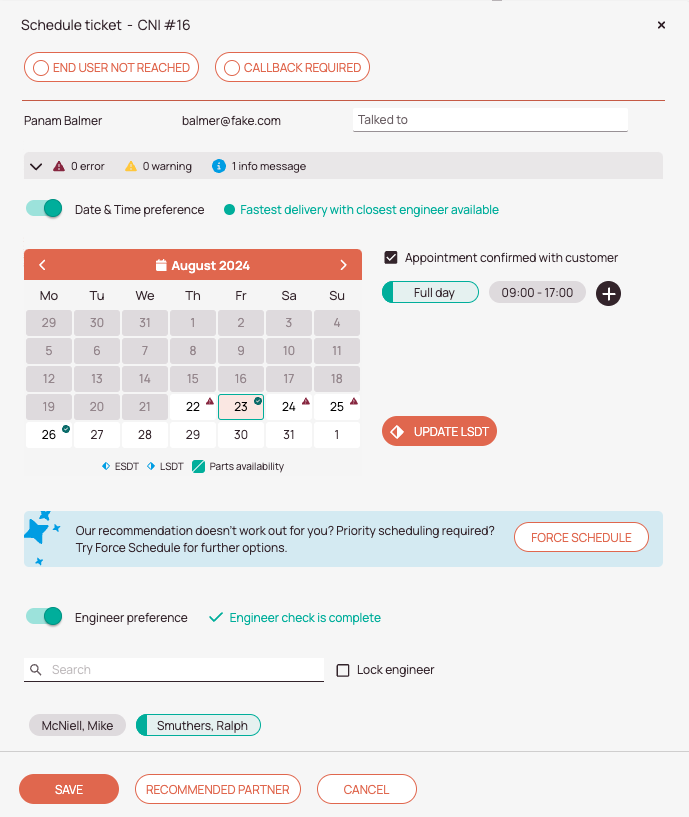
- Red highlights inside and outside the calendar indicate the current selection
- Green highlights inside and outside the calendar display other optimal suggestions that you can select in order to benefit from smart real-time recommendations.
While on the call with a customer you decide to offer options to the customer that are suggested by the system. If the customer agrees to them you are good to go.
- Ask for or suggest date preferences and if there are none select the highlighted date.
- Ask for or suggest time preferences and if there are none select the highlighted time.
By clicking the button right next to the Time you can add a custom time, if, for example, the ticket duration is exceeding. - Select Any Engineer or another highlighted engineer.
- (Optional) – Add the person you spoke with in the Talked to field.
- (Optional) – Lock the engineer.
Locking an engineer means the optimizer will not change the engineer for this ticket anymore and also lets the dispatcher know that this engineer should be assigned to ticket. - Click Save to move the Ticket to PENDING WAIT ONSITE status.
-
When the optimizer proposes a suggestion, the button on the left side has a green mark. The current selection can be recognized by a prominent border. In our case, the scheduler suggests that we pick “Full Day”.
-
When a suggestion is proposed by the optimizer, the button on the left side has a green check mark. The current selection can be recognized by a prominent border. In our case, the scheduler suggests that we pick the “23 August”.
-
When a suggestion is proposed by the optimizer, the button on the left side has a green mark. The current selection can be recognized by the prominent border. In our case, the scheduler suggests that we pick “Smuthers, Ralph”.
No optimal result available?
- Red highlights display the current selection.
- Green highlights display other optimal suggestions you can select to benefit from smart real-time recommendations.
While on the call or before the call with a customer you may decide to pick an appointment manually because there is either no optimized result available or you want to take the decision by yourself. This could be due to the customer has only time at a certain period or has other preferences and wishes for the appointment or due to other business or planning reasons.
- Ask or suggest date preferences and pick a date.
- Ask or suggest time preferences and pick a matching time.
By clicking the button right next to the time you can add a custom time, if, for example, the ticket duration is exceeding. - Select Any Engineer or pick the desired engineer.
- (Optional) – Add the person you spoke with in the Talked to field.
- (Optional) – Lock the engineer.
Locking an engineer means the optimizer will not change the engineer for this ticket anymore and also lets dispatchers know that this engineer should be assigned to this particular ticket. - Click Save.
You couldn't reach the customer?
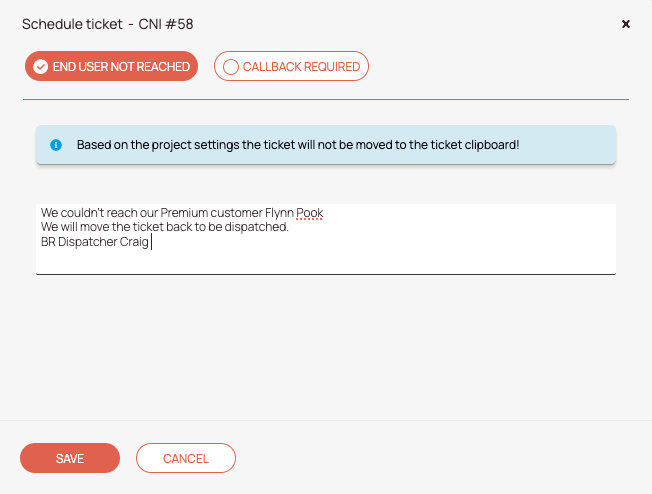
If you fail to reach the customer for whatever reason, you are able to mark it in the ticket by clicking the Customer Not Reached button in the assistant. Do not forget to click Save after doing so. If the Not Reached button is set to on, a log entry in the Call log will also be saved to inform.
Depending on the Call log settings inside the project settings of Admin panel your mileage of what is displayed can vary. Eg. it could be the case that a strike count is active for your project or/and a waiting duration (ticket stays in pending list) is configured. Learn more about the Call log settings.
- Click on the End-user not reached button in the upper row.
- (Optional) Add a comment to describe the situation.
- Click Save.
Your customer wants to call you back later?
If you pick the Callback required button you may be prompted to configure a waiting time, depending on admin-defined business regulations.
If the customer requests a callback, you are able to mark it in the ticket by clicking the Callback required button in the Scheduling assistant and clicking Save afterward. The reason behind this could be business rules (eg. the three-strike rule or other procedures) or that the called person requests the callback. Toggle Callback required to the right in this case.
- Click on the Callback Required button in the upper row.
- Add to whom you talked into the Talked to field.
- (Option 1) Insert a time duration for when the callback is due.
- (Option 2) Insert a custom end date & time for the ticket in order to close it.
- (Optional) Add a comment.
- Click Save.
You want to set a proposed appointment?
If you want to only set a proposed appointment for now, you can uncheck the Appointment confirmed with customer checkbox.
- Uncheck the Appointment confirmed with customer box.
- Ask or suggest date preferences and pick a date.
- Ask or suggest time preferences and pick a matching time.
By clicking the button right next to the time you can add a custom time, if, for example, the ticket duration is exceeding. - Select Any Engineer or pick the desired engineer.
- (Optional) Add the person you spoke with in the Talked to field.
- (Optional) Lock the engineer.
Locking an engineer means the optimizer will not change the engineer for this ticket anymore and also lets dispatchers know that this engineer should be assigned to this particular ticket. - Click Save.
You want to prioritize a ticket (Force Schedule)?
There are some dispatching situations where certain tickets need to be prioritized over others. For example, there may be tickets that need to be handled with extreme urgency. Prioritizing tickets can also be useful when there are no engineers available anymore to handle a particular ticket. For these so-called emergency tickets and for other edge cases, we have introduced the Force Scheduling feature.
- Compared to the default scheduling, existing tickets can be replaced on the Timeline instead of being moved or placed differently by the Scheduling Assistant.
- You can control access to Force Schedule and Scheduling Assistant inside Permissions.
- The Force Schedule feature ignores locked tickets, so you may want to unlock some tickets on the Timeline first to get better recommendations.
- If there was already a locked engineer on the ticket and the Force Schedule feature is used to select another engineer, the engineer lock is automatically removed from the current engineer and automatically applied to the newly selected engineer.
- The Force Schedule feature proposes a ranking list and prioritizes spots on the Timeline that do not send other tickets on the Timeline back to the Ticket Pool.
- The Force Feature Schedule feature smartly ranks suggestions higher that will generate lower distances and lower driving times.
- There is always one suggestion per engineer provided by the Force Schedule feature.
- The Force Feature Schedule compares driving times and driving distances and displays the driving time difference and driving distance difference directly in the table. Values can be positive or negative, depending on the result of the Force Schedule feature.
If Driving times or Driving distances are reduced the value inside the driving time or the driving distance is a negative value.
If Driving times or Driving distances are increased the value inside driving time or the driving distance is a positive value. - The ranking table compares the current Timeline to the expected Timeline and displays the difference.
- Tickets that have to be moved back to the Ticket Pool due to the Force Schedule contain ticket information indicating the fact of being moved back.
- Only suggestions are provided for tickets not yet being actively processed (=Start Drive) by the engineer (-> up until the default status: Published)
- As soon as an engineer starts driving to a ticket location, the ticket is no longer suggested to be replaced by the Force Schedule feature.
- The Force Schedule feature will send a max. amount of 5 tickets back to the Ticket Pool, not more.
- Click on the Force Schedule button.
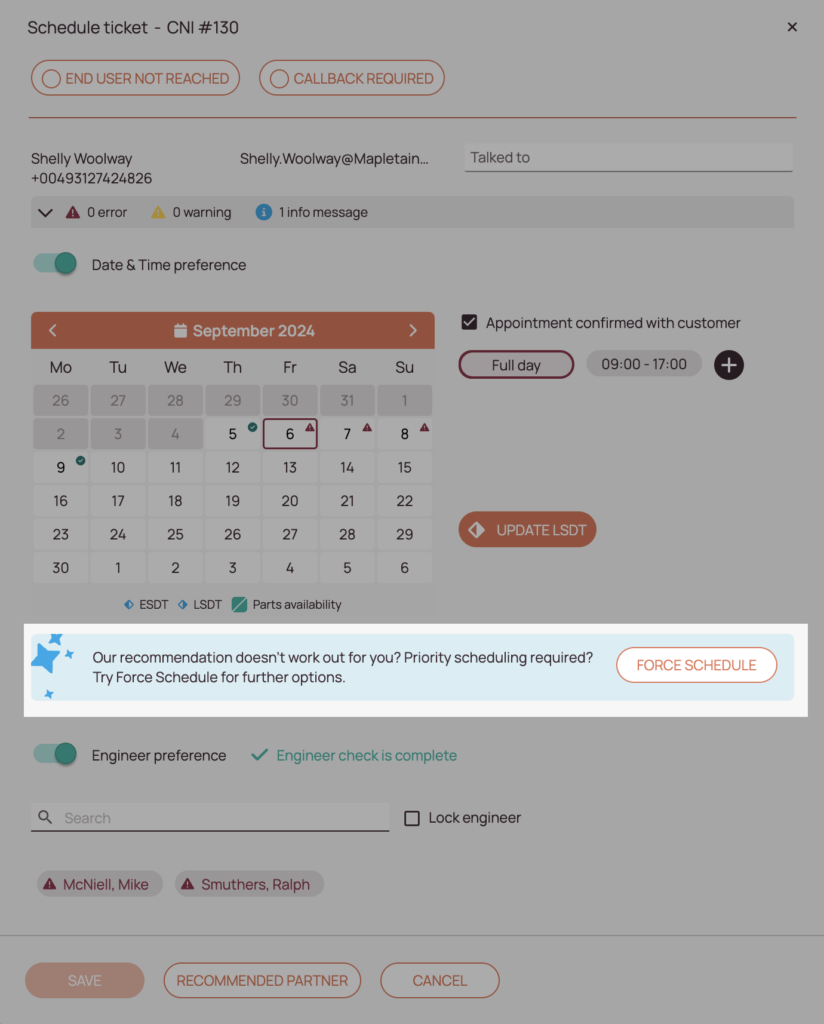
- A recommendation table should appear with different suggestions comparing driving time and distances between each other and indicating which tickets will be sent back to the Ticket Pool if you would check that option.

- Pick the option that makes the most sense for your dispatch day, usually, you should aim to pick the one with rank #1, because it has the least negative impacts overall. In our example, we achieve negative driving time and negative driving distance compared to the previous Timeline arrangement. This indicates that we are actually saving time and kilometers overall by force scheduling this particular urgent ticket.
- (Optional) – You can double-check all affected tickets by clicking on the CNI(s) inside a suggestion to open up the Ticket Details and investigate those tickets.
- Click on the Save button to finish the force scheduling process.


You want to assign an engineer only?
If you want to assign only an engineer via the Scheduling Assistant, you have the possibility to do so.
Short side note: You are not forced to configure date and time preferences through the Scheduling Assistant when configuring an engineer preference.
- Ensure that the switch for Engineer preference is switched on.
- Select the engineer that should be assigned to the ticket.
- (Optional) – Lock the engineer. Locking an engineer means the optimizer will not change the engineer for this ticket anymore and also lets dispatchers know that this engineer should be assigned to this particular ticket.
- Click Save.
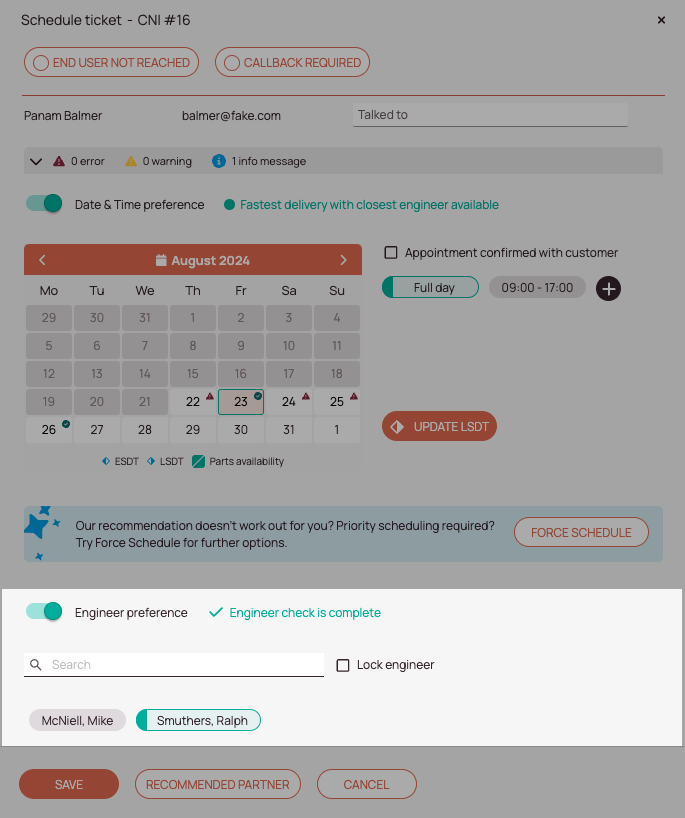
A particular engineer should handle the ticket?
That’s where the Lock Engineer functionality comes in handy. You can lock engineers to tickets generally when processing a ticket inside the scheduling assistant. Locking a particular engineer means the optimizer will not change the engineer for this ticket anymore and also lets dispatchers know that this engineer should be assigned to this particular ticket. There are currently two ways to lock an engineer, either via the checkbox Lock engineer (shown below) inside the engineer preference section or by using the assign engineer-only radio button.
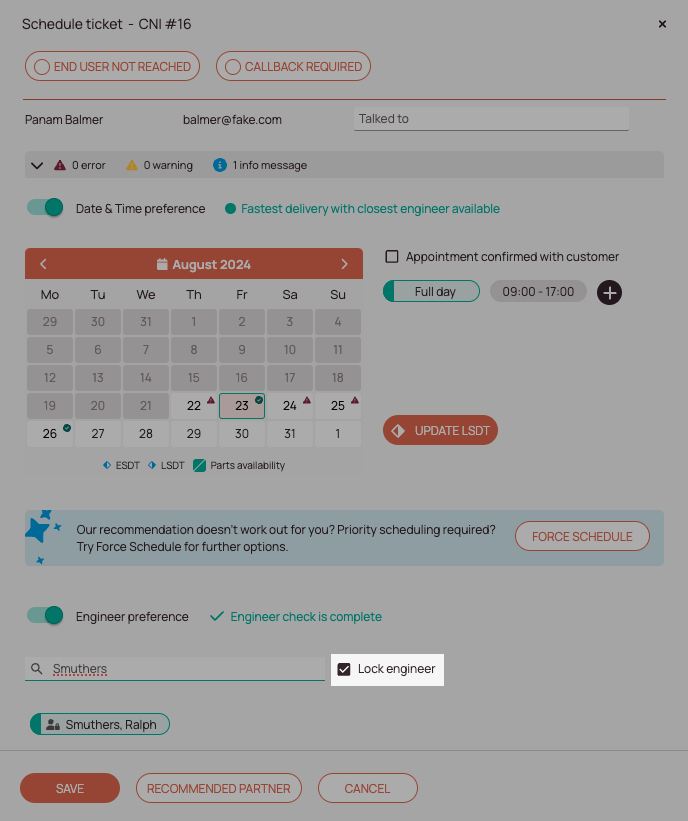
You can lock engineers to tickets when using the dedicated Lock engineer functionality:
- Select/Search for the engineer inside the engineer preference section.
- Afterwards check the Lock engineer checkbox.
- You should realize that there is a new icon (locked person) on the engineer you just have locked.
- Click Save.
That an engineer is locked to a ticket is also visible inside the Map and Ticket Details with the locked person icon.
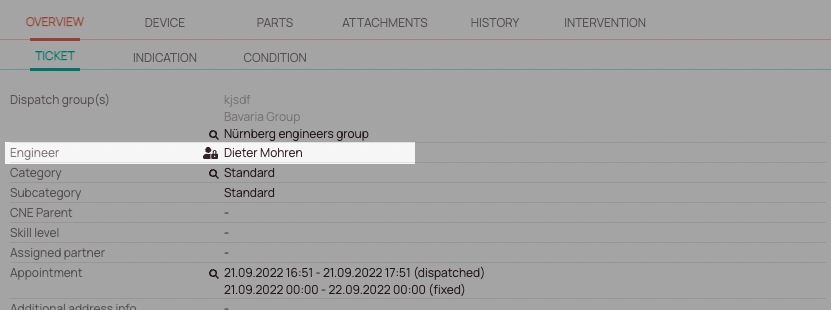
You need to cancel the ticket?
Sometimes an appointment or a ticket has to be canceled due to various reasons. You are able to cancel a ticket, but this is generally not done via the Scheduling Assistant. You do it inside the Ticket Details where you push the Cancel or delete appointment buttons depending on your use case. A call log entry in the history will be created and saved automatically based on the cancellation reason to inform others.

Your customer proposed you an appointment?
If the Customer Portal is configured so that customers can book appointments (done via Automated Actions), ticket requestors can book ticket appointments. Appt. are displayed in the Ticket Details and the Scheduling Assistant.
5 out of 5 stars
1 rating
| 5 Stars | 100% | |
| 4 Stars | 0% | |
| 3 Stars | 0% | |
| 2 Stars | 0% | |
| 1 Stars | 0% |
