Tip: You can use filters for better results
-
Latest News
-
Getting Started
-
Work Place
-
-
-
- About Buttons
- Action Buttons
- Schedule Tickets
- Ticket Info and COMS Buttons
- Add Parts
- Assign Partners
- Remove Tickets from the Ticket Clipboard
- Inline Skill Editing
- Create Intervention Info
- Create Intervention Reports
- Cancel Tickets
- Cancel Appointments
- Clone Tickets
- Edit Ticket Details
- Edit Privat Notes
- Report Tickets
- Close Tickets
-
Admin Panel
-
FMA 2 App
-
Customer Portal
About Partner Accounts
Partner accounts typically assist the regular account with ticket services on the field (usually under a subcontract agreement). They can be either Fieldcode users themselves or can be account partners that use a different interface to receive tickets (Email) and provide reports (Partner Portal). They both count as Partner Accounts, they just use different interfaces.To learn more about how partners are utilized inside the Work place check out the Partner Settings Explained topic.
Account partnership -> Connection inside the same account
Cooperation partnership -> Connection between different Fieldcode Accounts!
Account Partner: Connection inside the same account!
-> Account Partners can either rely on the Fieldcode system OR
-> Account Partners can alternatively rely on receiving tickets via email and doing the reporting via the Partner Portal
Cooperation Partner: Connection between different Fieldcode Accounts!
System Connection: Connection between Fieldcode system and third-party system!
Account Partners have the following characteristics:
- They login into the same Fieldcode Account as the contractor company
- The tickets are the same tickets as for the contractor company, the main difference is that partners have only view rights for assigned partner tickets
- They can work on tickets in the same way a contractor company would work on the ticket
Cooperation Partners have the following characteristics:
- They login into a different Fieldcode Account as the contractor company
- The tickets are the same tickets as for the contractor company, the rights are self-determined, tickets get synchronized, when work on the ticket starts
- The cooperation requestor sends a cooperation request to the potential partner via the Partner configuration menu inside Fieldcode Admin Panel
- The cooperation partner provides the partner business key to the requestor, which can be found below the header inside the Partner configuration menu
- The cooperation requestor receives an email with a 7-digit PIN code, that code must be entered inside the corresponding Partner configuration menu item
- They can work on tickets in the same way a contractor company would work on the ticket
- The system connection requestor uses a third-party accounting system
- The Fieldcode system and Account is the contractor system
- The third-party account system is the subcontractor system
- The purpose of a system connection is to establish a connection from an external system and your Fieldcode Account to pass data between the two systems
- After a system connection is created it needs to be mapped out so that data gets sent to the correct endpoint.
- Solution engineers can easily help you with arranging the system connection, NO CODING IS REQUIRED.
Partner Account users are created in the same way as regular users. You have to go to the Fieldcode Admin Panel -> Access -> Users and create the user as usual.
While creating the partner user you just check the checkbox “Is the user an External Partner?” in addition. Select the partner company afterwards.
The Partner company has to be created first inside Fieldcode Admin Panel -> Access -> Partners
Yes, that’s possible.
Select the user you want to convert inside Fieldcode Admin Panel -> Users and check the checkbox “Is the user an external partner?”.
Select the partner company afterwards.
Inside the Fieldcode Admin Panel go to Interfaces -> Cooperations.
You can view your own business key there and share it with potential cooperation partners. The business key is located under the heading in the list view.
From there you can also request a cooperation with another partner.
You can also confirm cooperations by entering a special partner PIN, which you would receive by email.
Partners are a group of partner engineers or partner dispatchers that assist regular dispatch groups or engineers
in fulfilling their service (eg. sub-contractors).
- Partners are able to use and utilize the Fieldcode software.
- Partners have specific view rights inside Fieldcode that ensure privacy:
A partner can be part of a dispatch group, but a partner itself will only see his tickets (not the tickets of the whole group!). - Partners are always a part of a customer account (roof company).
- Partners can be assigned from the Ticket Pool and Ticket Details.
- Partner engineers can be identified in the Timeline by their names written in: italic typography.
- A partner has to belong to a specific partner company that needs to be configured inside the Fieldcode Admin Panel
- Partners are not able to use the Optimizer.
- Partner users can only view partner engineers of a Dispatch group in the Timeline.
- Unassigning a partner results in tickets being moved back to the Ticket Pool.
The partner selection is limited to matching partners who are actually inside the area of the dispatch group.
Partner areas are configured inside the Partner configuration menu inside Fieldcode Admin Panel to make the partner selection for the dispatcher easier.
If you do not define a partner area for the partner it will remain selectable for every dispatch group.
Another reason why groups do not show up could also be related due to wrong configured filters.
Partner areas can be defined inside the Partner configuration menu when you select the Account Partner item and assign an area from there.
It is not done inside the Partners menu. The partner menu only lets you configure the general location of the partner company.
If you define partner areas inside the Partner configuration menu, only location-relevant partners will be displayed to dispatchers.
This will make the partner selection easier for dispatchers.
Partner company location = General definition of partner company, can be assigned to every engineer in the dispatch group
Partner company area (or other filters, eg. project) = Precise definition or partner operation circumstances, can be eg. assigned to overlapping dispatch group areas.
Let’s assume you have Account Partners, Account Partners without Fieldcode system, Cooperation Partners and system connections. Not only is your service network absolutely incredible in this case, but with all those types of “partners” it can be confusing to know what to configure where and how what affects what.
Therefore we would like to give you a brief summary over here:
- A user can be converted to a account partner user inside Access -> Users -> by switching the “External Partner” toggle to the right.
- Account Partners are configured under Access -> Account Partners.
- Account Partners that do not use the Fieldcode system are configured under Access -> Account Partners -> by switching the “Partner Portal” toggle to the right.
- Cooperation Partners are configured under Access -> Cooperation Partners.
- Direct connections (=System connections) are configured under Interfaces -> System Connection.
- Partner areas are configured inside Partners -> Partners configuration.
Important: Partner locations are not the same as Partner areas. - The Partner configuration menu also has the purpose to list and edit all your different partners (which can differ by partner type) one-by-one.
Accessing the Partner Accounts Page
Navigate to Access → Partner Accounts to configure/edit partner accounts.
Searching for Partner Accounts
How to search:
- Navigate to Access → Partner Accounts.
- Use the search bar at the top of the account partner list.
- Enter any of the following:
- Partner Account Name
- Email address
- ID
- Status (e.g., active, inactive)
-
As you type, the list will automatically filter to match your query.

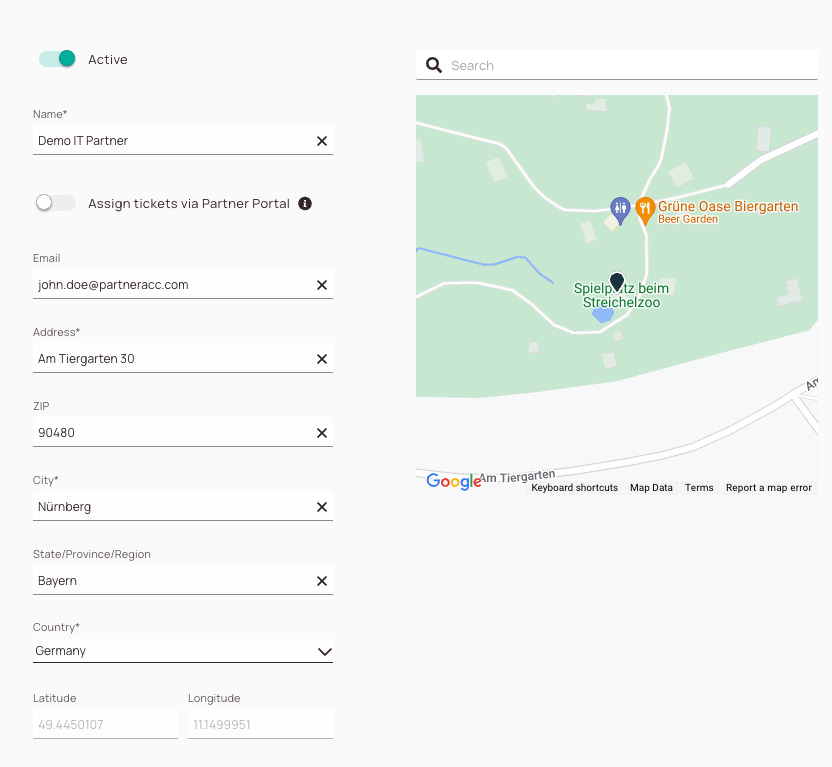
Creating/Editing Partner Accounts
- Go to the Admin Panel -> Access -> Partner Accounts.
- Click on the plus button.
- Add or edit the name of the partner company in the name field.
- (Optional) Switch on the “Assign tickets via Partner Portal” if you want that for this account the assigned tickets should be resolved via the Partner Portal.
Important: This switch needs to be enabled on the Account Partner’s side. Learn more about the Partner Portal. - Add or edit the partner company email address.
- Add or edit the address of the partner company either manually or automatically (both described below).
- (Optional) Add or edit the ZIP of the partner company.
- Select the country of the partner company from the drop-down.
- Wait until the system validates the address.
- Click Save.
Search for location automatically
- In the search field enter a new address or edit the current one.
- Click Enter to confirm the entered address.
- The manual fields will fill in automatically if the system recognizes the address.
- Click Save.
Search for a location manually
- Add or edit the address of the partner company in the address field.
- (Optional) Insert or edit the ZIP of the partner company in the ZIP field.
- Add or edit the city of the partner company in the city field.
- (Optional) Insert or edit the state/province/region of the partner company.
- Select or edit the country from the drop-down, where the partner company is located.
Should you define partner areas - and if yes - how?
The partner menu is there to configure a partner main location (eg. HQ).
Partner areas can be defined inside the Partner configuration menu when you select the Account Partner item and assign an area from there.
If you define partner areas inside the Partner configuration menu, only location-relevant partners will be displayed to dispatchers.
This will make the partner selection easier for the dispatchers.
- Partner company location = Fixed location (eg. HQ) of the partner company.
- Partner company area (or other filters, eg. project)=Operational zone of the partner company. Dispatchers will get matching partner suggestions, if an area is configured.
Overlapping areas are also considered for the partner suggestions.
0 out of 5 stars
| 5 Stars | 0% | |
| 4 Stars | 0% | |
| 3 Stars | 0% | |
| 2 Stars | 0% | |
| 1 Stars | 0% |