Tip: You can use filters for better results
-
Latest News
-
Getting Started
-
Work Place
-
-
-
- About Buttons
- Action Buttons
- Schedule Tickets
- Ticket Info and COMS Buttons
- Add Parts
- Assign Partners
- Remove Tickets from the Ticket Clipboard
- Inline Skill Editing
- Create Intervention Info
- Create Intervention Reports
- Cancel Tickets
- Cancel Appointments
- Clone Tickets
- Edit Ticket Details
- Edit Privat Notes
- Report Tickets
- Close Tickets
-
Admin Panel
-
FMA 2 App
-
Customer Portal
Editing & Publishing Workflows
Do you need a red thread because you want to successfully edit workflows for the first time? In this topic, we will illuminate the entire process and refer you to the matching sections for further details to get you started.
You will learn how to:
- Version Knowledge/Editing Requirements
- Editing Access Requirements
- Creating Temporary Versions
- About Editing Existing Versions
- About Workflow Editing
- Node Creation/Deletion
- Configuring Node Jumps
- Configuring FMA App Alerts (for now with Support only)
- Configuring Appearances
- Configuring Buttons
- Configuring Automations
- Configuring Guides
- Configuring Translations
- Connecting Nodes
- About Workflow Testing
- Solving Validation Errors
- Testing Workflows
- Adding Test Objects
- Running/Fixing Test Objects
- About Publishing New Versions
- Publishing New Versions
Legend:
Start Users = Green
Business/Enterprise Users = Blue
Try to stick to the following scheme to avoid misconfiguration: Edit -> Validate -> Test -> Publish
In general, we recommend adapting existing workflows, like the basic one, to your business requirements. That way, you already have a solid structure to start off from.
1. Version Knowledge/Editing Requirements
You can learn more details about the versioning in the matching topic. Nonetheless, here are some key points to keep in mind when it comes to getting started with editing workflows:
- Published versions can not be edited.
- Only temporary versions are editable.
- When you are editing/drafting a workflow, the version number field remains empty inside the Workflow designer/Workflow designer table view.
- Editing a workflow automatically creates a temporary version.
- Temporary versions can be checked out by pushing the Publish button.
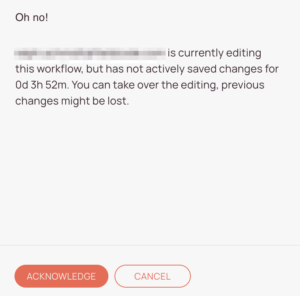
- Only one person at a time can edit a workflow.
- If someone else is currently editing a workflow, the hand icon is visible in the workflow table.
- To ensure that workflows do not remain permanently uneditable (e.g. because an employee is currently sick/on vacation, etc.) and the business could be threatened, we have set up a one-hour barrier. After an hour, someone else can take over editing. A counter also shows the time span since the last edit when you try to take over.
- Free users:
– Are allowed to edit workflows in a limited way. - Business/Enterprise users:
– Are allowed to fully edit workflows.
– Are allowed to add and delete nodes.
– Are allowed to clone workflows.
Please contact the person who made previous edits before you simply take over his/her edits.
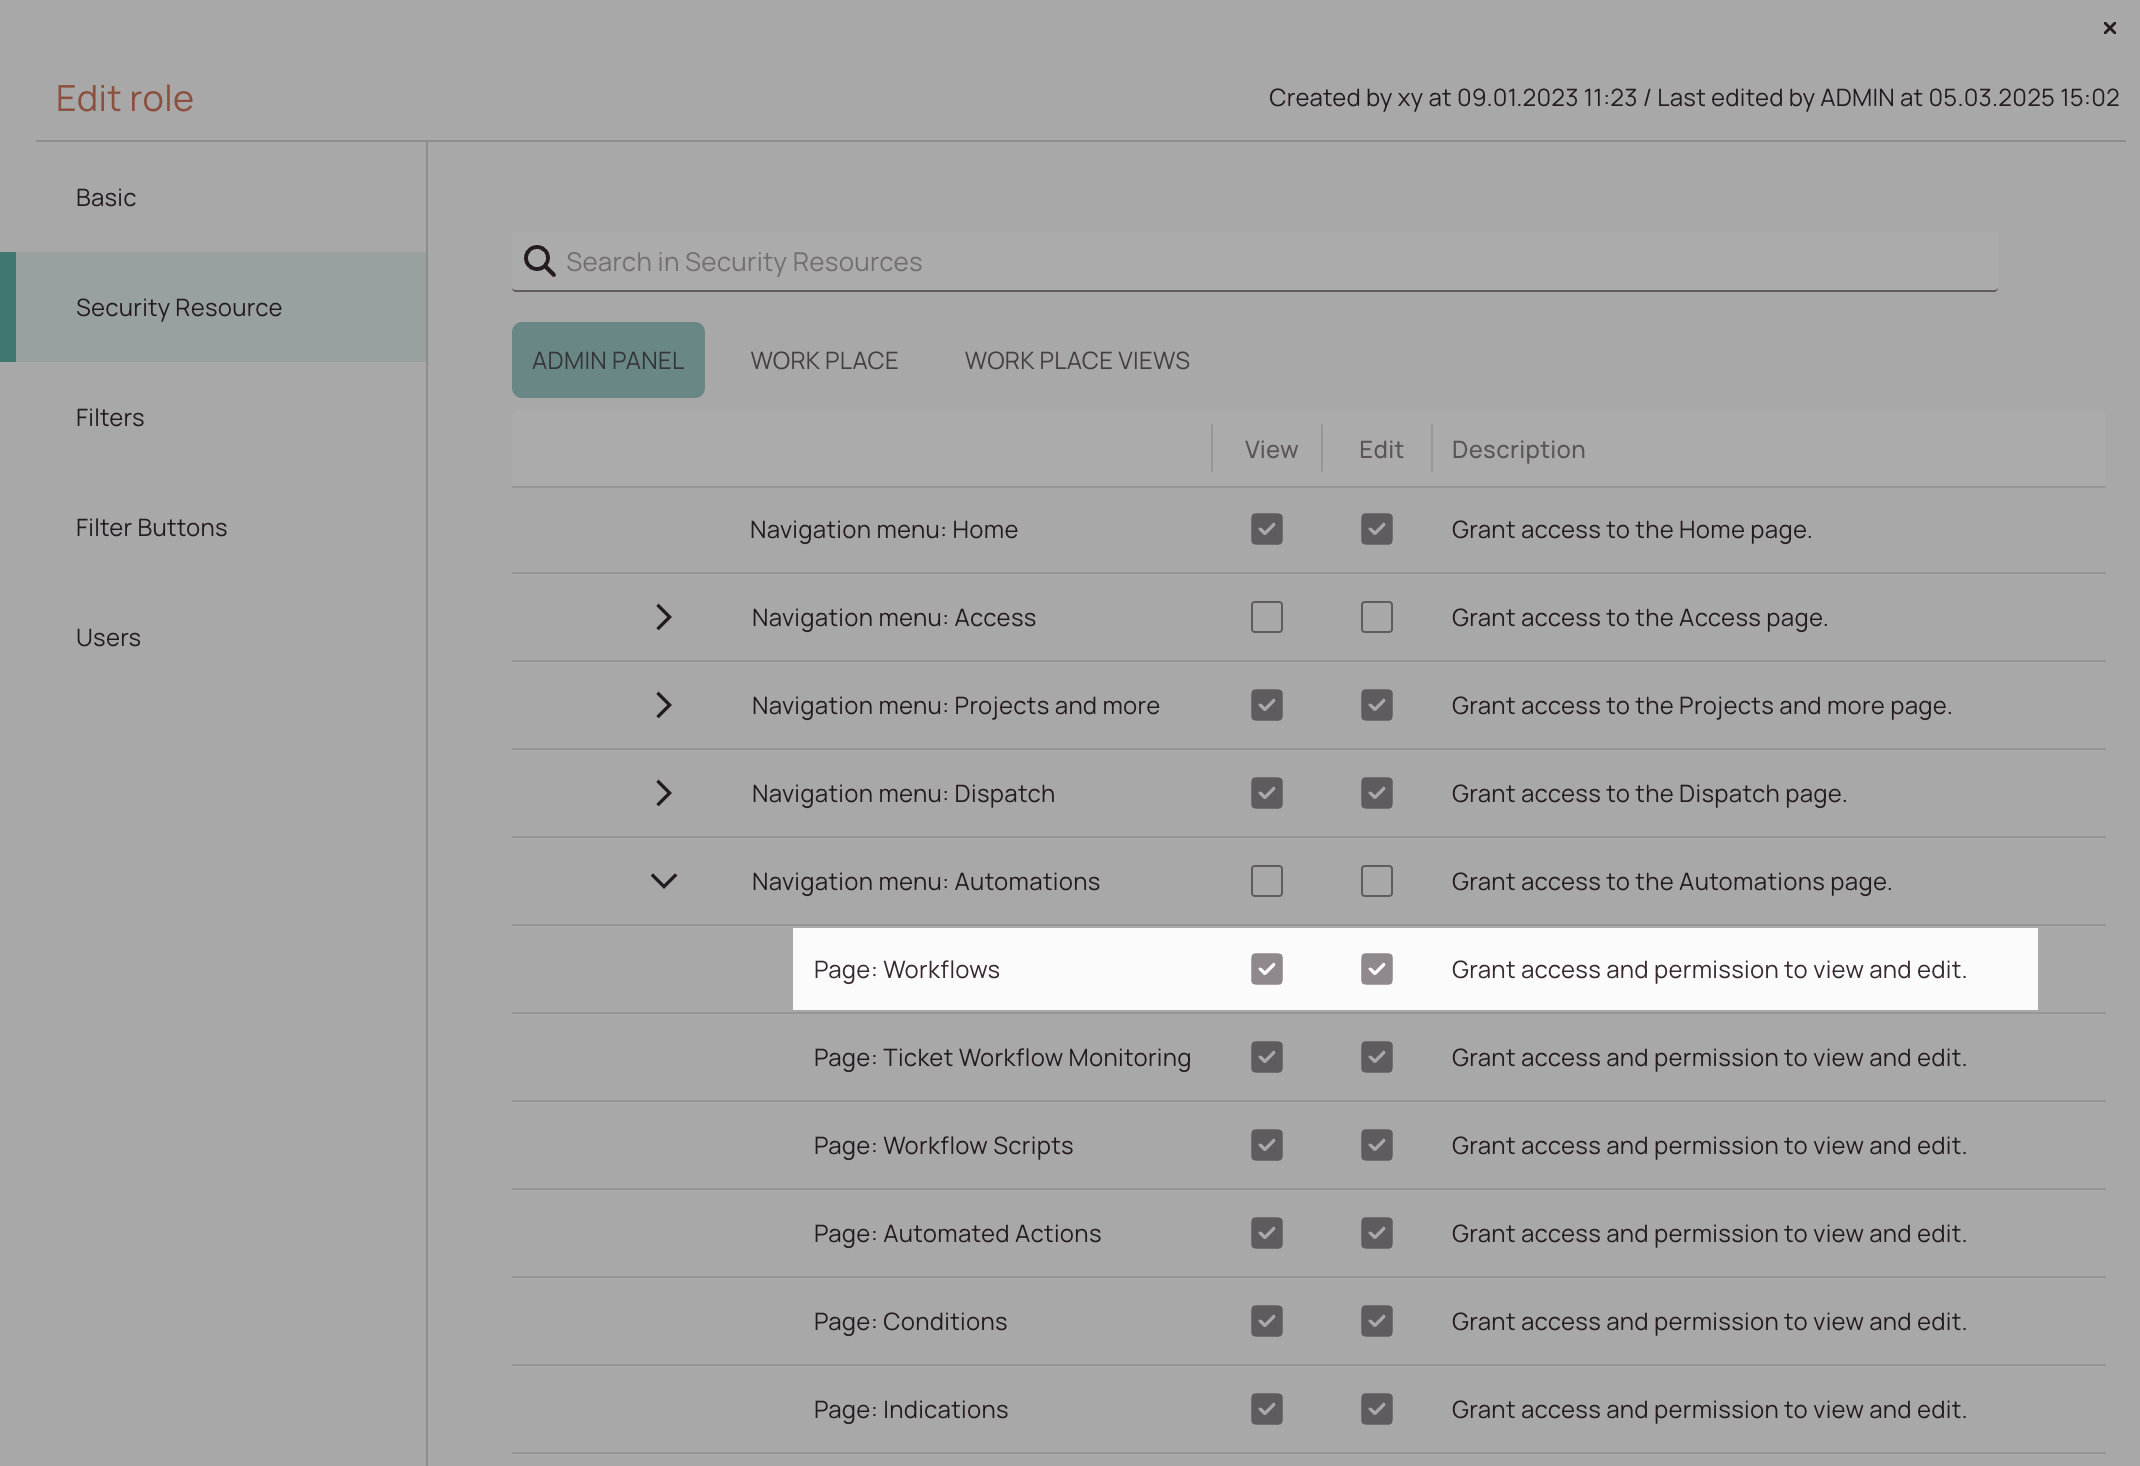
1.1. Editing Access Requirements
- The user who wants to edit must have View and Edit permissions for the Workflows page.
- Permissions for the Workflows designer can be activated via:
Admin panel/Permissions/Security Resources tab/Admin panel/Navigation menu: Automations/Page: Workflows
1.2. Creating Temporary Versions
- Inside the Workflow table view, click on a workflow that you want to edit/adapt to your requirements.
- The workflow opens up.
- Click on the Edit button.
- You have now successfully created a temporary version, with your user name assigned to that temporary version.
- Now you could start with editing the workflow.
- If you click on the close button, you will notice that the temporary version has no version number yet, and is grabbed by you.

1.3 About Editing Existing Versions
- Published versions are non-editable.
- Temporary versions are editable.
Therefore, to edit existing versions, you are always required to create a temporary version first which you can then publish afterward.
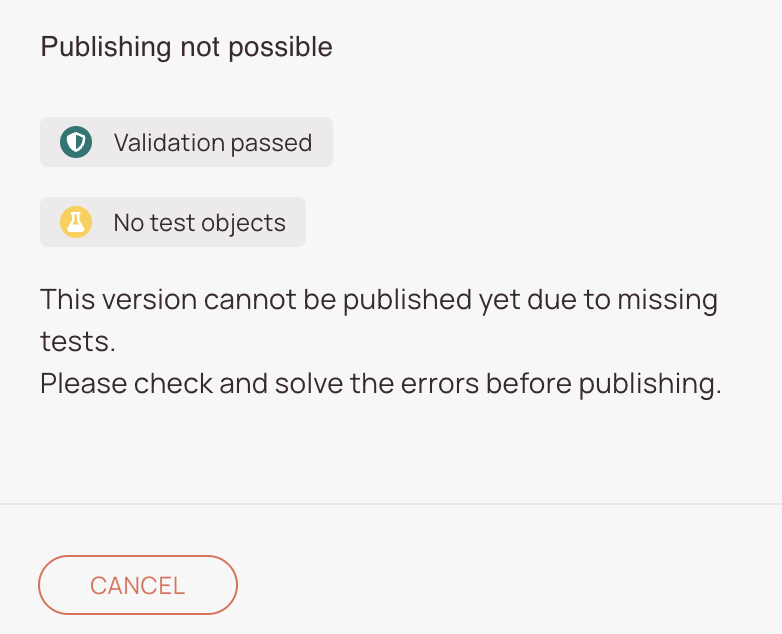
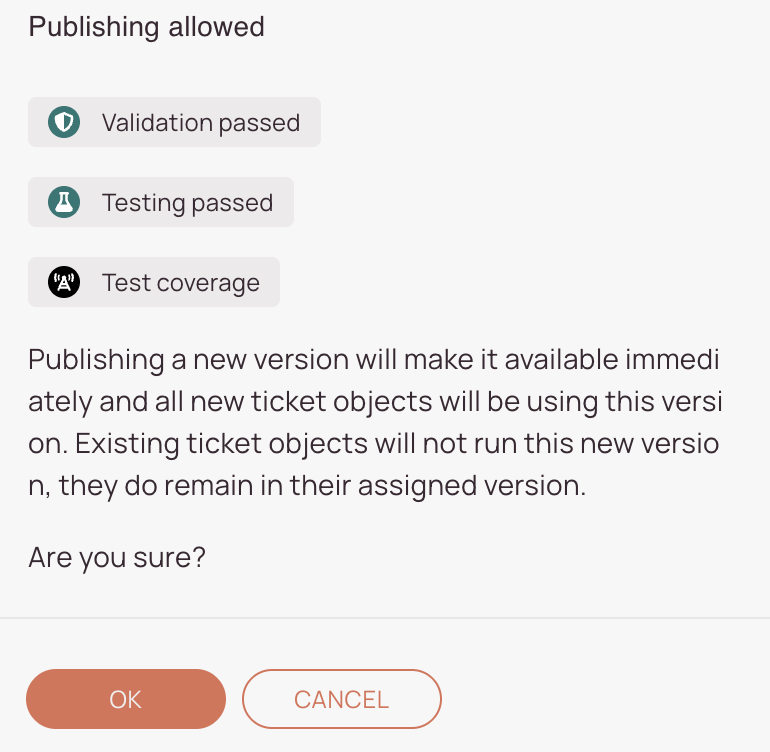
After doing your edits, you can check in this version. You can only check in a new version if the validation has passed and the testing has passed as well.
We have implemented this version control as a layer of security, so you can draft your workflow with no negative impacts on live environments because the already published workflow is still operating as intended while you are drafting your new temporary version.
As soon as you decide to publish your edits, the version number will increase, and new objects will use the updated workflow. Old objects will remain in the system; however, if you really want, you could push them to the updated root status by using the add test objects option and selecting the ones that should use the new workflow from scratch.
2. About Workflow Editing
Workflows can be configured in a variety of ways. The Workflow designer gives you almost unlimited possibilities to create and realize your workflow. Think of the Workflow designer as a big sandbox that may overwhelm you at first with all its configuration options, but once you’ve mastered it, it can take your entire business to the next level of productivity. In the following section, we will take a look at some of the possibilities offered by the Workflow designer. We will only cover some very basic examples and invite you to experiment yourself to achieve your individual small or bigger goals. If you know your overall goal, you can use it to take your business to the next level.
2.1. Node Creation/Deletion
Imagine you see a large and mighty sandbox castle in front of you, protected by a high wall and numerous towers, and inside is a pompous castle. But the king is not yet satisfied with his castle, he wants to enlarge it. He wants to add an extra warehouse to the castle, but to do that, part of the existing wall has to be demolished and then rebuilt around the new warehouse. The new wall should also include an additional defense tower. In this metaphor, the new tower is a node. The new warehouse is a custom form, and the custom button is the warehouse door.
In the beginning, Fieldcode created the base workflow structure. You might be quite happy with this basic structure and just want to add a button here or there, or change a status here or there.
You can first take a look at how to create a new node, as this is generally a good basis for further steps.
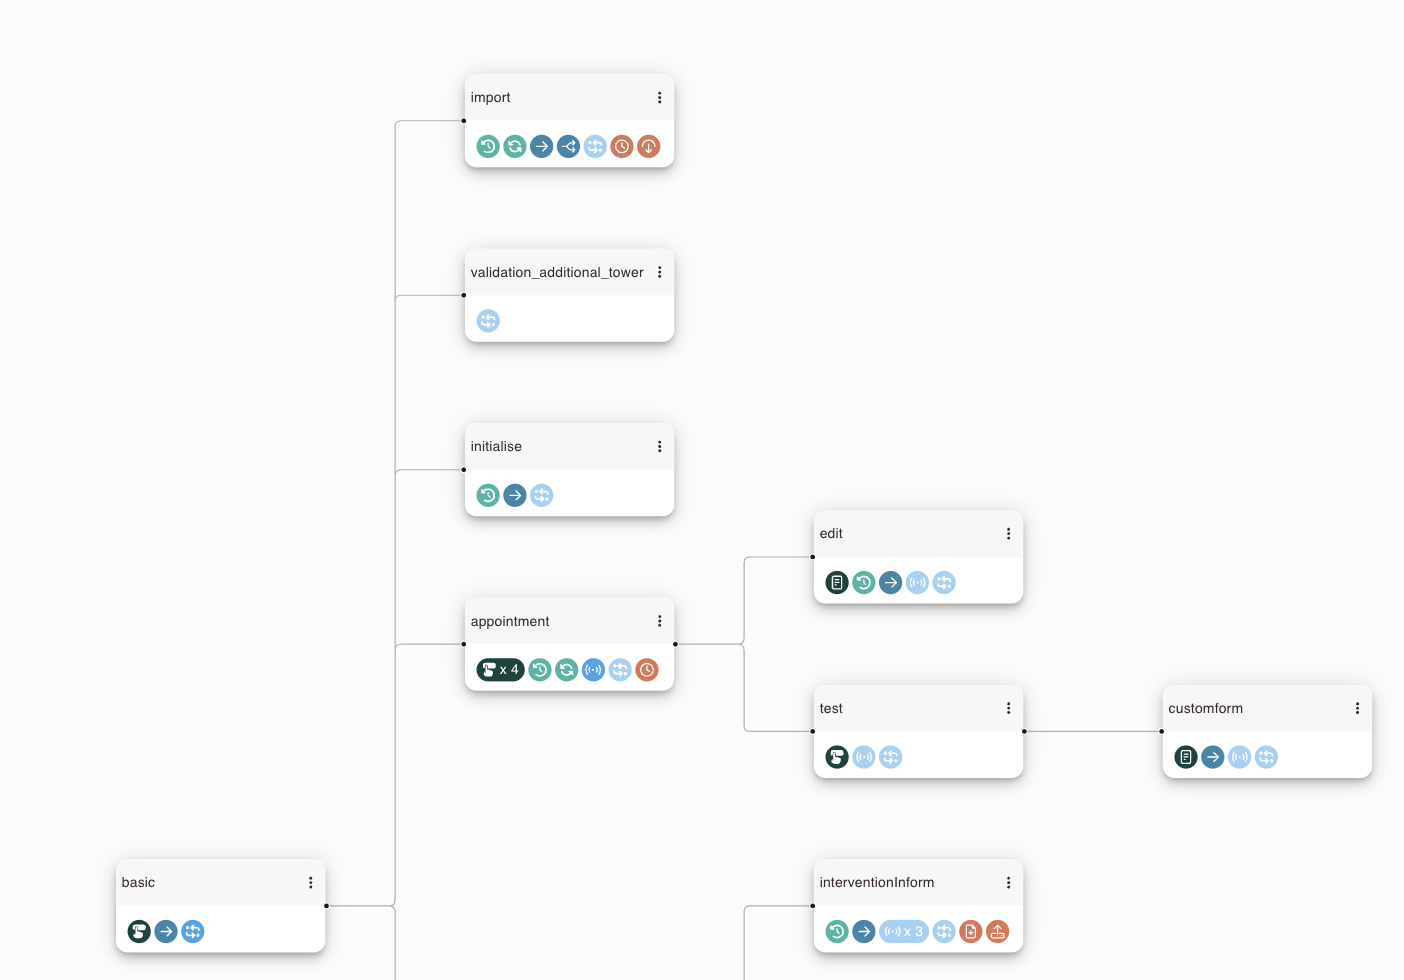
The new node needs a name and a location. We will create a new node under the Import Node.
We are calling this new node “validation_additional_tower".
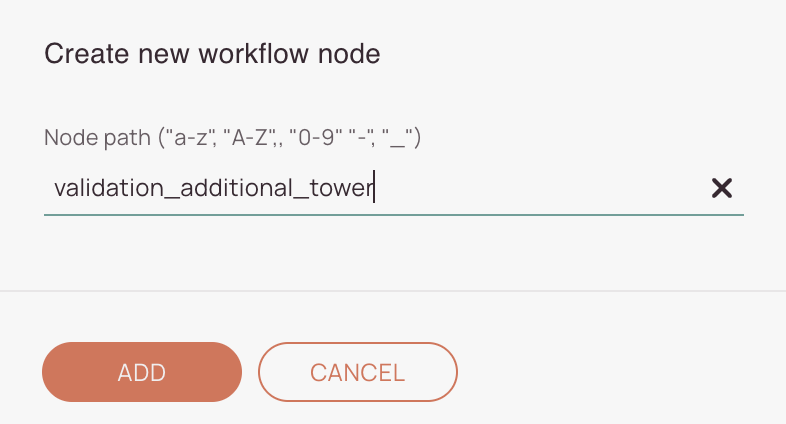
The new node is born! The next steps will be to give the new node some purpose in the workflow cycle!
2.2. Configuring Node Jumps
The castle is guarded by multiple guards. One guard regularly patrols in a circle along the castle wall. But sometimes there are troublemakers in front of the castle, and the guard has to quickly rush to a specific tower to support his fellow guards. This special route of the guard is the jump node. The regular patrol route from the first tower to the last tower is the workflow.
Jump button: You have the option to define an exceptional node process that will not follow the sequential path, but will jump to that node and back where it came from.
2.3. Configuring FMA App Alerts
Sometimes a guard has to blow into the horn to alert other gardists.
Alert field: Default Fieldcode setting to display pop-up alerts (mainly relevant for FMA app). Alerts cannot be edited or removed. You can contact the support if you need to make alarm edits or remove alerts.
2.4. Configuring Appearances
The tower has just been completed and the two-sided connection to the castle wall will soon be made. The warehouse is not yet standing at all, but the king already wants the surrounding towns to hear about the expansion of his castle. In our word picture, this would be a history entry that would appear in the Ticket details/X-details so that other users can understand that this step is happening.
Let's create a history entry for our new step. That can be done in the Appearances section by clicking the plus button, selecting a function, and inputting a message.
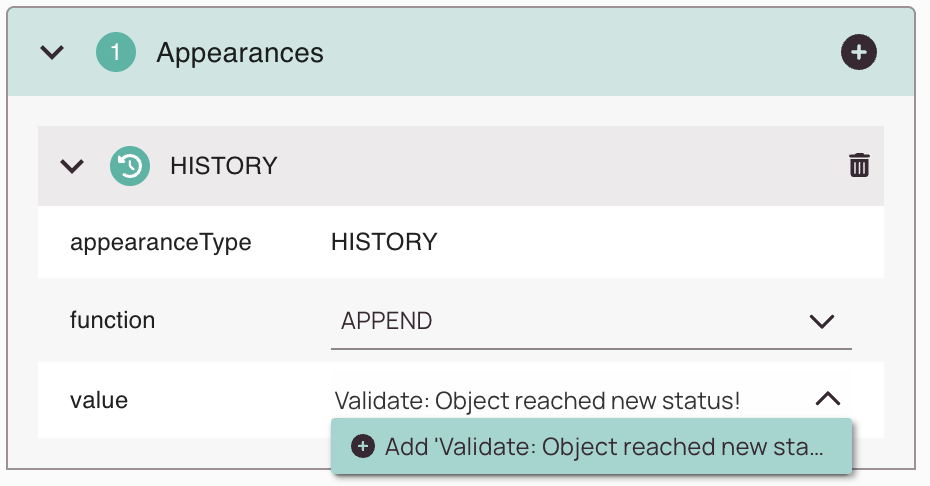
You can take a look at the appearances section to learn more about them.
2.5 Configuring Buttons
In Preparation!
2.6. Configuring Automations
In Preparation!
2.7. Configuring Guides
In Preparation!
2.8. Configuring Translations
In Preparation!
2.9. Connecting Nodes
In Preparation!
3. About Workflow Testing
In Preparation!
3.1. Solving Validation Errors
In Preparation!
3.2. Testing Workflows
In Preparation!
3.3. Adding Object(s) for Testing
In Preparation!
3.4. Running/Fixing Test Objects
In Preparation!
4. About Publishing New Versions
In Preparation!
4.1 Publishing New Versions
In Preparation!
0 out of 5 stars
| 5 Stars | 0% | |
| 4 Stars | 0% | |
| 3 Stars | 0% | |
| 2 Stars | 0% | |
| 1 Stars | 0% |