Fieldcode Manual

Tip: You can use filters for better results

The Fieldcode Optimizer automatically schedules and ranks tickets and is a great feature for dispatchers because it simplifies the dispatcher’s daily work.
Before using the optimizer admins may want to configure optimization behavior to meet company/business requirements.
The optimization behavior can be customized inside Fieldcode Admin Panel -> Dispatch Groups -> selecting a group -> Optimization tab.

The optimization behavior can be customized per dispatch group. You can create custom profiles and use the profiles differently depending on the usage scenario. 
You can fully customize the route optimization preferences, time window parameters for tickets, PUDO appointment scheduling behavior, Skills requirement consideration, and/or apply the optimization only on individual tickets (filters) and many other options.
The optimization behavior can be customized inside Fieldcode Admin Panel -> Dispatch Groups -> selecting a group -> Optimization tab.

Use case - Dispatching for a big company responsible for a big service area

You are a dispatcher in Indonesia and responsible for tickets in the IT Support sector in the metropolis of Kuala Lumpur. This is a large area of responsibility and therefore many tickets accumulate in the Dispatch tab on a daily basis. Because it would be a lot of work to manually schedule these tickets, you prefer to do it automatically. Your goal is to optimize as many tickets as possible according to the given target, whereby fast results are not necessarily important to you, but rather robustness. "Robustness" in this context means "best adapted to the company's goals". You will therefore allow the optimizer to go through several iterations to get as close as possible to desired end results. To do this, you click on "Optimize..." in the Timeline, then on "Today" and then on "Optimize All" to really take into account all current tickets in the Dispatch tab and all current (unlocked) tickets on the Timeline. You wait for 5 Minutes and click on "Take Over".

  1. Select the dispatch group that you want to optimize from the group picker in the Timeline.
  2. Click on the magic wand arrow on the upper-right side of the Timeline.
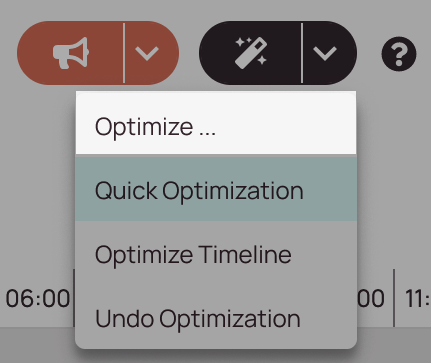
  3. Click on Optimize…
  4. Select an optimization interval.
    Today: Optimizes the current day (takes into consideration the time from midnight to midnight).
    Tomorrow: Optimizes the next day (takes into consideration the time from midnight to midnight for the next day).
    Defined duration: Allows you to optimize an interval of up to one week and can also be used to optimize just one particular day in the future (by picking eg. 26.01. to 26.01.)
  5. Select which optimization parameters should be taken into consideration.
  6. Optimize All: All tickets from the Dispatch tab will get optimized.
    Quick Optimization: All tickets from the Dispatch tab will get optimized with fast results.
    Optimize Timeline: Only tickets that are already sitting in the Timeline will get optimized.
  7. Engineers in scope dropdown: Allows you to select which engineers should be in optimization scope. 
    For example, if technicians are not in scope, the optimizer will not consider them when scheduling tickets.
    If you are using a optimization profile, you may see already certain engineers pre-selected, because it has been configured that way in the profile.
    Nonetheless – you can still decide manually which engineers should be in scope anytime.
  8. Click on Optimize Now.
  9. Wait for desired results.
    Note: Optimization results improve with time passing.
  10. Click on Take Over.
  11. (Optional) Click on Minimize and Continue Optimizing in the Background.
    Note: Optimization results improve with time passing.
Steps 1 to 3
Steps 4 to 7
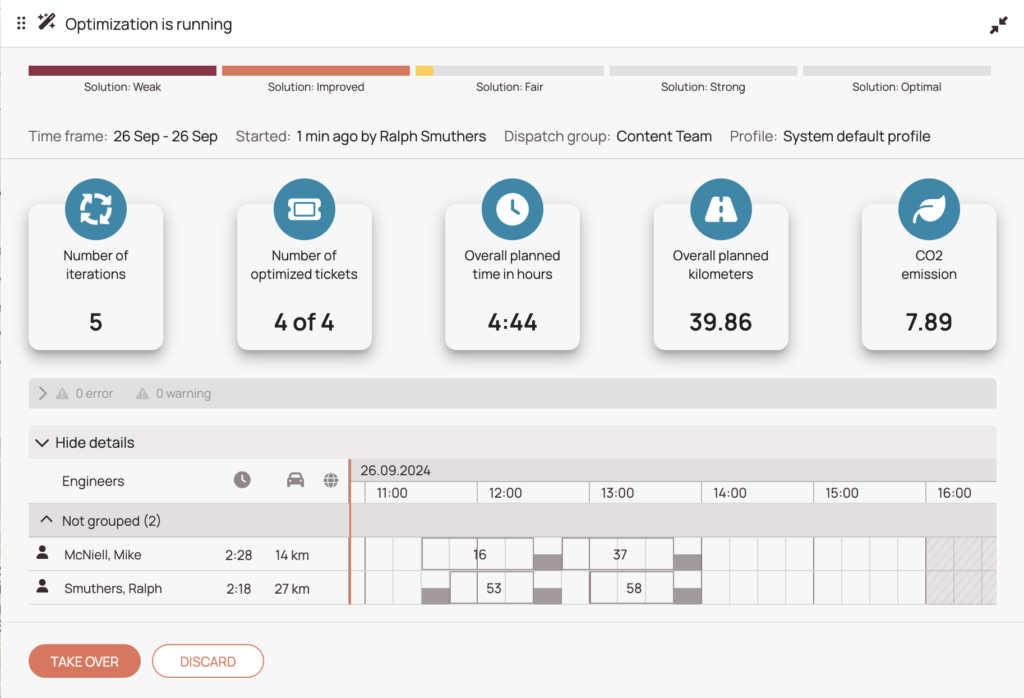
Steps 8 to 9 - The Optimizer Preview lets you check the optimization results with various stats and a practical preview
Step 10: Clicking on TAKE OVER will result in tickets smartly moving from the Dispatch Tab of the Ticket Pool to the Timeline.
Use case: Dispatching for a small company responsible for air conditioning system maintenance

You are a dispatcher in a small company responsible for the regular maintenance of air conditioning systems. It is currently an extremely warm summer and the current ticket situation for the day is hardly manageable manually due to a relatively large amount of open tickets. Quick decisions are required for the moment, but an orderly service process must of course be maintained. Quick Optimization can help you with this, as it can deliver initial quick, yet optimized results in a short time. The quick results save your busy day and you can take care of other more urgent problems. To perform a quick optimization you click on the "Quick Optimization" button in the Timeline. After a few moments, the first results appear and you click on "Take Over". As a result of the quick optimization, you now have enough time remaining to deal with other important work in the process of dispatching.

  1. Select a dispatch group in the Timeline that you want to optimize.
  2. Click on the magic wand arrow.
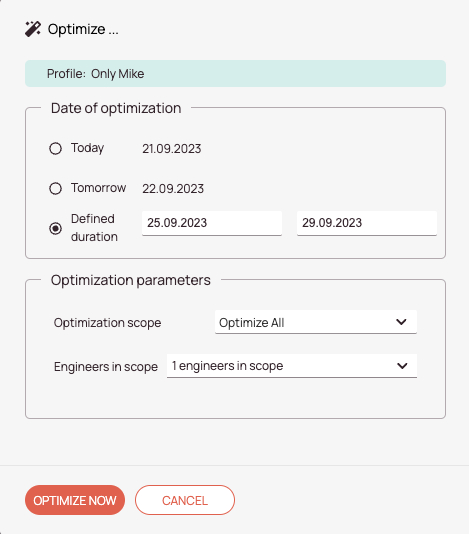
  3. Select Quick Optimization.
  4. The tickets of today will be placed on the Timeline in a quick manner.
  5. The Optimizer Preview will appear.
  6. Click on Take Over to accept the optimization results.
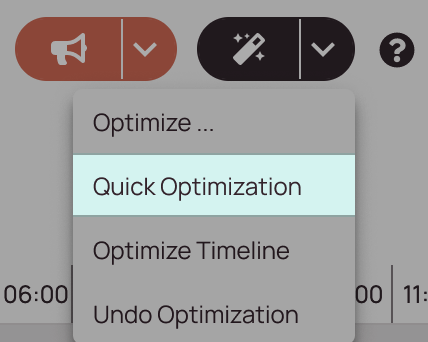
Quick Optimization option
Use case: Dispatching for a small company for a small area

You are an old-school dispatcher in a small call center for cell phone repairs who trusts his manual approach more than the full automation magic of the Optimizer. That's why you prefer to manually place tickets to the Timeline using Drag & Drop. One day, a younger colleague approaches you and tells you that you can still passively benefit from the optimizer by optimizing only the already existing tickets on the Timeline. The tickets that should be optimized have to be unlocked and after clicking on "Optimize Timeline", all existing unlocked tickets on the Timeline will be optimized for the day. You don't even have to unlock all tickets for this since tickets that are not unlocked simply remain on the Timeline as scheduled. The "Optimize Timeline" functionality can therefore also be used as a kind of semi-automatic optimization.

  1. Select a dispatch group in the Timeline that you want to optimize.
  2. Click on the magic wand arrow.
  3. Select Optimize Timeline.
  4. The tickets of today, only the ones placed on the Timeline, will be placed in best order by the Optimizer.
  5. The Optimizer Preview will appear.
  6. Click on Take Over to accept the optimization results.
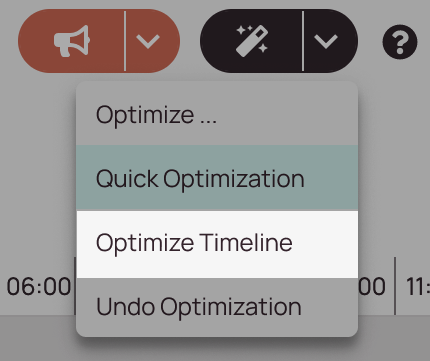
Optimize Timeline option

The “Optimize” and “Optimize Timeline” buttons initiate the actual optimization process of tickets inside the Dispatch group or inside the Timeline.
Inside the Optimizer preview, you will see precisely what is currently happening to your tickets from the Dispatch tab or from the Timeline and you will see how they will be placed on the Timeline.

The Optimization is based on one of the three available Presets that are selectable inside Fieldcode Admin Panel -> Dispatch -> Service Delivery
Please also read the questions below in this FAQ to learn what each of the Presets means.

You will notice that tickets from the Ticket Pool inside the Dispatch tab will move to the Timeline.
The tickets auto-move to spots in the Timeline where it makes the most sense depending on the desired preset you select inside the Fieldcode Admin Panel.

While you are optimizing different information is dynamically displayed:

  • Number of displayed tickets: Amount of tickets that is currently optimized.
  • Overall planned time in hours: The from the optimizer overall planned time in HH:MM format.
  • Overall planned kilometers: The estimated amount of kilometers that is estimated to be driven by engineers/technicians.
  • CO2 emissions for this planning: The amount of CO2 emissions in grams estimated to be produced by driving engineers.
    The number is calculated by multiplying the total traveling distance (meters) by 0.198.
    Did you know? A modern car produces around 100-200 grams of emissions per kilometer.

The following tickets benefit from the Optimizer functionality:

  • Tickets inside the Dispatch tab (ready for Dispatch)
  • Tickets with the status APPOINTMENT.
  • Tickets with mandatory and non-mandatory skills.
  • You will still have to schedule tickets with the end-user manually.
  • Tickets within a 300 km range of the particular dispatch group area.
  • Tickets outside a 300 km range, if they are already placed on the Timeline and unlocked.

The following tickets are excluded from the Optimizer functionality:

  • Locked tickets are not affected by the Fieldcode Optimizer as you still should have the possibility to decide on certain tickets for yourself.
  • Tickets with a proposed or fixed time in the past cannot get optimized.
  • Tickets with non-matching skills (if skill matching is mandatory!).
  • Tickets outside a 300 km range of the particular dispatch group area.
  • Edge case: If a ticket contains a PUDO appointment and the PUDO appointment location is more than 300km away -> Ticket and appointment will get excluded

These are the most common reasons:

  • You may not have the matching permissions granted.
    Please contact your local admin, if you need permissions for the Optimizer.
  • Partner users are currently not able to use the Optimizer.

In this case, the “first come, first served” rule would apply.

  • The second user would see the optimization results of the first user (after the optimization has finished).
  • The second user would also be notified when the first user takes over the optimization results.
  • Ongoing optimizations of a group are smartly displayed to other dispatchers.

In this case those new added tickets will move to the Dispatch tab.
You then have the possibility to run the optimizer again to get updated results.
Unlocked tickets may get sent back to the Ticket Pool due to new optimization potential.

The warning messages will teach you why particular tickets were ignored by the Optimizer and sent back to the Ticket Pool. You should try to manually schedule them after the optimization or fix the reason and try to optimize again after fixing the reason.

The warning messages will teach you why particular tickets were ignored by the Optimizer and sent back to the Ticket Pool.
You should try to manually schedule them after the optimization or fix the reason and try to optimize again after fixing the reason.

The main goal of the Fieldcode Optimizer is to find smart ticket assignments taking into account company-relevant criteria like:

  1. Minimize spent time:
    Use this setting if you are paying your workforce for their spent time per day. We will optimize the schedule to reduce driving times per engineer which might lead to a higher CO2 footprint.
  2. Reduce CO2 emissions:
    We will optimize your workforce schedules to reduce the maximum amount of CO2.
  3. Maximize engineer utilization:
    This setting is recommended for organizations that want to maximize engineer utilization. Our optimizer will try to schedule as many tickets as possible per headcount which might leave engineers without any assignment for the day.

By utilizing available parameters inside Fieldcode such as:

  • Working engineers
    considering their locations
    considering their availabilities
    considering their skillset
  • Combined ticket challenges (Ticket challenges + PUDO challenges)
    considering the end user’s location
    considering the ticket lock status (time + engineer)
    considering the ticket priorities (ticket scoring)
    considering dependencies
    considering availabilities
  • Time interval (Optimization interval) the user selects
  • Track matrix
    considering distances between the engineer and the tickets
    considering durations between engineer and tickets
  • Algorithm parameters
    considering Optimizer objective
    considering the pc clock time
    considering other relevant algorithm parameters

To fulfill the goals of the in the Fieldcode Admin Panel configured preset in the smartest and most personalized possible way.
Available Presets:

  1. Minimize spent time:
    Use this setting if you are paying your workforce for their spent time per day. We will optimize the schedule to reduce driving times per engineer which might lead to a higher CO2 footprint
  2. Reduce CO2 emissions:
    We will optimize your workforce schedules to reduce the maximum amount of CO2.
  3. Maximize engineer utilization:
    This setting is recommended for organizations that want to maximize engineer utilization. Our optimizer will try to schedule as many tickets as possible per headcount which might leave engineers without any assignment for the day.

The Optimizer operation is dependent on the Optimizer interval first. After that, it starts taking location constraints into account. A location constraint consists of various dependencies such as driving times, absent times, idle times, and more. All these factors are considered for an efficient route calculation for tickets that will be optimized. Location constraints help to define the ticket order.

The Fieldcode Optimizer tries to schedule the optimal calendar for the overall group and not just individual tickets.
The complexity exponentially grows with more engineers and more stops on the route (e.g. customer appointments and PUDO visits).

Our sophisticated algorithm is able to handle engineer data, ticket data (including PUDOS), optimization intervals, track matrices,
and a lot more variables in future.

Iteration generally describes a process of repeating the same or similar actions multiple times to approach a solution or a specific goal.
For the Optimizer this means the more iterations pass the closer the optimization will be to best possible results.

The following results are to be expected:

  • Minimized transport efforts. Considering driving durations, driving distances, idle times, etc. pp
  • Best engineer availabilities for the tickets are considered
  • Matching skills between engineer and ticket are considered
  • Nearby engineer location is considered for the tickets
  • LSDT/ETA of the ticket is observed
  • Tickets with priority get scheduled faster
  • Other dependencies that are considered
You will notice a green message on top of the Scheduling Assistant telling you that the real-time recommendations were already active. Chips that are highlighted display the best option for the particular ticket. Selecting the suggested daytime, and engineer preferences means picking the smartest choice for this particular ticket.

Yes, SLA profiles are also considered for finding optimal results.
“Cut-on” and “Cut-off” times of the SLA profile will be considered in the calculation, as well as bank holidays (if configured), and weekends.
If no SLA profile is active the “Cut-on” and “Cut-off” times of the user-defined working hours of each user are considered for the calculation.

You can undo the current optimization if you are for example not happy with the current optimization result or if you want to undo the current optimization because of other reasons. Undoing the Optimization will move the tickets back to the Ticket Pool  (except locked tickets).
  1. Click on the expand arrow right next to the magic wand.
  2. Click on Undo Optimize Now.
  3. Confirm the upcoming prompt with Undo.
Undoing optimization
  • Be advised that manual changes to tickets after the optimization will also be affected by the Undo Optimization since they were technically part of the optimization process.
  • Be advised that undone tickets may not immediately appear on the Timeline. Please refresh the page, in this case, to ensure all of those tickets are displayed in the Dispatch tab again (Reload button or CTRL + F5).
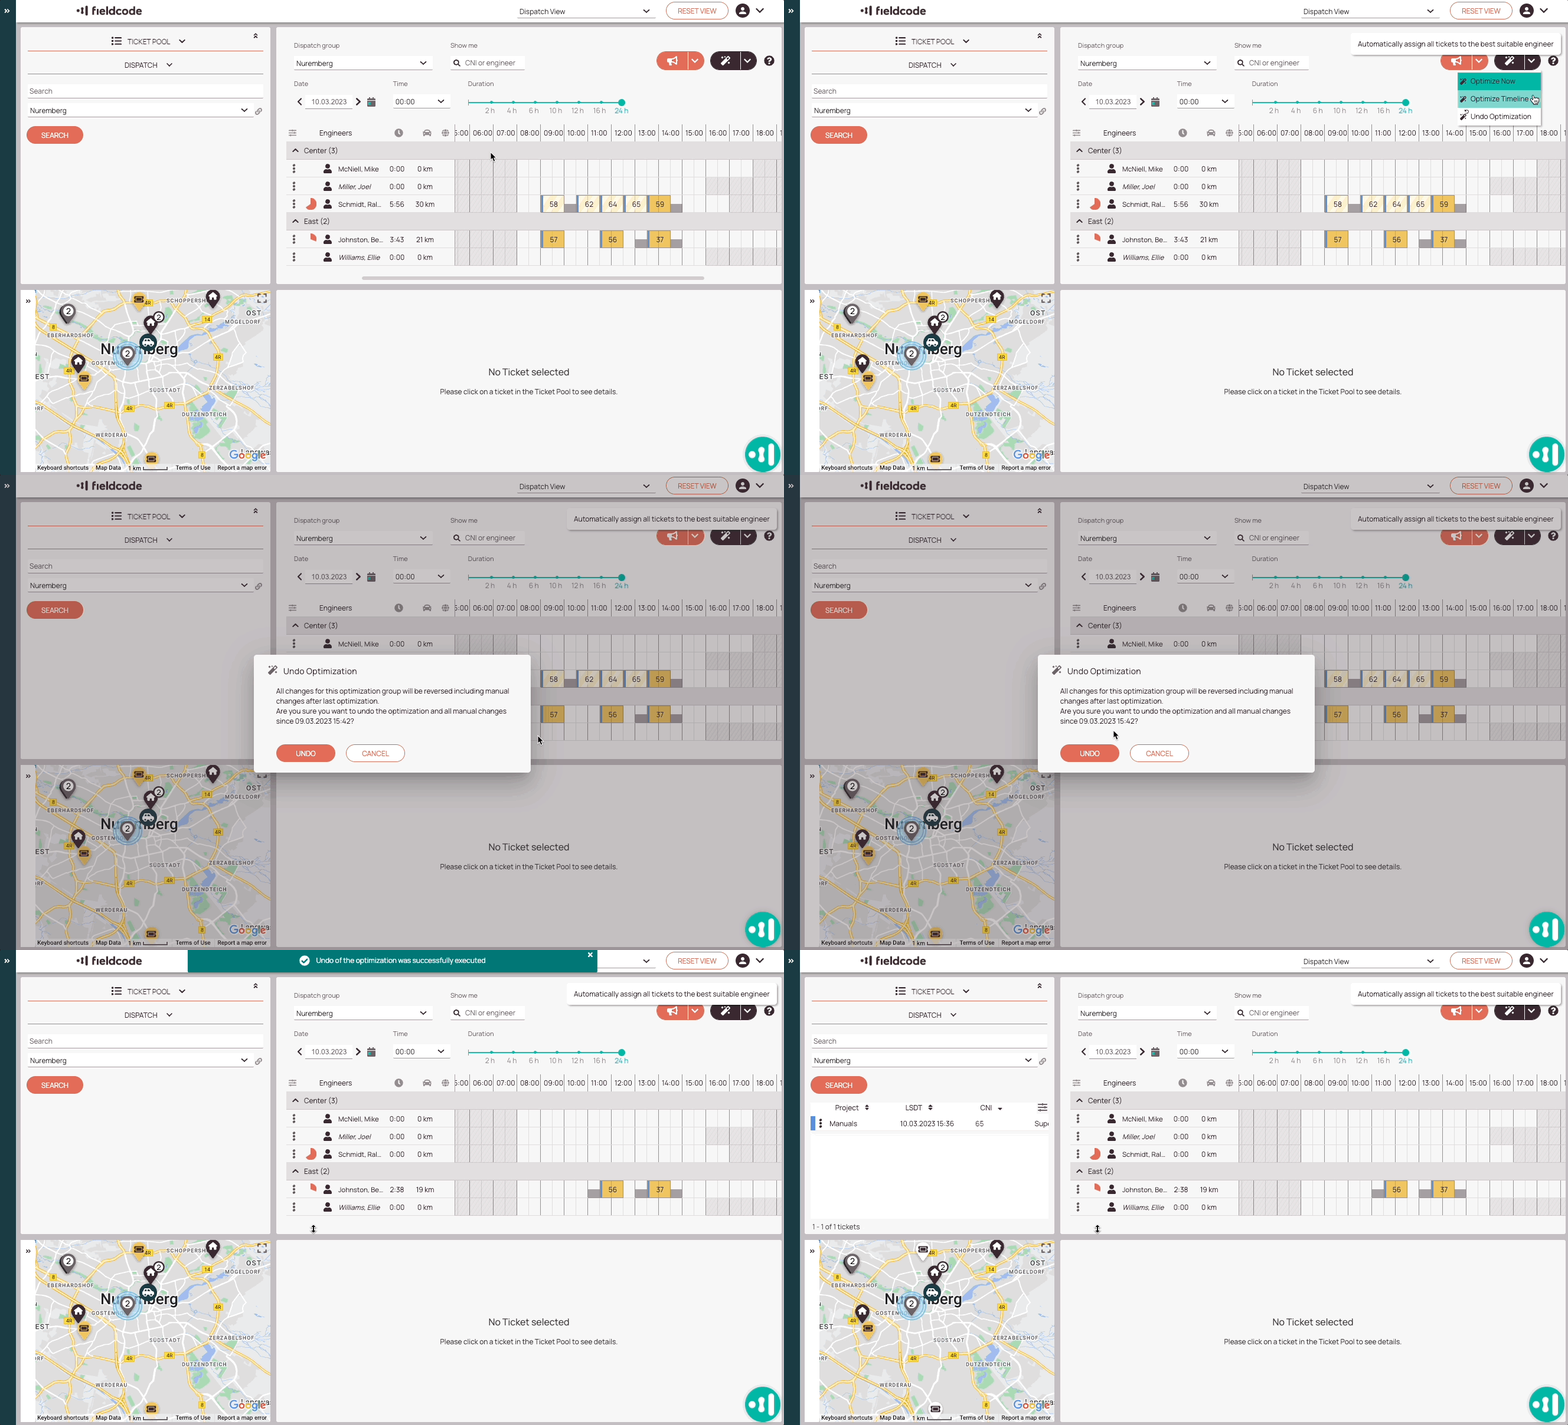
Example of undoing the Optimization with tickets added manually afterwards. Undoing will also revert manually unlocked tickets that have been added later.

The Undo optimization button will be available after a so-called “snapshot” has been taken by the Optimizer.
The snapshot will save ticket and PUDO appointments from the Timeline which were inside the last optimization interval.
Furthermore the snapshot contains every ticket from the Ticket Pool which hasn’t been filtered out with some previously determined optimizer configuration
(like eg, projectId, timelineOnly, etc.), and already existing tickets, that were already in the queue, when the optimization started.
Currently excluded from the snapshot: Container tickets and published ticket/PUDO appointments.

When a optimization is taken over and the changes appear on the Timeline the Undo Optimization button gets available for usage.
If the Undo Optimization button is pushed, the Optimization will revert to that previously created “snapshot” status including manual actions.

When a snapshot is restored the previous appointments are restored.
The snapshot creation time is not relevant. 
Exception: If there are PUBLISHED tickets on the tickets the whole snapshot cannot be restored.
The following fields are restored:

  • Ticket appointment fields 
    Includes the following fields -> ticket, dispatchGroup, Resource, dispatchFrom, dispatchTo 
  • PUDO appointment fields
    Includes the following fields -> ticket, resource, PUDO, item, from, to

Let’s assume the following circumstances are given:

  • Optimization interval: 
    2023-03-14 (23:00 PM) to 2023-03-16 (23:00 PM)
  • Engineers affected:
    E1, E2
  • Tickets on Timeline:
    CNI: 1 on E1 at 2023-03-15 (12:00 PM) (Ticket duration: 1 hour) and
    CNI: 2 on E2 at 2023-03-16 (11:00 AM) (Ticket duration: 1 hour)
    and a PUDO for CNI:2 on E2 at 2023-03-16 (10:00 AM)
  • Tickets in Ticket Pool:
    CNI: 3, 4, 5, 6, 7, 8, 9, 10
  1. The user starts the Optimization for all tickets (no tickets were filtered out).
  2. The user takes over the optimization.
    -> The Optimizer creates the snapshot, CNI:1 and CNI:2 and the PUDO will have the engineer, and the from-to times set. The other tickets will have these fields empty. This is the original state before a TAKEOVER happens.
    -> The Optimizer sends the appointments, but CNI:9 and CNI:10 have no appointments, because they do not fit on the Timeline for the optimization period, so they will remain in the Ticket Pool.
  3. Time passes.
  4. Some user decides to Drag & Drop the CNI:10 on E1 on the 2023-03-17 (outside optimization interval!).
  5. Time passes.
  6. A new ticket is created, CNI: 11.
  7. Time passes.
  8. Some user decides to Drag & Drop the CNI:11 on E2 on the 2023-03-17.
  9. Time passes.
  10. The UNDO optimization button is pushed.
    ->If no other tickets were published in the meantime of the snapshot (CNI:1,2,3,4,5,6,7,8,9,10), the tickets will be resent to the ORIGINAL status. Every ticket movement of the tickets (CNI 1-10) will be included.
    -> The manually dragged and dropped ticket CNI:10 will go back to the Ticket Pool as if it was automatically locked by the drag and drop.
    -> It is not relevant if the original appointments were in the past.
    -> CNI:11 will be untouched because it is not part of the snapshot.

You are still able to revert the optimization in this case.
However, you may notice that manually changing the LSDT is not possible in this case.
Therefore we suggest moving the ticket manually back to the Ticket Pool before undoing the whole optimization and then change the LSDT after wards.
If you now optimize the ticket with the updated LSDT again, the new LSDT will taken into consideration again (also if the LSDT lays in the past).
If you undo the optimization, the tickets move back to the Ticket Pool to the last “snapshot” status.

The Undo optimization button is available for the following use cases:

  • After any successful optimization takeover 
  • After a successful optimization takeover is overwritten by a new takeover
  • Restoring a snapshot will delete the snapshot
  • Anytime, except at least one ticket inside the interval gets PUBLISHED
  • All users have the permissions to UNDO optimizations by default

This depends if the ticket has been already involved in the optimization:

  • If the ticket has not been included in the optimization, then no optimization effect would be visible for this ticket.
  • If the ticket is involved, and somebody even decided to lock it/cancel appointment/create a new ticket the original one will be restored, if no ticket has been published meanwhile.

In this case those new added tickets will move to the Dispatch tab.
You then have the possibility to run the optimizer again to get updated results.
Unlocked tickets may get sent back to the Ticket Pool due to new optimization potential.

Yes, that’s possible if the following circumstances apply:

  • The snapshot contains past dates

The ticket appointments and PUDO appointments which were included in the snapshot will be reverted to the last snapshot. Other tickets won’t be reverted.
It is important to understand that appointments (PUDO/Ticket) are reverted and not full days.

Examples:

  • The user optimizes a two-day interval, tickets are already on the Timeline for those two days:
    -> After the Optimizer took over, everything moves to the first day -> the snapshot stores the original appointments ->tickets will move some appointments to the second day, and some appointments to the first day.
  • A new ticket comes in:
    -> User moves ticket to the second day by Drag & Drop (at that time the second day is totally clear, because the Optimizer moved everything to the first day) -> Snapshot gets restored -> Every ticket gets put back to ORIGINAL place -> As the new ticket was not part of the snapshot it may cause overlapping issues -> please take care of those tickets manually in this case.
Was this topic helpful?
0 out of 5 stars
5 Stars 0%
4 Stars 0%
3 Stars 0%
2 Stars 0%
1 Stars 0%
5
How can we further improve this topic?
Please submit the reason for your vote so that we can improve this topic.
Navigation