Tip: You can use filters for better results
-
Latest News
-
Getting Started
-
Work Place
-
-
-
- About Buttons
- Action Buttons
- Schedule Tickets
- Ticket Info and COMS Buttons
- Add Parts
- Assign Partners
- Remove Tickets from the Ticket Clipboard
- Inline Skill Editing
- Create Intervention Info
- Create Intervention Reports
- Cancel Tickets
- Cancel Appointments
- Clone Tickets
- Edit Ticket Details
- Edit Privat Notes
- Report Tickets
- Close Tickets
-
Admin Panel
-
FMA 2 App
-
Customer Portal
About Timeline Optimization
The optimizer automatically schedules and prioritizes tickets by individual business requirements, which is a great simplifier for dispatchers because it makes the dispatcher’s daily work less stressful and more organized. Before using the optimizer admins may want to configure optimization behavior to meet company/business requirements.
Optimizer Settings
The Optimizer can be configured and customized per dispatch group. You can create custom profiles and use the profiles differently depending on the usage scenario. You can fully customize the route optimization preferences, time window parameters for tickets, PUDO appointment scheduling behavior, Skills requirement consideration, and/or apply the optimization only on individual tickets (filters) and many other options.
The Optimizer can be configured inside the Admin panel -> Dispatch Groups -> by selecting a group and then moving over to the-> Optimization tab.
Check out the recommended optimizer settings in the topic below.
Custom Timeline Optimization
You are a dispatcher in Indonesia and responsible for tickets in the IT Support sector in the metropolis of Kuala Lumpur. This is a large area of responsibility and therefore many tickets accumulate in the Dispatch tab daily. Because it would be a lot of work to manually schedule these tickets, you prefer to do it automatically. Your goal is to optimize as many tickets as possible according to the given target, whereby fast results are not necessarily important to you, but rather robustness. "Robustness" in this context means "best adapted to the company's goals". You will therefore allow the optimizer to go through several iterations to get as close as possible to desired results. To do this, you click on "Optimize..." in the Timeline, then on "Today" and then on "Optimize All" to take into account all current tickets in the Dispatch tab and all current (unlocked) tickets on the Timeline. You wait for 5 Minutes and click on "Take Over".
- Select the dispatch group that you want to optimize from the group selector in the Timeline.
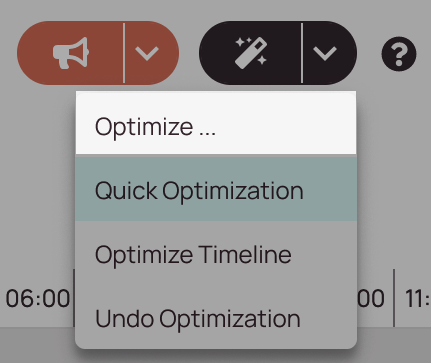
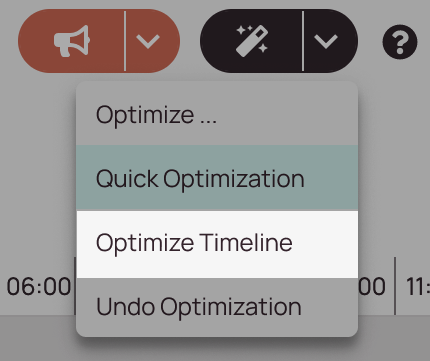
- Click on the magic wand arrow on the upper-right side of the Timeline.
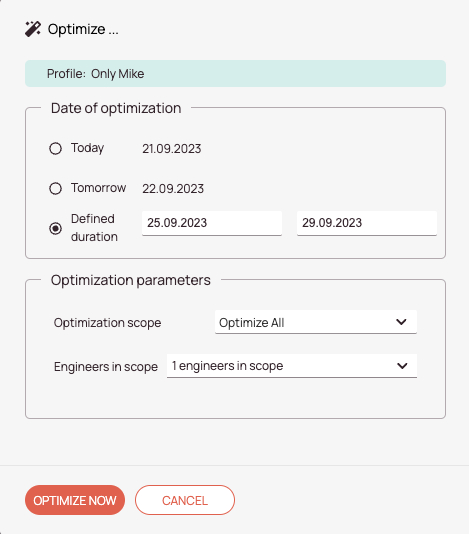
- Click on Optimize…
- Select an optimization interval.
Today: Optimizes the current day (takes into consideration the time from midnight to midnight).
Tomorrow: Optimizes the next day (takes into consideration the time from midnight to midnight for the next day).
Defined duration: Allows you to optimize an interval of up to one week and can also be used to optimize just one particular day in the future (by picking eg. 26.01. to 26.01.) - Select which optimization parameters should be taken into consideration.
- Optimize All: All tickets from the Dispatch tab will get optimized.
Quick Optimization: All tickets from the Dispatch tab will get optimized with fast results.
Optimize Timeline: Only tickets already sitting in the Timeline will get optimized. - Engineers in scope dropdown: You can select which engineers should be in optimization scope.
For example, if technicians are not in scope, the optimizer will not consider them when scheduling tickets.
If you are using a optimization profile, you may see already certain engineers pre-selected, because it has been configured that way in the profile.
Nonetheless – you can still decide manually which engineers should be in scope anytime. - Click on Optimize Now.
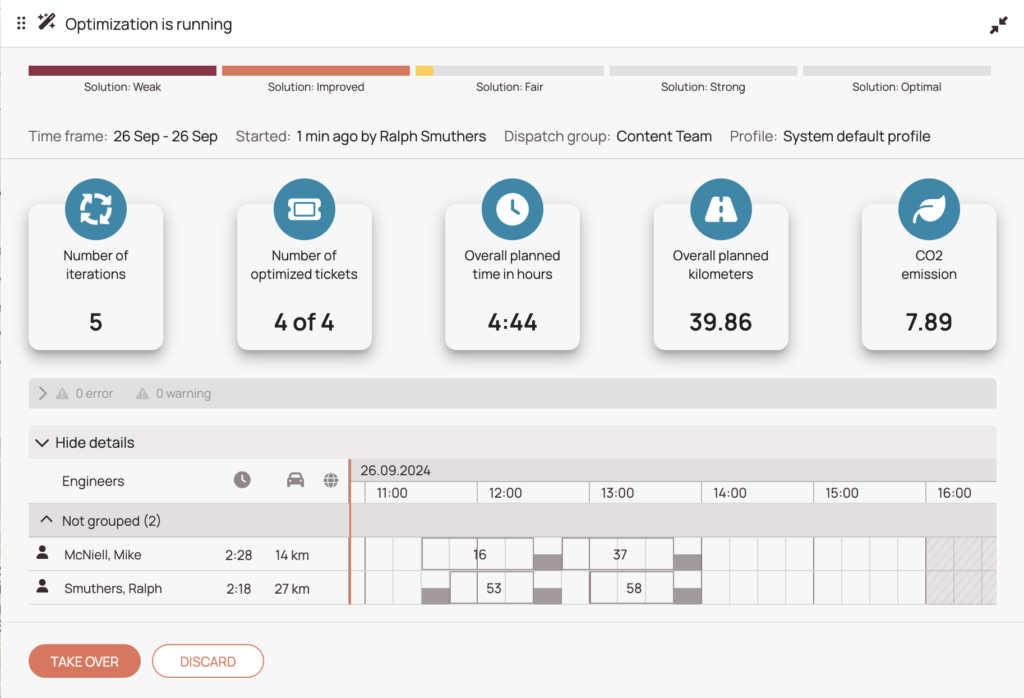
- Wait for the desired results.
Note: Optimization results improve with time passing.
You can learn more about the optimizer results window here. - Click on Take Over.
- (Optional) – Click on Minimize and Continue Optimizing in the background.
Note: Optimization results improve with time passing.
Quick Optimization
You are a dispatcher in a small company responsible for the regular maintenance of air conditioning systems. It is currently an extremely warm summer and the current ticket situation for the day is hardly manageable manually due to a relatively large amount of open tickets. Quick decisions are required for the moment, but an orderly service process must of course be maintained. Quick Optimization can help you with this, as it can deliver initial quick, yet optimized results in a short time. The quick results save your busy day and you can take care of other more urgent problems. To perform a quick optimization you click on the "Quick Optimization" button in the Timeline. After a few moments, the first results appear and you click on "Take Over". As a result of the quick optimization, you now have enough time remaining to deal with other important work in the process of dispatching.
- Select a dispatch group in the Timeline that you want to optimize.
- Click on the magic wand arrow.
- Select Quick Optimization.
- The tickets for today will be quickly placed on the Timeline.
- The Optimizer Preview will appear.
- Click on Take Over to accept the optimization results.

Timeline Optimization
You are a dispatcher in a small call center for cell phone repairs who trusts his manual approach more than the full automation magic of the Optimizer. That's why you prefer to place tickets to the Timeline using Drag & Drop manually. One day, a younger colleague approaches you and tells you that you can still passively benefit from the optimizer by optimizing only the already existing tickets on the Timeline. The tickets that should be optimized have to be unlocked and after clicking on "Optimize Timeline", all existing unlocked tickets on the Timeline will be optimized for the day. You don't even have to unlock all tickets for this since tickets that are not unlocked simply remain on the Timeline as scheduled. The "Optimize Timeline" functionality can therefore also be used as a kind of semi-automatic optimization.
- Select a dispatch group in the Timeline that you want to optimize.
- Click on the magic wand arrow.
- Select Optimize Timeline.
- The tickets of today, only the ones placed on the Timeline, will be placed in the best order by the Optimizer.
- The Optimizer Preview will appear.
- Click on Take Over to accept the optimization results.
Undo Optimization
- Click on the expand arrow right next to the magic wand.
- Click on Undo Optimize Now.
- Confirm the upcoming prompt with Undo.
- Be advised that manual changes to tickets after the optimization will also be affected by the Undo Optimization since they were technically part of the optimization process.
- Be advised that undone tickets may not immediately appear on the Timeline. Please refresh the page, in this case, to ensure all of those tickets are displayed in the Dispatch tab again (Reload button or CTRL + F5).
0 out of 5 stars
| 5 Stars | 0% | |
| 4 Stars | 0% | |
| 3 Stars | 0% | |
| 2 Stars | 0% | |
| 1 Stars | 0% |