Tip: You can use filters for better results
-
Latest News
-
Getting Started
-
Work Place
-
-
-
- About Buttons
- Action Buttons
- Schedule Tickets
- Ticket Info and COMS Buttons
- Add Parts
- Assign Partners
- Remove Tickets from the Ticket Clipboard
- Inline Skill Editing
- Create Intervention Info
- Create Intervention Reports
- Cancel Tickets
- Cancel Appointments
- Clone Tickets
- Edit Ticket Details
- Edit Privat Notes
- Report Tickets
- Close Tickets
-
Admin Panel
-
FMA 2 App
-
Customer Portal
About the Customer Portal
The Customer Portal is a self-service interface that allows your end customers to interact with their service tickets in a simple and secure way. Depending on your configuration, customers can track ticket progress, book or reschedule appointments, and provide feedback – all without needing to log in or contact support.
Customer Portal Purpose
The portal is designed to improve transparency and reduce manual communication by giving customers direct access to:
- Real-time ticket tracking
- Appointment booking and rescheduling
- Feedback submission after service completion
This helps streamline operations and enhance customer satisfaction.
Customer Portal Activation
The Customer Portal is activated through Automated Actions in the Admin panel. When a ticket reaches a certain status or condition, the system sends a secure link to the customer via email or SMS. This link opens the portal for that specific ticket.
There are two main activation modes:
- Tracking Only – Customers can view ticket status and engineer details.
- Tracking + Appointment Booking – Customers can also select or change appointment slots.
🔗 For more detailed setup instructions, check the Customer Portal Activation topic.
Customization Options
You can tailor the portal’s appearance and behavior to match your brand and business needs. Customization is managed via Customer Portal Profiles in the Admin panel.
🎨 What you can customize:
- Company logo and redirect link
- Salutation and booking instructions
- Appointment windows (based on SLA or custom intervals)
- Feedback options and labels
- Portal language and styling
🎨 Learn more about customization in the Customer Portal Customization topic.
Calendar Legend
The following table explains what the different indicators displayed in the Customer Portal indicate:
| Icon | Description |
|---|---|
| Current Appointment | |
| Earliest Service Delivery commitment date | |
| Latest Service Delivery commitment date | |
| Status Before the Availability has been checked by the system | |
| Checked, Available | |
| Selected - Checked, Available | |
| Checked, Unavailable - Reason: Weekends, Bank Holidays, SLA Profile | |
| Checked, Unavailable - Reason: Result of the check | |
| Selected - Unavailable After Checking | |
| Checking Availability Automatically | |
| Selected - Currently Checking | |
| No Engineers Available (with matching skills) or Parts Not Available | |
| Selected - No Engineers Available (with matching skills) or Parts Not Available | |
| Part Availability Begin | |
| Part Availability Ending |
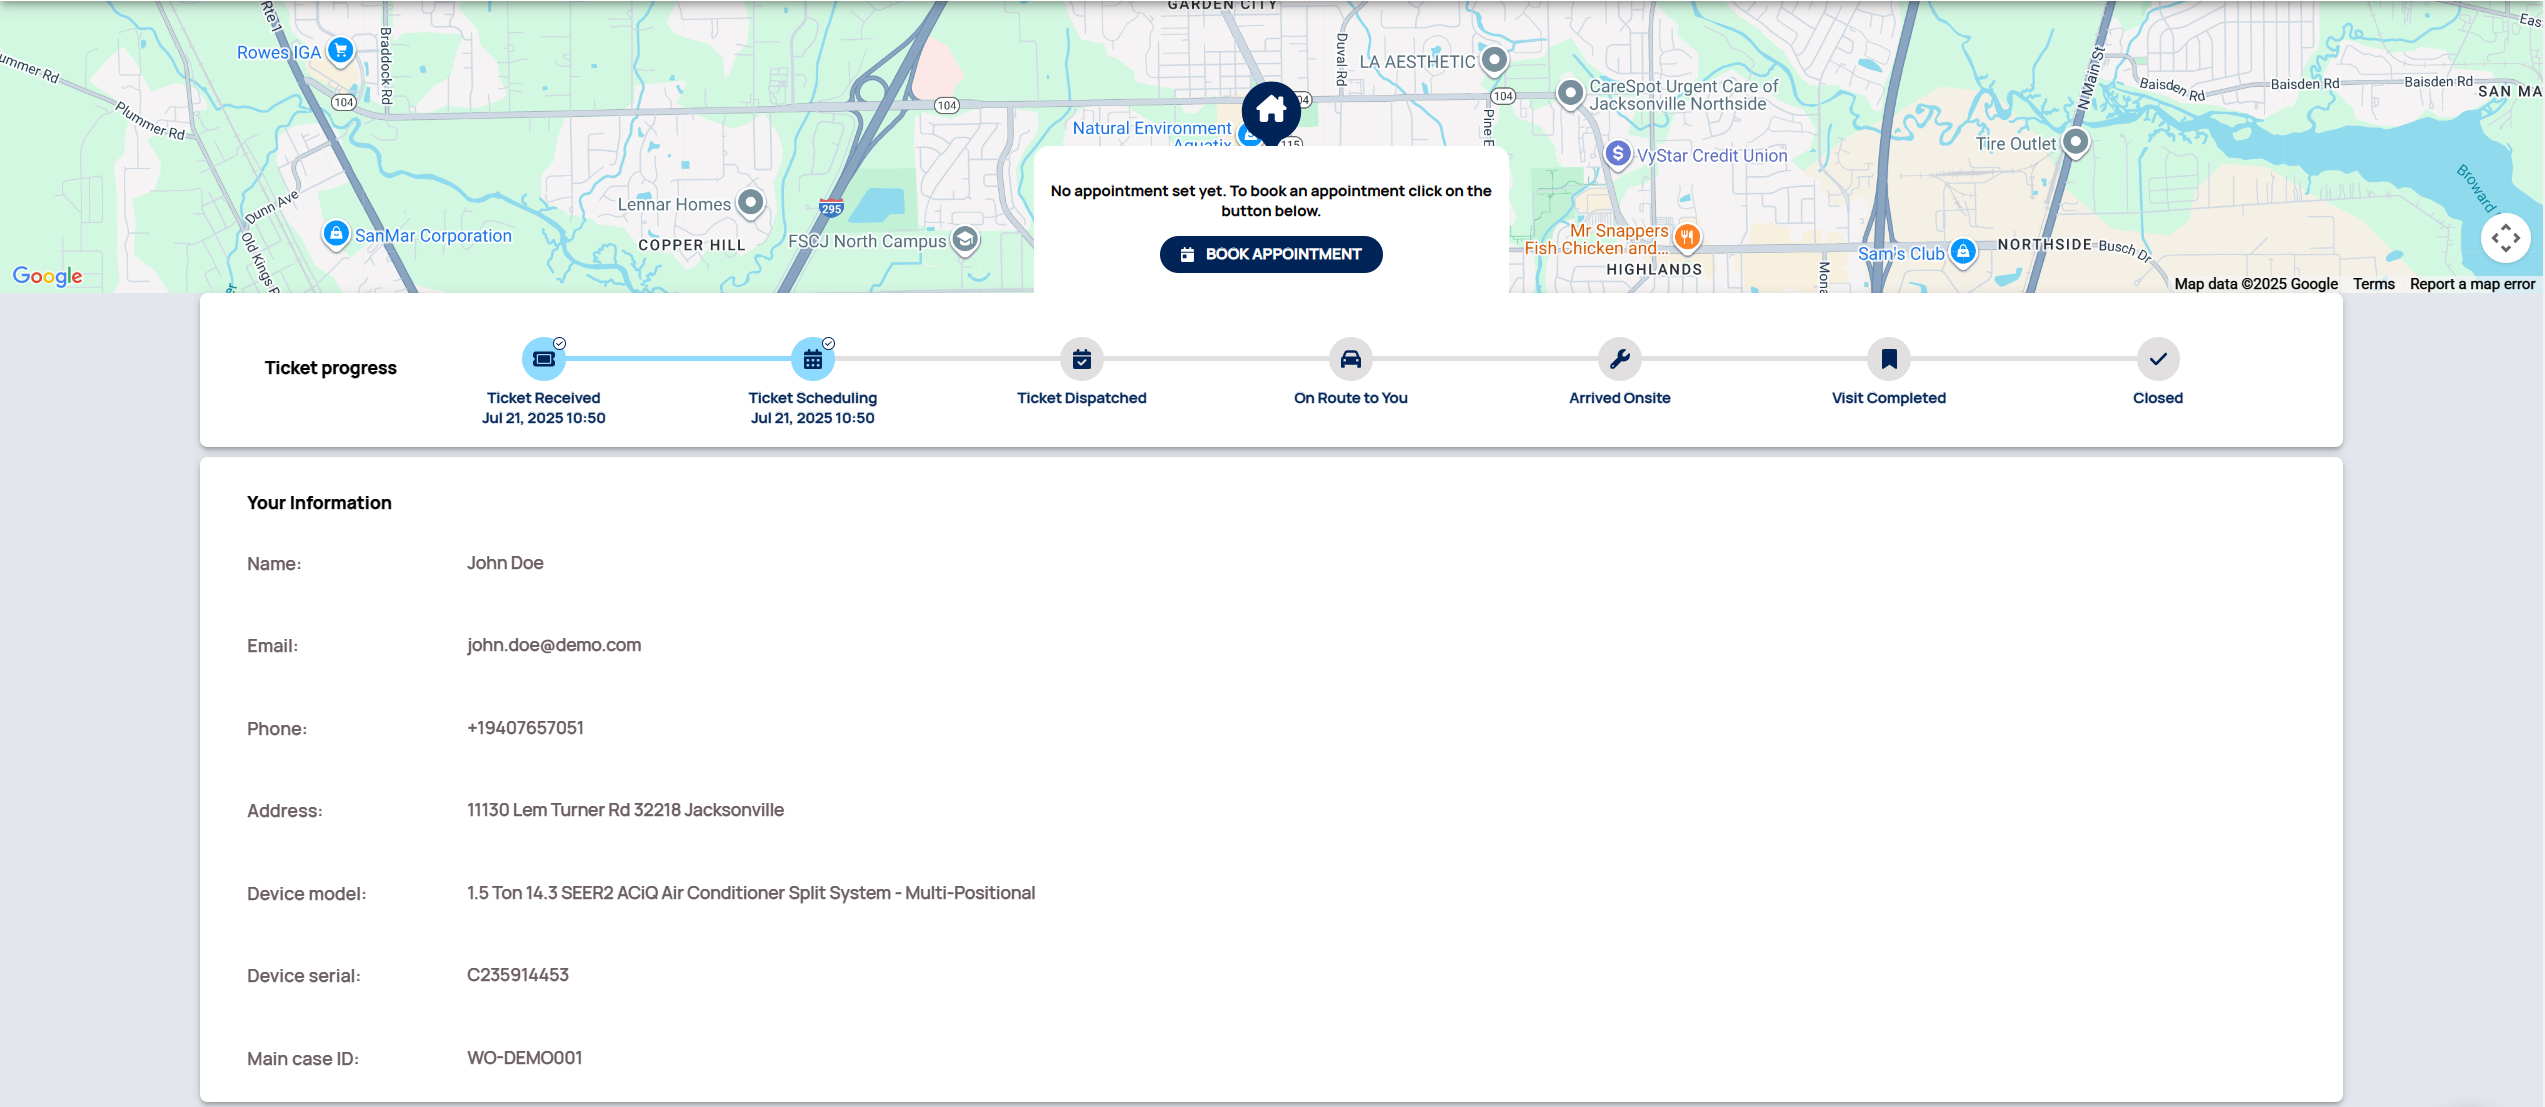
Default Statuses
| Customer Portal Status | Explanation |
|---|---|
| Ticket Received | The ticket arrived inside Work place. |
| Ticket Scheduling | The ticket has been scheduled by the dispatcher. |
| Ticket Dispatched | The ticket arrived on the engineer's device. |
| On Route to You | The engineer is currently driving to the customer location. |
| Arrived Onsite | The engineer arrived onsite and starts solving the the ticket. |
| Visit Completed | The engineer visit has been completed by the engineer. |
| Closed | The ticket has been closed. |
About the Calendar
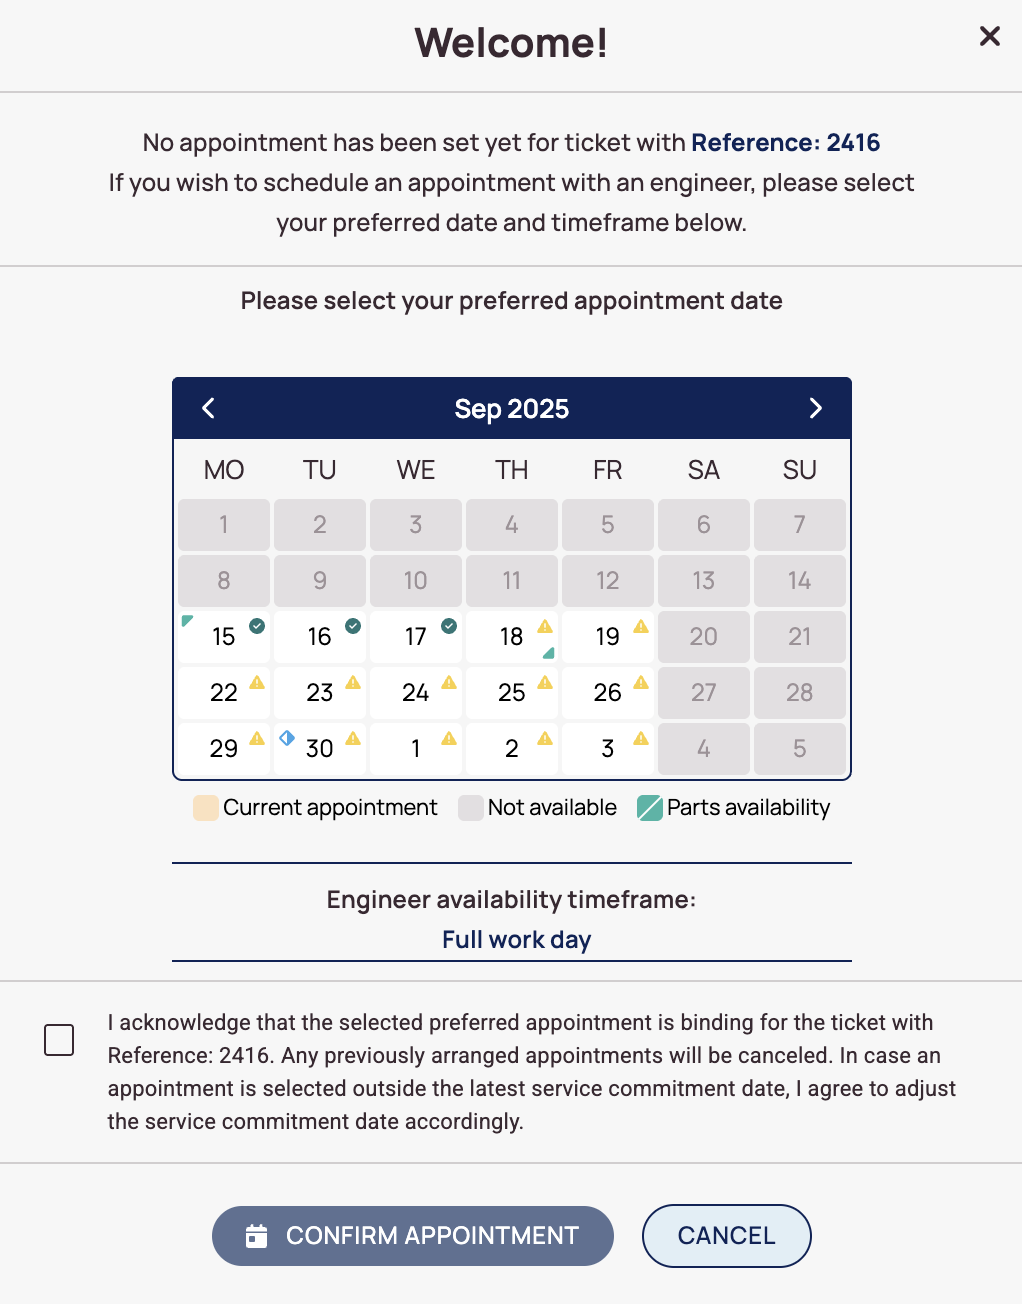
-
This row displays the date that has been entered in the system before any changes were made.
-
Dates marked in gray are not available for booking. This can be due to specific Custom Customer Portal configuration or because these days are bank holidays or weekends.
-
Green triangles indicate part availability.
-
Green checks indicate available booking dates.
-
Yellow triangles indicate limited availability.
-
The blue diamonds indicate the earliest and the latest service delivery date.
-
You need to check this checkbox first for confirming your appointment booking.
-
This button lets you confirm a selected appointment.
Use Cases
🖨️ Printer Repair Company
A customer receives an SMS with a link to track their repair ticket. They open the portal, view the technician’s ETA, and reschedule the appointment to a more convenient time.
💻 IT Service Provider
After resolving a ticket, the customer receives a feedback prompt via the portal. Their response helps the provider improve service quality.
FAQ - Customer Portal
You can activate the Customer Portal in different ways. We will go over the most common ones here
- You can configure a “Send email” automated action and integrate Customer Portal links.
- You can configure a “Create Info” automated action and integrate Customer Portal links
- You can configure a “Send SMS” automated action and integrate Customer Portal links.
You have as well different options to configure what end users can achieve in the Customer Portal:
- Tracking Only – End users receive a link to track ticket progress.
- Tracking + Appointment Booking – End users receive a link to track progress and book appointments.
You can configure everything around the Customer Portal Activation inside Automated Actions in the Admin panel.
- Dispatchers need to create tickets with a valid and correct end-user email address.
- Dispatchers are not allowed to leave the email address field empty when creating tickets.
- The matching Automated Action for the Customer Portal functionality has to be activated.
Yes. You can configure portal profiles to allow tracking only.
The following settings can be currently configured inside the Customer Portal Settings page:
- You can create different Customer Portal Profiles for different projects
- You can configure if your end users should be able to leave feedback on tracked tickets
- You can configure a custom company logo that should be visible for your end users when using the tracking link
- You can configure that the custom company logo directs your end users to a custom website (usually you may aim for the company website)
- You can customize the salutation that is displayed inside the booking window and change the appointment window
- You can customize the text that is displayed inside the booking windows and change the appointment window
- You can customize the disclaimer text that is displayed inside the booking window and change the appointment window
- You can customize available end-user booking appointment windows by using SLA profiles
- You can customize available customer booking appointment time windows by using custom intervals
Yes. You can assign different portal profiles to different projects.
The custom logo must meet the following requirements:
- The picture must be in .jpg or .png format
- The maximum file size is 20 kilobytes
- The maximum pixel file should not exceed 25 pixels
Yes, you can clone Customer Portal Profiles. This makes sense if you want to use a profile as a template to create another profile for example for another project.
- Select a Profile from the Customer Portal List.
- Click on the black squared copy button.
No. Each portal link is ticket-specific and secure. No login is required.
Yes. The portal is optimized for both desktop and mobile devices.
5 out of 5 stars
5 ratings
| 5 Stars | 100% | |
| 4 Stars | 0% | |
| 3 Stars | 0% | |
| 2 Stars | 0% | |
| 1 Stars | 0% |