Tip: You can use filters for better results
-
Latest News
-
Getting Started
-
Work Place
-
-
-
- About Buttons
- Action Buttons
- Schedule Tickets
- Ticket Info and COMS Buttons
- Add Parts
- Assign Partners
- Remove Tickets from the Ticket Clipboard
- Inline Skill Editing
- Create Intervention Info
- Create Intervention Reports
- Cancel Tickets
- Cancel Appointments
- Clone Tickets
- Edit Ticket Details
- Edit Privat Notes
- Report Tickets
- Close Tickets
-
Admin Panel
-
FMA 2 App
-
Customer Portal
PUDOs and Parts in FMA
Parts is a separate menu in FMA focused only on parts management. The part menu lets you fully manage your parts. Some jobs may require parts, so you can end the intervention successfully. In field service, it is often important to get parts ready at the right moment so that a job can run successfully and resources can be conserved. This also includes, for example, the timely return of discarded parts, so that they can be properly recycled.
In the PUDOS and Parts checklist section, we will simulate that a special screwdriver is required for ticket 68. We will also assume that ticket number 69 requires a battery replacement. The battery replacement includes putting it in a new battery and returning the old battery (for recycling purposes).
Working with Parts
Parts added in the Work place are also displayed (and get synchronized) in the FMA app. The assigned parts can be viewed in the app in the respective appointment in the Parts tab, provided that the appointment has already been published in the FMA app. You can also view all spare parts available in the app at once by tapping directly on the parts menu, where you can also search through parts, sort parts and scan new parts.
Parts may be required to successfully resolve a ticket. You can easily track which parts you need to pick up at a PUDO or at the customer and you shall report the part usage before you complete the ticket report, so everything is documented properly. If parts are to be picked up in a PUDO location, you’ll see a dedicated PUDO appointment(s) for your PUDO visit. Once you visited it, it will disappear from your Appointments screen. The return of spare parts shall be also be logged in the app as in the Fieldcode model, the parts returning is the last step of parts FMA processing.
In the following sections, we will take a closer look at what happens with parts in the app, how they behave in the app, and we will go through various scenarios relating to parts to give you a better understanding of how to treat parts inside the FMA app.
If there is an Parts API configured and connected with Fieldcode then there is an "Add Parts" button visible inside the FMA App (only in Appointment details for now) from which you can add parts from eg. a BOM list or a Van Stock.
When an appointment gets canceled, parts also get cancelled automatically.
Parts Publishing and Unpublishing (which parts are visible in the FMA app)
Parts appear in the FMA app when the scheduled appointment is forwarded to the engineer (published) in the Work place.
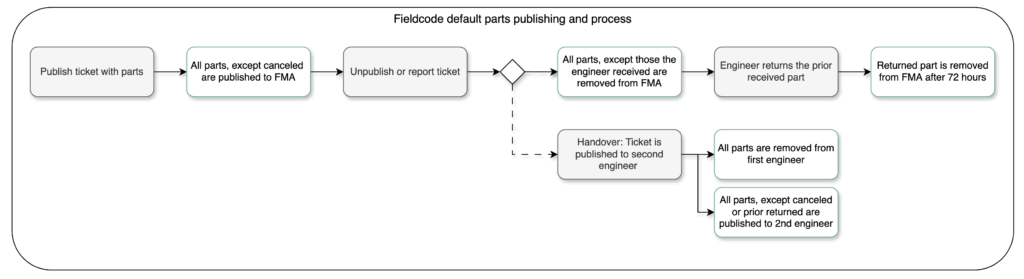
The FMA lifecycle for parts is the following in the Fieldcode model:
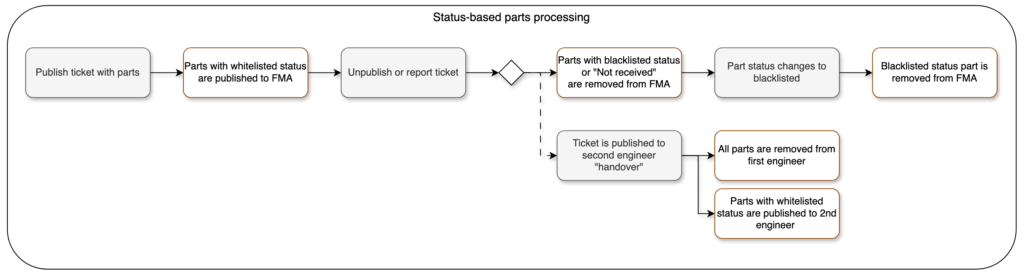
Furthermore, you can decide to switch to status-based publishing and unpublishing strategy for parts with the help of Fieldcode Support. In that case, the part status would drive the FMA lifecycle of parts the following way:
In the following paragraphs we’ll guide you to some of the Fieldcode default process details, which might be different in case of customized workflow configurations, settings.
Receiving Parts
- The engineer must confirm receipt/non-receipt of replacement parts in the app before a usage rate can be added.
- The engineer can do this by selecting “Receive” and then filling out the corresponding form.
Not Receiving Parts
- The engineer must confirm receipt/non-receipt of replacement parts in the app before a usage rate can be added.
- The engineer can do this by selecting “Not Received” and then filling out the corresponding form.
Adding Parts Usage
It is mandatory to enter the usage level of replacement parts in the app (if a ticket contains one or more replacement parts) in order to complete an appointment. The usage level can be entered by the engineer using the “usage form” within the FMA app. To do this, the engineer simply calls up the relevant part in the app (either via the corresponding appointment or the Parts menu) and can then enter the usage level.
Returning Parts
After the receipt/non-receipt of the part and the degree of use of the replacement part have been documented, the return of the replacement part must also be documented. To do this, the engineer must tap “Return” in the FMA app and fill out the return form as well. Parts might be already returned during the customer appointment by leaving them with the customer, disposing them or they can be returned later by e.g. a PUDO dropoff. For this reason, we keep the parts under the Parts page even after the appointment has been reported. Once the part has been returned, the removal of the part is scheduled to happen in 72 hours and then the part disappears from the Parts list.
The completed appointment and the replacement parts required/used for the appointment can still be viewed in the archive.
About Parts Unpublishing
Parts are removed (or in other words unpublished) from the FMA app:
- either when the appointment is removed because it’s unpublished or reported (not received or already returned parts are removed together with the appointment)
- or in case part is returned later than the the appointment report, it disappears after 72 hours after the part has been returned by engineer via Return form.
PUDO and Parts Checklist
Before I start working on tickets, I check if there are any spare parts listed in the Parts menu of the FMA. If this is the case, I go further with this checklist. If no spare parts are needed, I can continue directly with processing my appointments.
- Check the main menu to see if there is a number of spare parts listed for today. If yes, continue with number 2.
- Tap on the Parts menu.
- Go through the parts list and the matching details row by row, to check what has to be done with today’s parts. In our case the special screwdriver for ticket 68.
Tip: The part status already gives you a good hint of what has to be done with the part.
Tip: The ETA gives you a good first idea, when the part should be actually available for pick-up. - Inside a part the options are pretty dynamic, depending on what should happen with the part.
You can for example mark parts as received, or mark parts as not received.
You may utilize one of the above actions after visiting a PUDO for example.
I need parts for some of my tickets as there is a PUDO listed in the appointments menu and I also have parts listed in the parts menu of FMA. Therefore, I treat the PUDO appointment as a regular appointment that I need to handle in order to get parts for my appointments. The PUDO appointment is usually the first appointment I need to handle in order to successfully complete my appointments.
- Tap on the Appointments menu.
- Check the Appointments menu to see if there are PUDO appointments listed for today. If yes, continue with number 3.
- Tap on the PUDO appointment.
Tip: The PUDO appointment behaves quite similarly to a regular ticket, except that the available actions differ from a regular ticket. For example, with a PUDO appointment, you can only enter into the system whether you have visited it. Thanks to this entry, the dispatcher then knows that this PUDO was visited by the engineer. - (Optional) – Tap on the address pin in order to launch the navigation app and get directions to the PUDO location.
- (Optional) – Tap on “Look Around” to precision-find your PUDO location.
- Mark the PUDO as visited if you used it to interact with parts.
My appointments may require discarded, unneeded parts to be returned after my appointments. This may be due to recycling requirements, or because unneeded parts could be used later by other engineers. The return is done either through a PUDO or by going to another location, such as headquarters after the appointments have all been handled. I then only have to note the return within the app. I do this by entering the part as “Returned” in the parts menu.
- Tap on the appointment you want to resolve.
Then tap on the Parts menu.
Select the part you want to return.
Then tap on the Usage button.
Alternatively: Tap on the Parts menu.
Select the part you want to return.
Tap on the Usage button. - For our case, we assume that a used battery is to be returned – therefore we select “Used and consumed”.
- Tap on Done.
- Tap on the Return button.
- Enter all return details such as date and time,.
Important: Filling in where the part has been returned is mandatory. - Tap on Done.
- The part is now successfully returned.
Of course, it may also be the case that certain spare parts have not yet been entered into the system by dispatchers. This is the case, for example, when I remove a part myself and the dispatcher does not yet know that this part is affected. Therefore, I will, for example, scan this spare part with the spare parts scanner of the FMA so that I can return it and it can be used again. Of course, it can also simply be that a spare part has to be scanned spontaneously because it is perhaps entered incorrectly in the system, or because it was received externally, or for other reasons.
- Tap on the appointment you want to resolve.
Tap on the Parts menu.
Tap on the Parts scanner button.
Alternatively: Tap on the Parts menu.
Tap on the Parts scanner button. - Scan the part.
Note: At first usage, you are prompted to give camera access.
Please allow camera usage in order to benefit from the barcode scanner. - Select the matching code by tapping on it.
Note: This requires dedicated extensive configuration and setup of processes ahead in order to work as desired. Our friendly support team is glad to help you with your business needs. - Data for the part should be filled in automatically if the standards stored in the QR code are fulfilled.
Note: This requires dedicated extensive configuration and setup of processes ahead in order to work as desired. Our friendly support team is glad to help you with your business needs.
- Engineer consumes part from trunk stock
- Work is completed – Part is reported as “Wait for replenishment”
- The engineer goes ahead and reports the case as normal including the part usage status
- The engineer waits until the part has arrived
- The engineer picks the part, confirms the receipt
- The engineer returns the bad part and adds a new part to the trunk stock
Not by default, but it is configurable. You can benefit from Van Stocks/BOM lists and add parts in the FMA app when there is an Parts API connected with the Fieldcode system. Please contact the Fieldcode Support to learn more about potential solutions.
Part was not confirmed by FMA USER A
- What happened? The part was removed before FMA USER A could confirm it.
- FMA USER A: No longer has access to the part.
- FMA USER B:
- Shipping info: Shows current shipping details.
- Workflow buttons: Shows the default buttons as originally configured.Use Case 1: Part was not confirmed by FMA USER A
What happened? The part was removed before FMA USER A could confirm it.
FMA USER A: No longer has access to the part.
FMA USER B:
Shipping Info: Shows current shipping details.
Workflow Buttons: Shows the default buttons as originally configured.
Part was not received by FMA USER A
- What happened? The part was removed before FMA USER A could receive it.
- FMA USER A: No longer has access to the part.
- FMA USER B:
- Shipping Info: Shows current shipping details.
- Workflow Buttons: Shows the “Receive” button.
Part was received by FMA USER A
- What happened? The part was available to FMA USER A, but gets removed when published to FMA USER B.
- FMA USER B:
- Shipping Info: Shows current shipping. If there’s no new shipping, it displays the received date and FMA USER A as the receiver.
- Workflow Buttons: Workflow is reset and starts again from the first step.
Part usage was added by FMA USER A
- What happened? The part was used by FMA USER A, but gets removed when published to FMA USER B.
- FMA USER B:
- Shipping Info: Shows current shipping. If there’s no new shipping, it displays the received date and FMA USER A as the receiver.
- Workflow Buttons: Workflow is reset and starts again from the first step.
Part return was added by FMA USER A
- What happened?
- If the part was returned before unpublishing, it gets removed.
- Otherwise, it is removed when published to FMA USER B.
- FMA USER B:
- Status Display: Returned parts are shown only if their status is whitelisted.
- Visibility: The part is not shown to FMA USER B. To make it visible, a new shipping or new part must be created.
- Reason: In special workflows, if the first intervention fails, a new ticket and intervention are created. Returned parts from the first intervention are not needed for the second one, so they are hidden by default.
Part Statuses
| Part status | Explanation |
|---|---|
| Canceled | The part has been canceled for this appointment. |
| In Shipment | The part is currently in the shipping process. |
| Not Received | The part has not been received by the addressee. |
| Ordered | The part has been ordered. |
| Out of stock | The part is currently not available. |
| Received | The part has been received by the addressee. |
| Recommended | The part is recommended for this appointment. Not using this part may lead to an unsuccessful intervention. |
| Wait for Replenishment | Some tickets are resolved using trunk stock prior the receipt of booked parts. |
FAQ - Parts
- The Parts tab is not available for every Field Service branch. The availability of the tab depends on the branch you specified during your registration.
- There might be no permissions configured for the Parts tab. You can grant permissions for the Parts tab inside the Admin panel/Permissions.
Please read the matching topic.
Please continue to read this topic.
You can also learn more about the Parts tab in particular.
Yes, you can – if you have a Business or Enterprise Account. Fieldcode allows flexible customization of parts handling through workflows. This means you can tailor how parts are requested, returned, or processed based on your specific business needs.
For example, by adding custom workflow buttons, you can extend the default FMA (Field Material Authorization) or Part workflows. This enables you to introduce new actions or reporting options that aren’t available by default.
💡 Example:
By default, Work place users may not have the ability to report part returns. However, with a customized workflow, you can add a dedicated button that allows them to do so – making the process smoother and more aligned with your operational needs.
0 out of 5 stars
| 5 Stars | 0% | |
| 4 Stars | 0% | |
| 3 Stars | 0% | |
| 2 Stars | 0% | |
| 1 Stars | 0% |