Tip: You can use filters for better results
-
Latest News
-
Getting Started
-
Work Place
-
-
-
- About Buttons
- Action Buttons
- Schedule Tickets
- Ticket Info and COMS Buttons
- Add Parts
- Assign Partners
- Remove Tickets from the Ticket Clipboard
- Inline Skill Editing
- Create Intervention Info
- Create Intervention Reports
- Cancel Tickets
- Cancel Appointments
- Clone Tickets
- Edit Ticket Details
- Edit Privat Notes
- Report Tickets
- Close Tickets
-
Admin Panel
-
FMA 2 App
-
Customer Portal
About Parts
Spare parts are helping the engineer to fulfill the service on the field. Engineers on the field use parts to fulfill the service needs of customers. Parts can be attached to a ticket in two different ways inside the system.
- You can add parts from the context menu inside the Ticket Pool.
- You can add parts to a ticket from the Ticket details.
- You can add parts via API inside the FMA App.
Default Part Statuses
| Part status | Explanation |
|---|---|
| Canceled | The part has been canceled for this appointment. |
| In Shipment | The part is currently in the shipping process. |
| Not Received | The part has not been received by the addressee. |
| Ordered | The part has been ordered. |
| Out of stock | The part is currently not available. |
| Received | The part has been received by the addressee. |
| Recommended | The part is recommended for this appointment. Not using this part may lead to an unsuccessful intervention. |
| Wait for Replenishment | Some tickets are resolved using trunk stock prior the receipt of booked parts. |
Part Adding Methods
You can add spare parts in various ways:
- Adding Parts Manually
- (Optional) – Adding Shipping Information
- (Optional) – Adding/Adjusting PUDOs
- Adding Parts via API
1. Adding Parts Manually
- Click on “Add Part” from the Ticket Pool or Parts tab in the Ticket details.
- From the “Method to add part” dropdown select the option “Add part manually“.
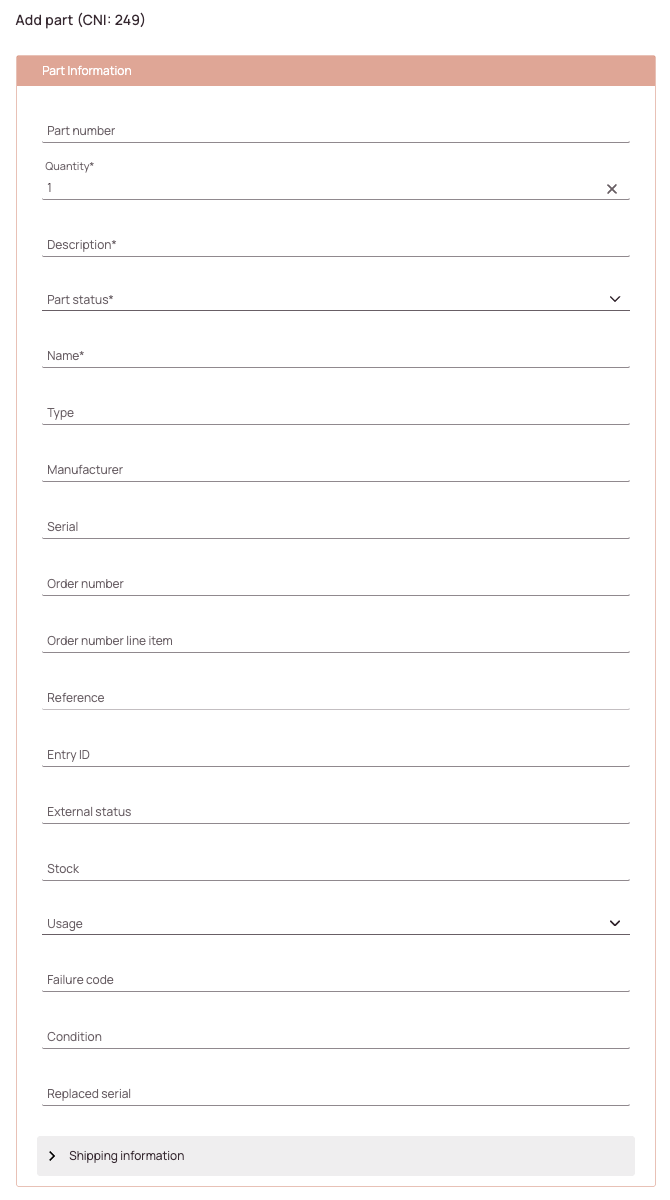
(If you do not see the method dropdown, it means that you are adding by default parts manually.) - Enter the part data as required. The procedure for the standard part form is described in the section below.
(Please note that you also have the option to customize the add part form inside forms.) - Click on Save after filling in the fields.
-
Part number field (Optional): Enter the part number.
-
Quantity field: Enter the number of parts you want to add. You are required to add at least one part.
-
Description field: Enter a description for the part.
-
Part status field: Select a part status from the drop-down (Canceled, In Shipment, Not received, Ordered, Out of Stock, Received, Recommended).
-
Name field: Enter a name for the part.
-
Type field – (Optional): Enter the part type.
-
Manufacturer field – (Optional): Enter the manufacturer for the part.
-
Serial field – (Optional): Enter the serial number for the part.
-
Order number field – (Optional): Enter an order number.
-
Order number line item field – (Optional): Enter the order number line item number.
-
Reference field – (Optional): Enter the Reference for the part.
-
Entry ID field – (Optional): Enter the Entry ID for the part.
-
External statues field – (Optional): Enter the external status for the part.
-
Stock field – (Optional): Enter the stock for the part.
-
Usage field – (Optional): Enter the usage for the part.
-
Failure code – (Optional): Enter the failure code for the part (if applicable).
-
Condition field (Optional): Enter the condition for the part (if applicable).
-
Replaced serial (Optional): Enter the replaced serial for the part (if applicable).
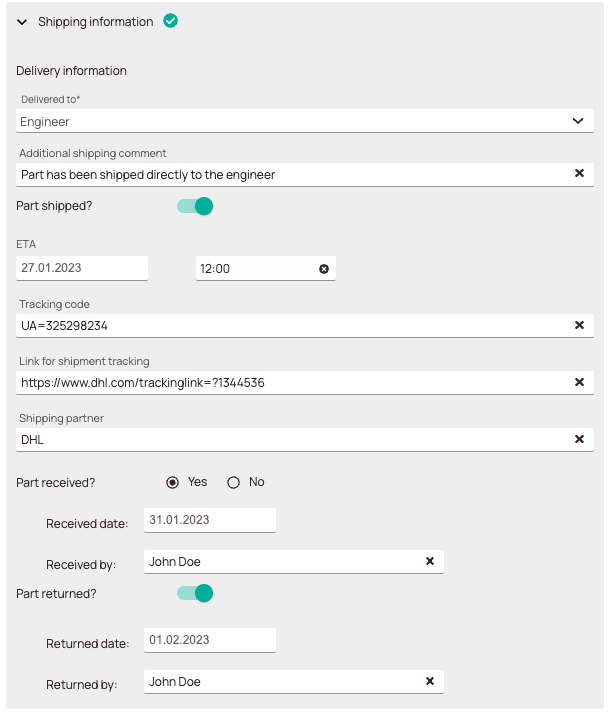
1.1. (Optional) - Adding Shipping Information
- Select to whom the part will be delivered (Affected -> end user, Custom -> you decide, Engineer -> person that handles the ticket, PUDO -> Pick-Up-Drop-Off-Location).
- (Optional) – Enter an additional shipping comment.
- (Optional) – The part was already shipped toggle: If the part was already shipped to the location you can select this via this option.
- (Optional) – Part received toggle: If the part was already received you can select that via this option.
- (Optional) – Part returned toggle: If the part was already returned back you can select that via this option.
- Click Save.
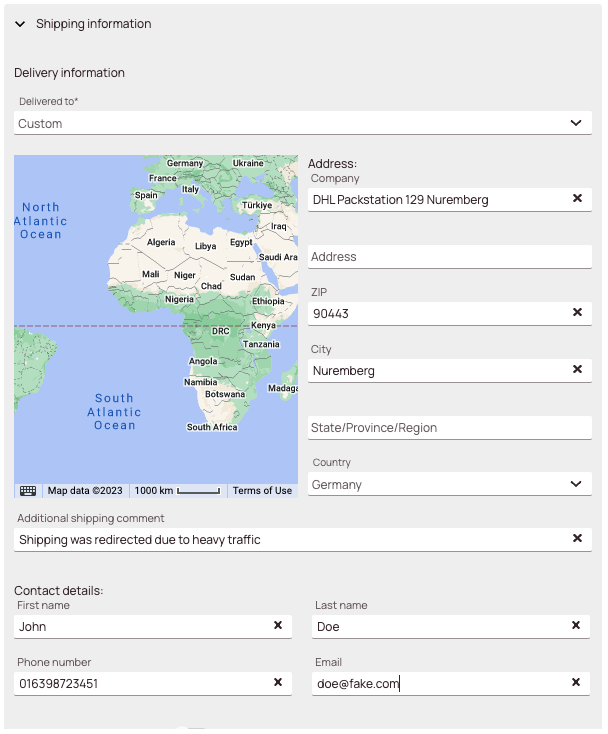
If you selected Custom in the Delivered To field you will be asked to provide address data:
- (Optional) – Enter the company name of the recipient.
- Enter the address.
- (Optional) – Enter the ZIP.
- Enter the city.
- (Optional) – Enter the region.
- Select the country.
- (Optional) – Enter the first name of the recipient.
- (Optional) – Enter the last name of the recipient.
- (Optional) – Enter the phone number of the recipient.
- (Optional) – Enter the email address of the recipient.
- Click Save.
1.2. (Optional) - Adding/Adjusting PUDOs
If you selected PUDO in the Delivered To field you can have two situations:
Option A: PUDO is already in the system -> select the wished PUDO from the drop-down.
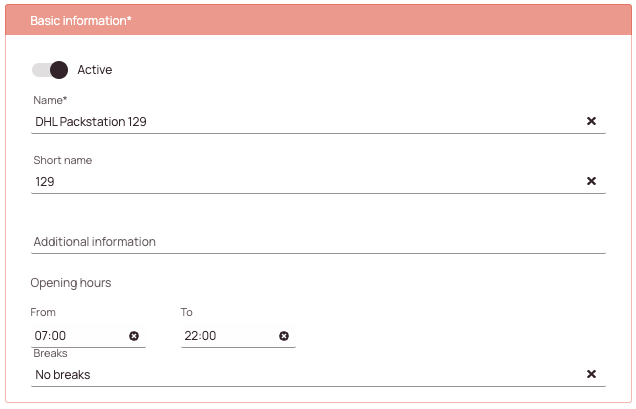
Option B: PUDO is not in the system yet -> Create one by clicking on the Plus button:
- Decide whether the PUDO location should be activated or only drafted.
- Enter a name for the PUDO location.
- (Optional) – Enter a short name for the PUDO location.
- (Optional) – Provide additional information regarding the PUDO.
- (Optional) – Provide the opening hours for the PUDO location to let engineers know when it’s the best time to arrive there.
- (Optional) – Enter the From opening time in this field (eg. 08:00 AM).
- (Optional) – Enter the To closing time in this field (eg. 16:30 PM).
- (Optional) – Enter the pause breaks in this field (eg. 12:00 to 13:00).
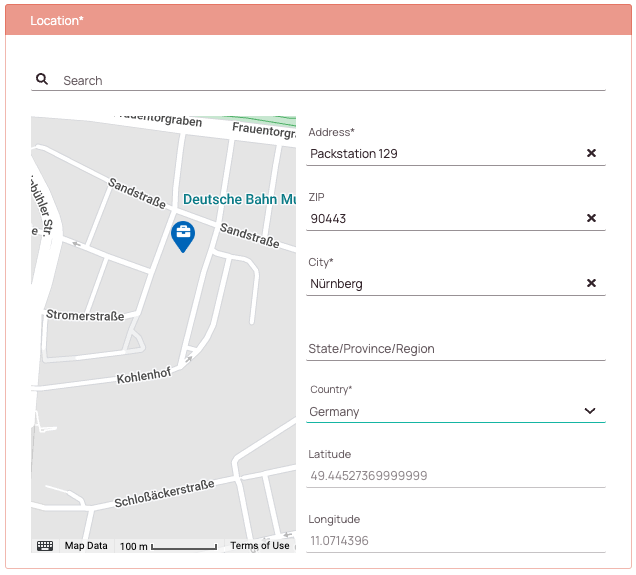
Manual address insertion
- Enter the address of the PUDO location.
- (Optional) – Enter the ZIP of the PUDO location.
- Enter the city of the PUDO location.
- (Optional) – Enter the region of the PUDO location.
- Enter the country for the PUDO location.
- (Optional) – Enter the Latitude of the PUDO location.
- (Optional) – Enter the Longitude of the PUDO location.
- Click Save.
Automatic address insertion
Enter the address and click enter or pin the location directly on the map – if you pin the location – the other fields will fill in automatically. Click Save afterwards
After you have filled in all required data you can either click SAVE to save the Part OR click SAVE & CREATE NEW to directly create a new part.
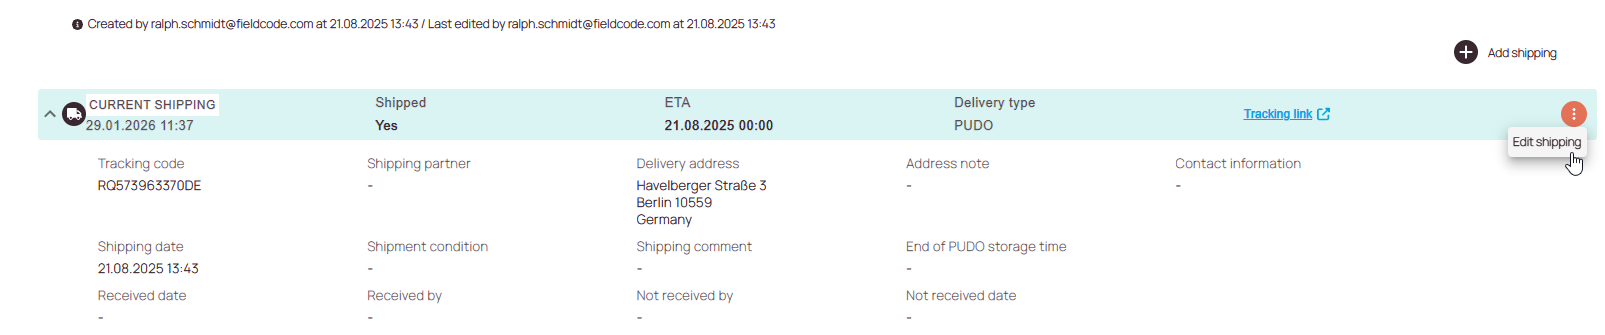
Editing Parts/Shipping information
You can edit parts and shipping information at any time, and updates should take effect immediately. You can edit parts and shipping information via the Parts tab in the Ticket details.
- Click on the ticket in the Ticket Pool for which you want to edit parts/shipping information to open up the Ticket details, click on the
- In the Ticket details click on the Parts tab to find the part/parts which you want to edit.
- Editing Part details: Click on Edit part and edit the fields, click Save afterwards.
- Editing Shipping information: Expand the part and edit the current shipping by clicking on the pencil button, edit the fields, and click on the Save button afterwards.

2. Adding Parts via API
Adding parts via API require special setup, which our team can do for you. Pease, reach out to support@fieldcode.com if you are interested in adding parts via API or have any other special requirements in this area.
You can also add parts via API, if set up. To set up an API link for parts, please contact Fieldcode Support.
If you have set up an API, it is possible, for example, to add parts from a Bill of materials list or, for example, a Van Stock. The BOM list/Van Stock list can be managed on a project-specific basis within the Workplace or via ticket using the API.
Let’s take an explanatory look at what it might look like when you add parts via an API:
(Please note that we here took a very basic example, since the configuration is all up to preference.)
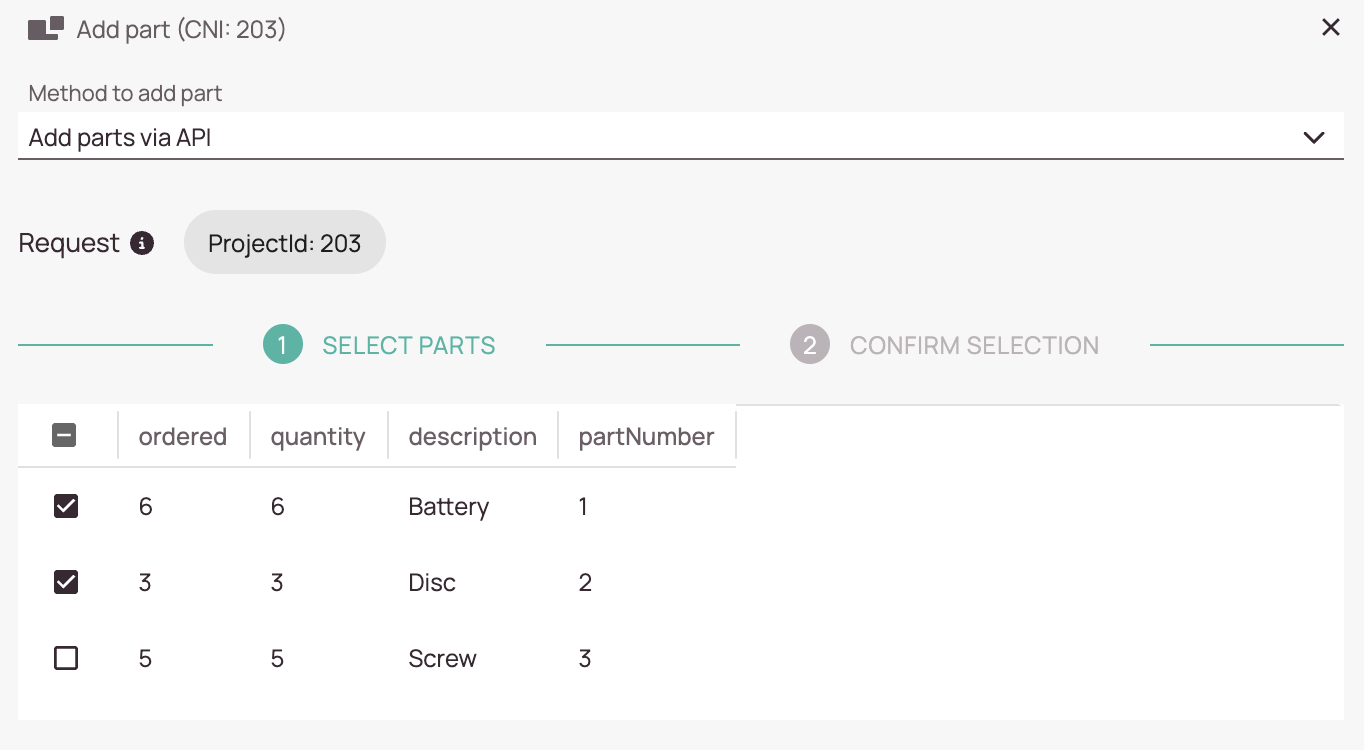
- Click on “Add Part” from the Ticket Pool or Parts tab in the Ticket details.
- From the “Method to add part” dropdown select the option “Add parts via API“.

- Select the parts which you want to add by checking them.
- Click on the Next button.
- Adjust the quantity with the arrows or adjust your other custom fields (in the example Entry ID).
- Click on Save.
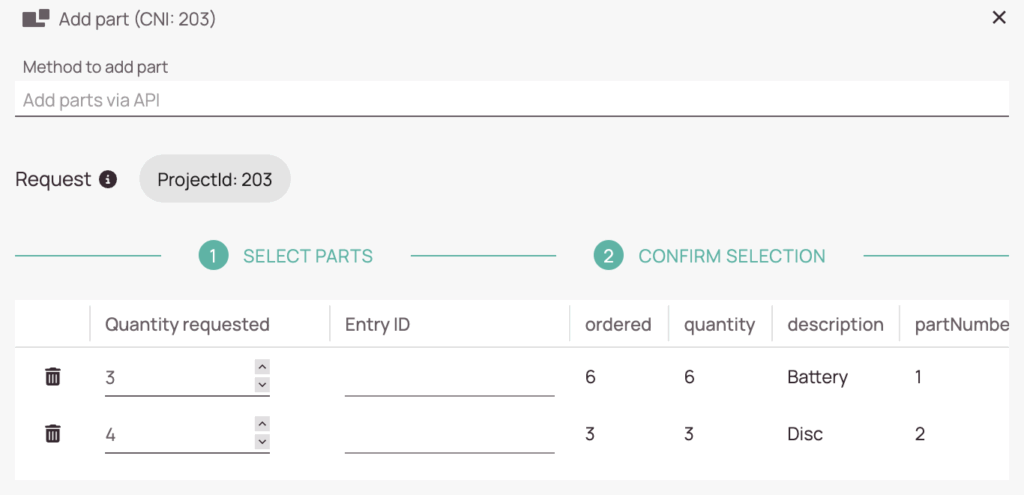
- Selected parts and quantities should appear in the Parts tab.
FAQ - Parts
- The Parts tab is not available for every Field Service branch. The availability of the tab depends on the branch you specified during your registration.
- There might be no permissions configured for the Parts tab. You can grant permissions for the Parts tab inside the Admin panel/Permissions.
Please read the matching topic.
Please continue to read this topic.
You can also learn more about the Parts tab in particular.
Yes, you can – if you have a Business or Enterprise Account. Fieldcode allows flexible customization of parts handling through workflows. This means you can tailor how parts are requested, returned, or processed based on your specific business needs.
For example, by adding custom workflow buttons, you can extend the default FMA (Field Material Authorization) or Part workflows. This enables you to introduce new actions or reporting options that aren’t available by default.
💡 Example:
By default, Work place users may not have the ability to report part returns. However, with a customized workflow, you can add a dedicated button that allows them to do so – making the process smoother and more aligned with your operational needs.
0 out of 5 stars
| 5 Stars | 0% | |
| 4 Stars | 0% | |
| 3 Stars | 0% | |
| 2 Stars | 0% | |
| 1 Stars | 0% |