Tip: You can use filters for better results
-
Latest News
-
Getting Started
-
Work Place
-
-
-
- About Buttons
- Action Buttons
- Schedule Tickets
- Ticket Info and COMS Buttons
- Add Parts
- Assign Partners
- Remove Tickets from the Ticket Clipboard
- Inline Skill Editing
- Create Intervention Info
- Create Intervention Reports
- Cancel Tickets
- Cancel Appointments
- Clone Tickets
- Edit Ticket Details
- Edit Privat Notes
- Report Tickets
- Close Tickets
-
Admin Panel
-
FMA 2 App
-
Customer Portal
Configuring/Viewing Account Settings
Under this tab you can configure account settings. You can check and edit your account details in this menu, like your account email address, your company details, and your main Fieldcode contact.
- When day-limit is reached you are prompted to change to either the business plan or enterprise plan.
- You can check our pricing plans and all the pricing details on the Fieldcode website.
What does "user-based" and "session-based" mean?
- User-based: The free plan is tied to one specific user account.
- Session-based: You can use the Fieldcode FMA app on one device simultaneously. You cannot simultaneously use the Fieldcode FMA app on another device if the other person is already logged onto the first device.
Accessing the Account Settings
Navigate to Access → Account to configure and view your account settings.
Checking Account
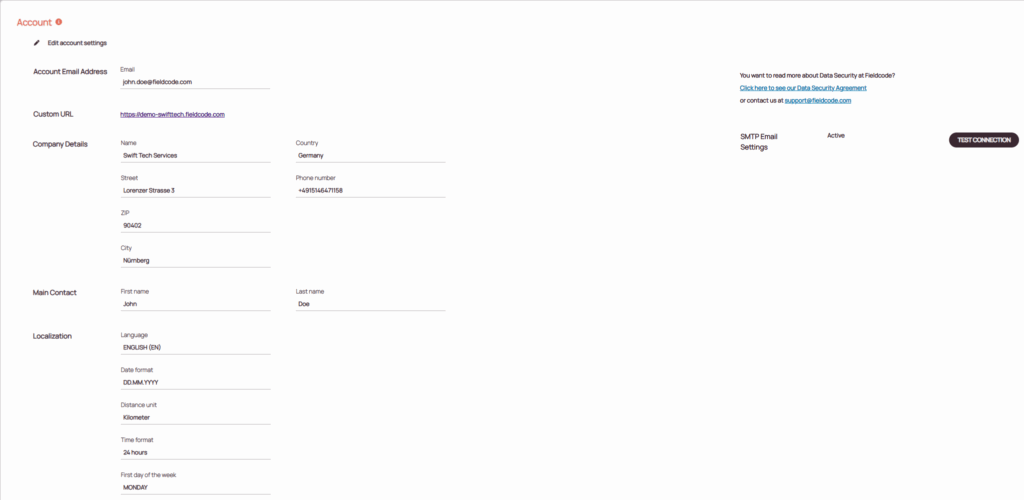
The main page allows you to check your account details, which were entered into the system when you registered. Your account details include information about the Account email address, the Custom URL, Company Details, Main Contact, Data Security Agreement, and SMTP email settings.
Editing Account

- To edit the Account you have to scroll on the main page of the Account to the right first.
- Then you should see the pencil button with Edit Account Settings.
- You can then edit the following tabs: Account Email Address, Company Details, Main Account tab, and SMTP Email address.
1. Account email address tab
You can change your Account Email Address in this tab:
- Click on the X on your current email address.
- Enter your new email address in the field.
- Click Save.

2. Company details tab
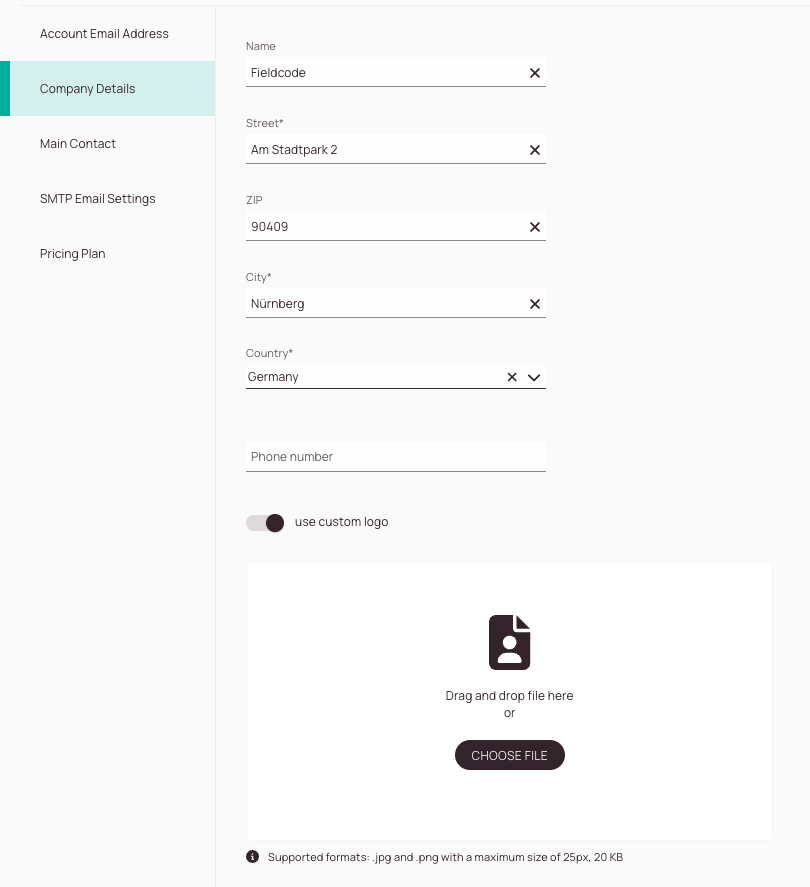
You can change your company details in this tab:
- Click on the X on the Name field and replace it with the new name.
- Click on the X on the Street field and replace it with the new Street name.
- Click on the X on the ZIP field and replace it with the new ZIP.
- Click on the X on the City field and replace it with the new city.
- Click on the X on the Country field and insert the new country.
- (Optional) – Click on the X on the Phone number field and replace it with the new number.
- (Optional) Replace the default Fieldcode Logo with a custom logo for Work place and Admin panel by enabling the “Use Custom Logo” toggle.
The logo will afterwards be visible in the top-left header of both applications if the logo requirements are met. - Click Save.
3. Main Contact tab
You can change your main contact in this tab:
- Click on the X on the First Name field and replace it with the new First Name.
- Click on the X on the Last Name field and replace it with the new Last Name.
- Click Save.

4. Localization Settings tab
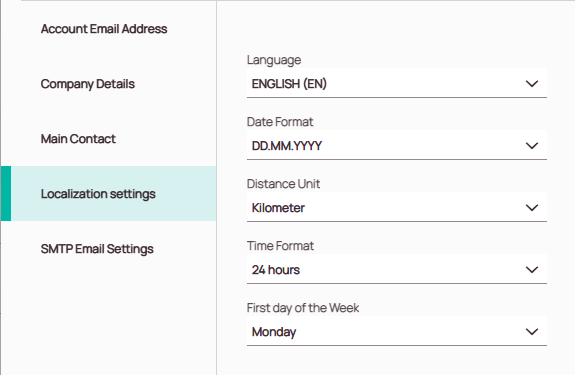
You can change some global default settings for new users in this tab:
- Select the language most commonly used by your team.
- Select the date format used by your organization.
- Select the distance unit used by your team.
- Select the time format used by your team.
- Select the first day of the week used by your country.
- Click Save.
5.1. SMTP email settings tab
Setting up SMTP allows use of Fieldcode’s email features, including emails sent via Automated Actions. The emails will be sent from the email address chosen and will help clients and partners know that it is authentic. SMTP can be set up at the global level in the account settings, but can be also configured for individual projects.
🔐 You can decide between two authentication methods:
Please contact your IT department to make sure the address you use is configured to allow SMTP.
- In the Account Settings, you configure the SMTP email settings on a global level, which means that the email sender will default to your choice.
- If you want to configure SMTP email settings on a project level you have the option to do this inside Admin panel -> Projects -> SMTP Email Settings.
- Expected behavior if SMTP and global SMTP is configured -> Project SMTP will be taken for configured projects, global SMTP for not configured ones.
- Configuring a "Custom Sender" inside Custom Automated Actions is only possible if the SMTP is configured either on project or global level.
5.1.1. Basic Authentication
Basic Authentication is the traditional method for connecting to SMTP servers using a username and password. This method is still supported for most providers, but please note that Microsoft will discontinue support for Basic Authentication in September 2025. If you’re using Microsoft Exchange or Office 365, we recommend switching to OAuth2 to ensure uninterrupted email delivery.
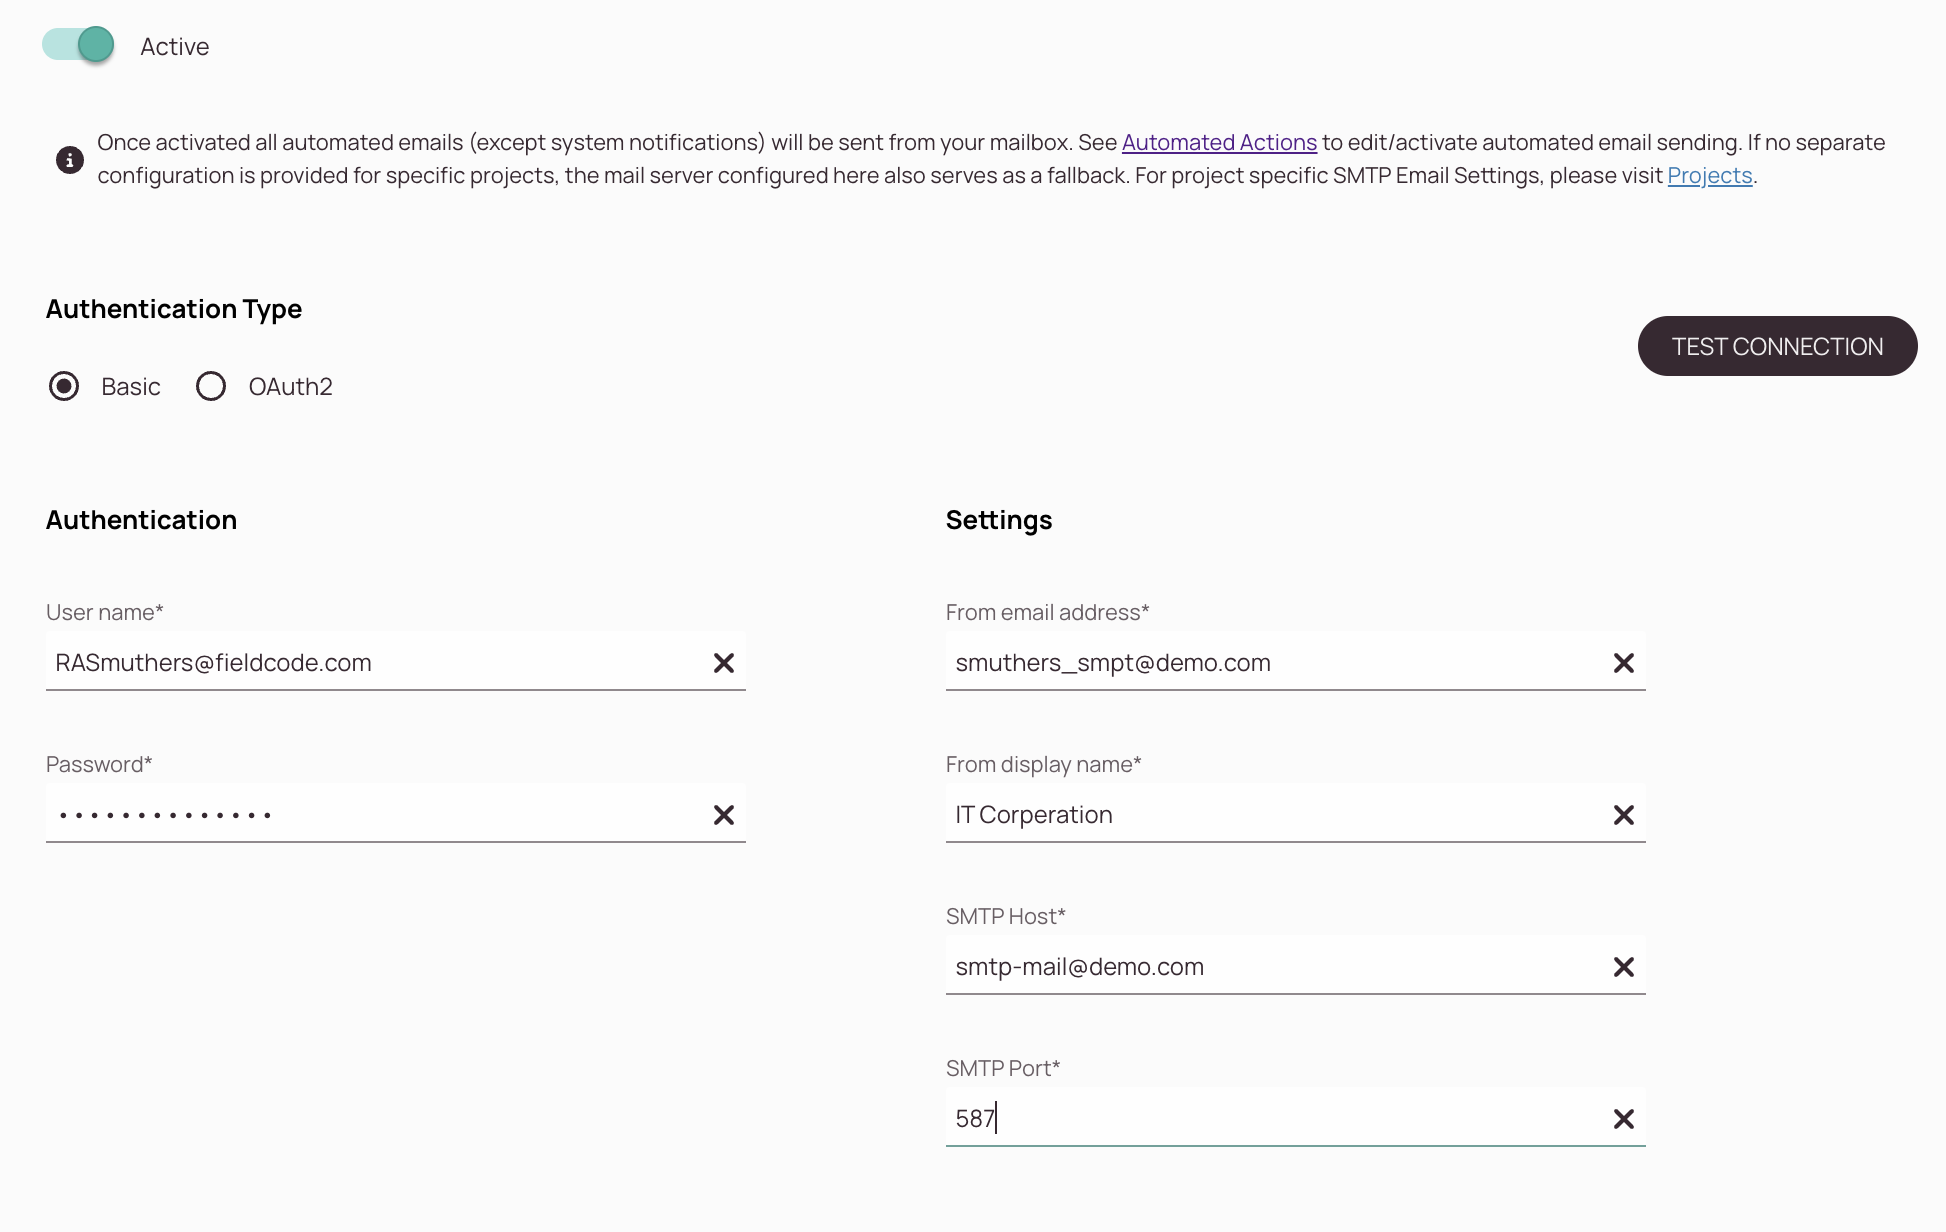
When Basic Authentication is selected, you’ll be asked to provide the following credentials:
- SMTP server address
- Port
- Username
- Password (hidden input)
This method remains the default for new configurations unless otherwise specified.
-
Active Toggle
-
Select the Basic Authentication Type.
-
Enter the user name that you use for login to the SMTP Account.
-
Enter the password that you use for login to the SMTP Account.
-
Enter the from email address. This email address will be later visible when sending out emails to customers.
-
Enter the from display name. This display name will be later visible when sending out emails to customers.
-
Enter the SMTP Host address. On the left, you can see what it might look like. You can find the SMTP host address for example by checking mail provider support pages.
-
Enter the SMTP Port. On the left, you can see what it might look like. You can find the SMTP host address for example by checking mail provider support pages.
-
Check if the SMTP connection works by clicking the Test Connection button.
5.1.2. OAuth2 Authentication
OAuth2 is a modern, secure authentication method that replaces Basic Authentication for many email providers, including Microsoft Exchange. Starting September 2025, OAuth2 will be required for all default mailboxes using Microsoft-hosted SMTP services.
When OAuth2 is selected, you can choose between two authentication flows:
- Client Credentials
- Password
Depending on the selected flow, you’ll be asked to provide the following information:
- Access Token URL
- Client ID
- Username
- Client Secret (hidden input)
- Password (only if Password flow is selected; hidden input)
- OAuth2 Scope (optional)
- Method (BASIC or POST)
OAuth2 ensures secure token-based access and is recommended for all Microsoft-based SMTP configurations.
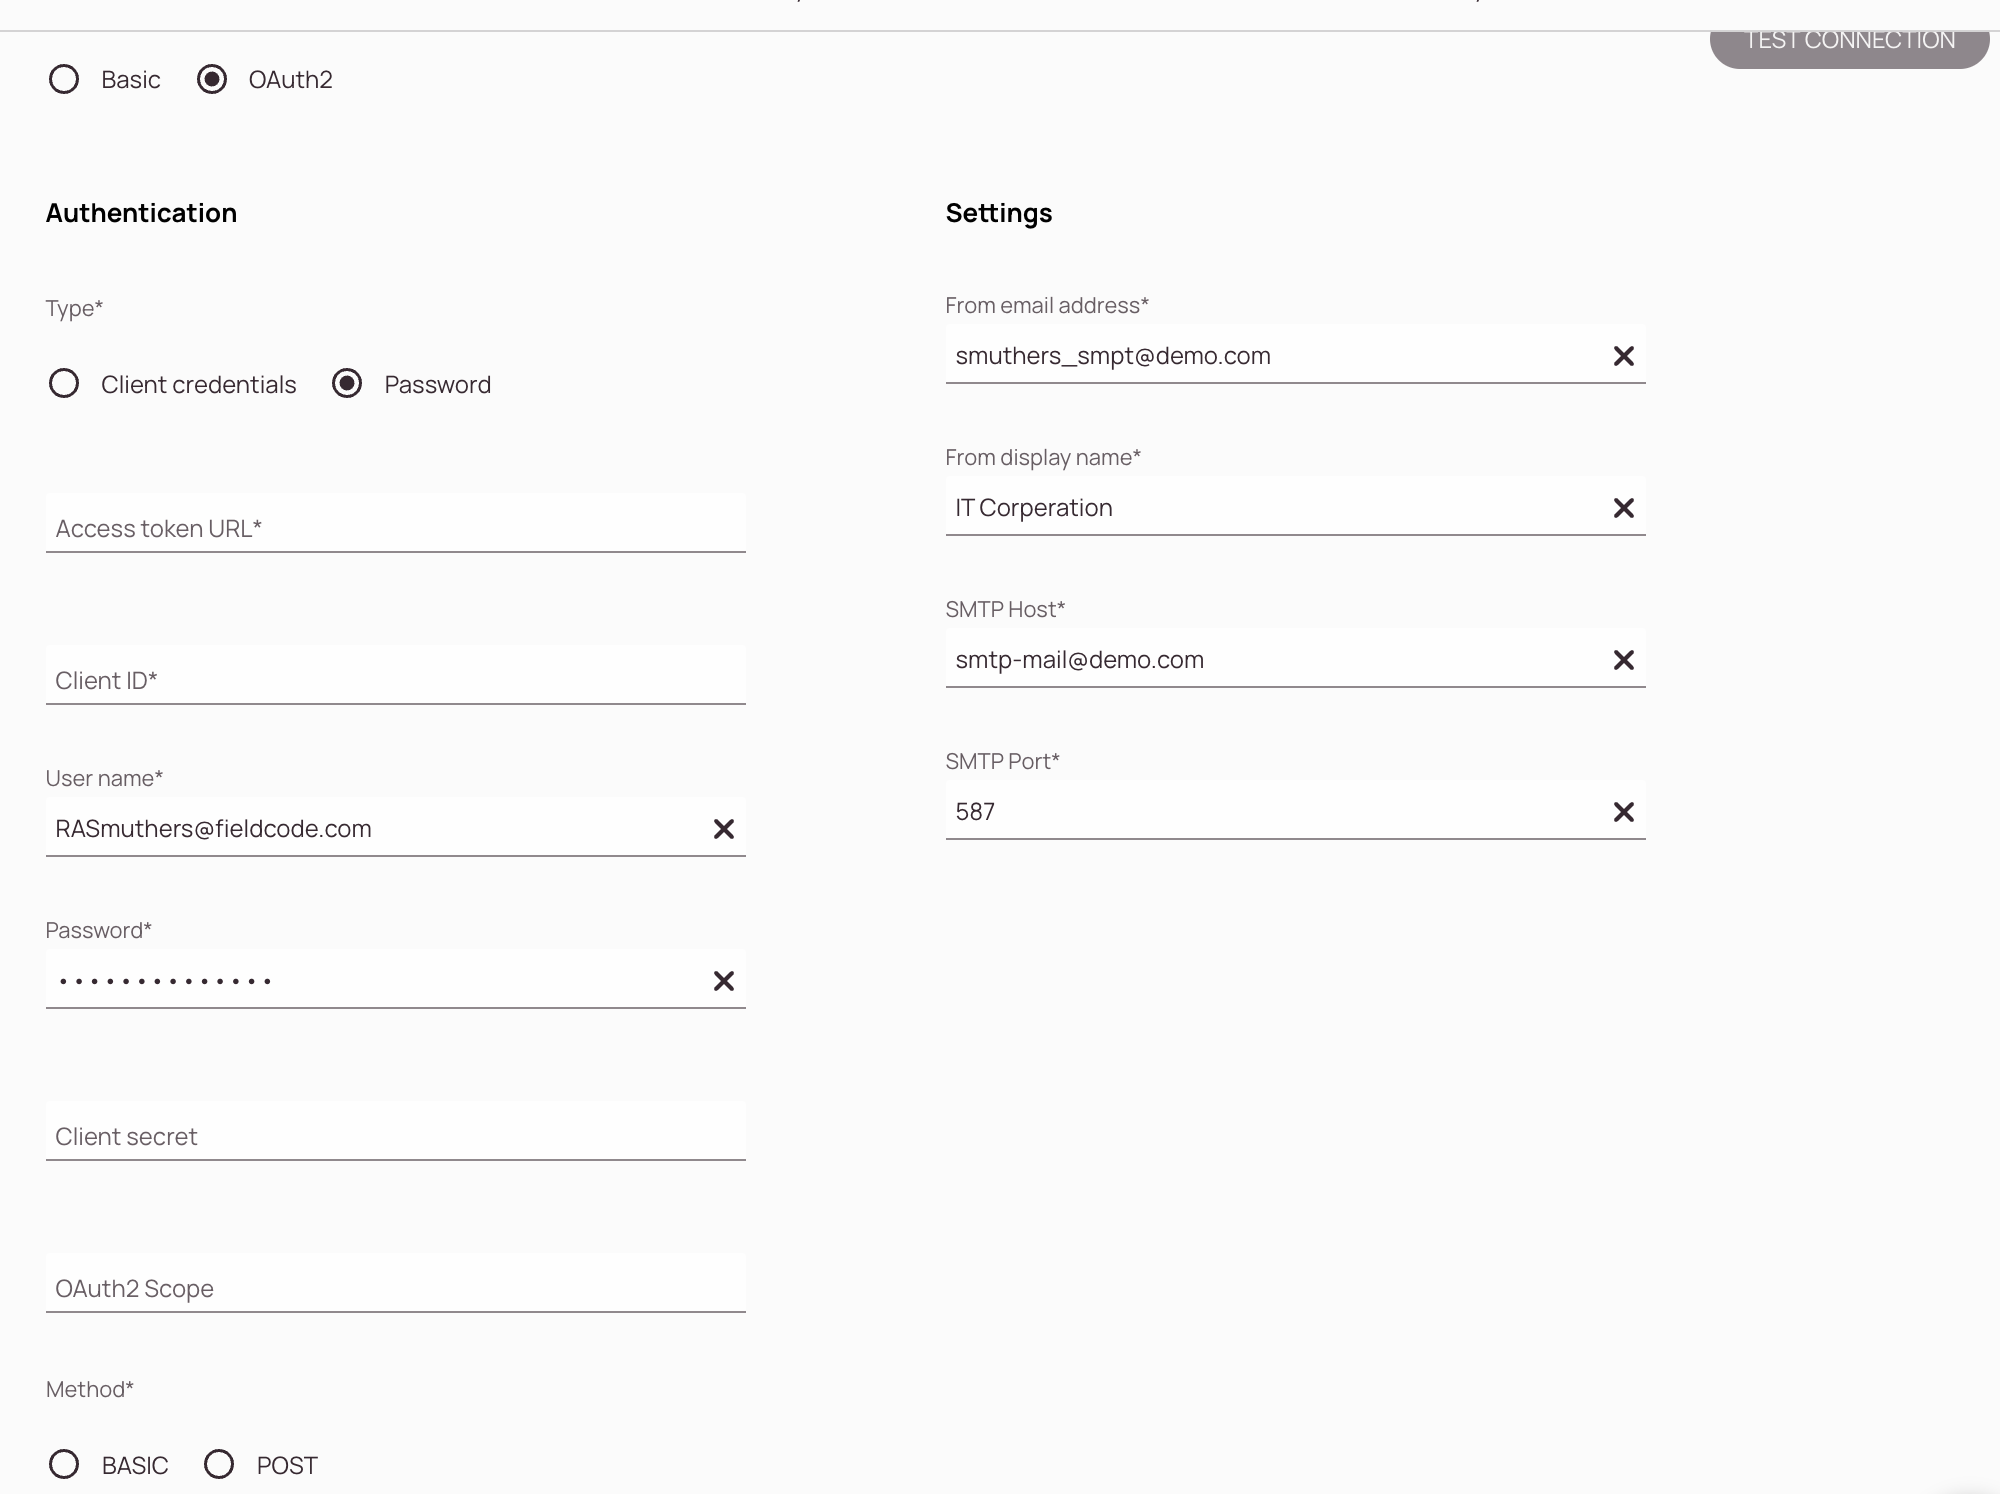
-
Active Toggle
-
Select the OAuth2 authentication method.
-
Select the Authentication type:
Client Credentials: Authentication is done via Client credentials
Password: Authentication is done via here set password. -
Enter the Access token URL.
-
Enter the Client ID.
-
Enter the User name.
-
Enter the Password (if Password is selected as Authentication type).
-
(Optional) – Enter the Client secret.
-
(Optional) – Enter the OAuth2 Scope.
-
Select the Method:
Basic: The BASIC method sends the client credentials (Client ID and Client Secret) using HTTP Basic Authentication. This means the credentials are encoded and included in the Authorization header of the request.
Use case: Preferred when the token endpoint expects credentials in the header.
Security: Credentials are not exposed in the request body, but still require HTTPS to ensure secure transmission.Post: The POST method sends the client credentials in the body of the HTTP request instead of the header. This is useful for endpoints that do not support Basic Authentication headers.
Use case: Required when the token endpoint expects credentials in the request body.
Security: Credentials are included in the body, so HTTPS is essential to protect sensitive data.💡 If you’re unsure which method to use, check the documentation of your SMTP provider or test both using the “Test Connection” button.
-
Enter the from email address. This email address will be later visible when sending out emails to customers.
-
Enter the from display name. This display name will be later visible when sending out emails to customers.
-
Enter the SMTP Host address. On the left, you can see what it might look like. You can find the SMTP host address for example by checking mail provider support pages.
-
Enter the SMTP Port. On the left, you can see what it might look like. You can find the SMTP host address for example by checking mail provider support pages.
-
Check if the SMTP connection works by clicking the Test Connection button.
0 out of 5 stars
| 5 Stars | 0% | |
| 4 Stars | 0% | |
| 3 Stars | 0% | |
| 2 Stars | 0% | |
| 1 Stars | 0% |
