
Tip: You can use filters for better results
-
Latest News
-
Getting Started
-
Work Place
-
-
-
-
- About Buttons
- Action Buttons
- Schedule Tickets
- Ticket Info and COMS Buttons
- Add Parts
- Assign Partners
- Remove Tickets from the Ticket Clipboard
- Inline Skill Editing
- Create Intervention Info
- Create Intervention Reports
- Cancel Tickets
- Cancel Appointments
- Clone Tickets
- Edit Ticket Details
- Edit Privat Notes
- Report Tickets
- Close Tickets
-
-
Admin Panel
-
FMA 2 App
-
Customer Portal
Schedule Tickets with the Scheduling Assistant
About scheduling with the Scheduling Assistant
Scheduling with the Scheduling Assistant means planning a ticket’s appointment with real-time recommendations for the date, time, and engineer. You can do this while you are on the phone with the end user and offer them a time that also suits your engineers.
You can also schedule a ticket by dragging it onto the Timeline. A ticket you drag onto the Timeline is locked, so the Optimizer does not move it. A ticket you schedule in the Scheduling Assistant stays open to optimization, unless you lock the engineer.
With the Scheduling Assistant, you can:
- schedule a fixed appointment at a recommended date, time, and engineer
- set a proposed appointment that the end user has not confirmed yet
- assign an engineer without setting a date and time
- lock an engineer to a ticket
- update the Latest Service Delivery Time (LSDT)
- force schedule an urgent ticket onto a fully booked Timeline
- record that you could not reach the end user or that they want a callback
The sections below follow this list. Each part of the window is explained in Scheduling Assistant Explained, including the ways to open it. To cancel an appointment, use Ticket Details, as described in Cancel Appointments.
Scheduling an appointment
Scheduling an appointment gives the ticket a date, a time window, and an engineer. Fieldcode marks the best options in green, so in most cases you only need to confirm them with the end user.
How to schedule an appointment
- Open the Scheduling Assistant for the ticket.
- Make sure Date & Time preference is on.
- Make sure Appointment confirmed with customer is selected. To set a proposed appointment instead, follow the next procedure.
- Select a date in the calendar. Days with a green circle and a checkmark have a suitable engineer. If you select another day, Fieldcode checks it and updates the recommendations.
- Select a time chip. The recommended chip has a green mark on its left side.
- (Optional) Click the plus icon next to the time chips to set a custom time window. Use this when the end user is only available at certain times.
- Make sure Engineer preference is on.
- Select an engineer. The recommended engineer has a green mark on the left side of their chip. To find another engineer, type their name in Search.
- (Optional) Select Lock engineer. See Locking an engineer.
- (Optional) Type the name of the person you spoke with in Talked to.
- Click Save.
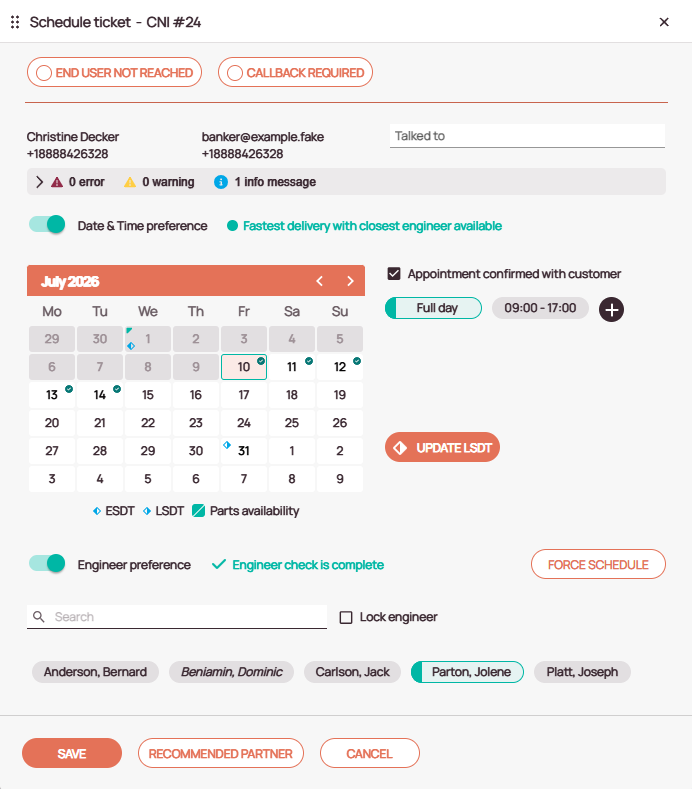
The appointment appears on the Timeline. If Appointment confirmed with customer was selected, the ticket moves to the Pending Wait Onsite status. Otherwise, it stays in the Appointment status. The statuses are described in Ticket Statuses.
How to set a proposed appointment
Set a proposed appointment when the end user has not confirmed the time yet, or when your engineers schedule their own tickets. Fixed and proposed appointments are compared in Scheduling Assistant Explained.
- Open the Scheduling Assistant for the ticket.
- Make sure Date & Time preference is on.
- Clear Appointment confirmed with customer.
- Select a date in the calendar.
- Select a time chip, or click the plus icon to set a custom time window.
- Select an engineer.
- Click Save.
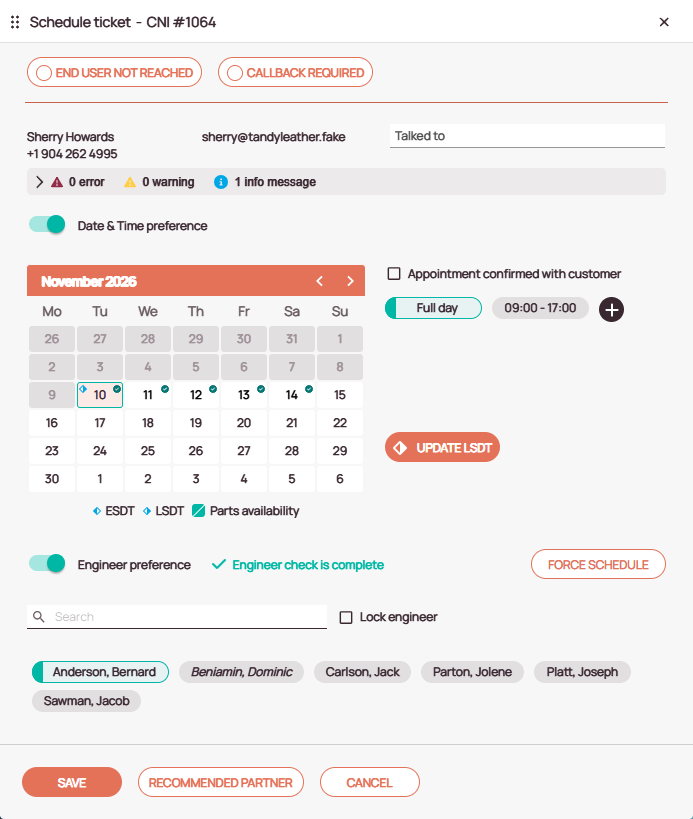
The ticket stays in the Appointment status until the appointment is confirmed.
Assigning an engineer
Assigning an engineer gives the ticket to an engineer without setting a date and time. This is typical when engineers schedule their own tickets in the FMA, as described in Schedule Tickets in the FMA.
How to assign an engineer without a date
- Open the Scheduling Assistant for the ticket.
- Turn off Date & Time preference. The calendar and time chips are hidden.
- Select an engineer. The recommended engineer is already selected, but you can select any available engineer who has the mandatory skills.
- (Optional) Select Lock engineer. See Locking an engineer.
- Click Save.
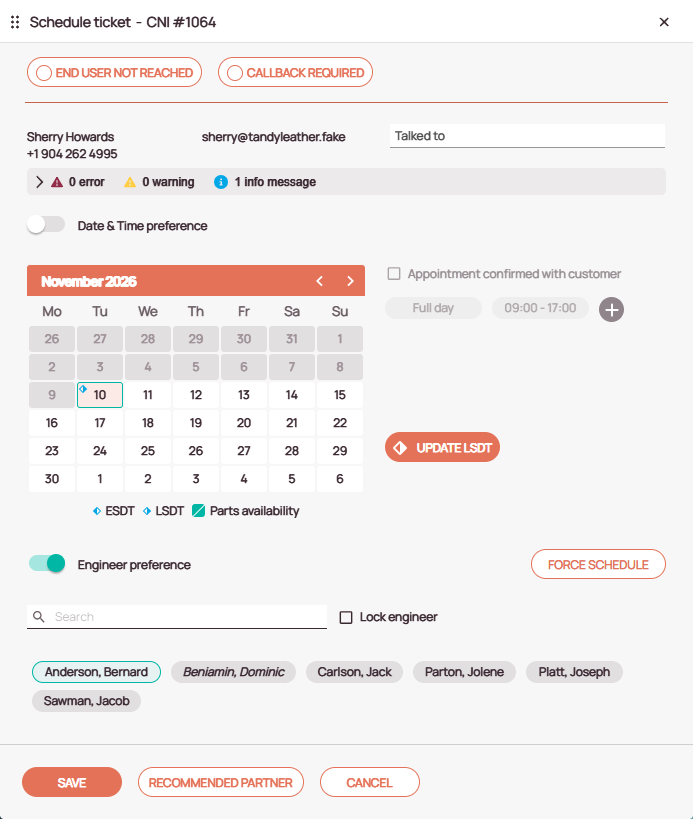
The ticket stays in the Appointment status. The engineer can see the ticket in the FMA and schedule it there.
Locking an engineer
Locking an engineer ties them to the ticket. The Optimizer then never moves the ticket to another engineer, even if this would improve the schedule. An engineer who is assigned but not locked is not guaranteed to keep the ticket.
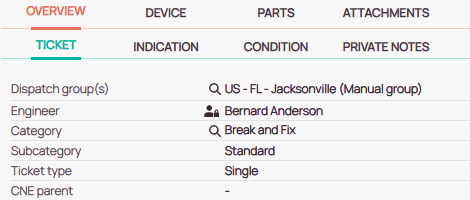
A ticket with a locked engineer shows a locked-person icon on the Timeline and in the Overview tab of Ticket Details. A ticket whose engineer is assigned but not locked has no icon.
How to lock an engineer
You can only lock an engineer who is available and has the mandatory skills. If you select an engineer whose chip shows a warning triangle or a wrench icon, Save is unavailable.
- Open the Scheduling Assistant for the ticket.
- Select the engineer. To find an engineer who is not shown, type their name in Search.
- Select Lock engineer. A locked-person icon appears on the engineer’s chip.
- Click Save.
To unlock the engineer, clear Lock engineer and click Save.
Updating the LSDT
The LSDT is the deadline by which the service must be delivered. Update it when the circumstances of the ticket change, for example when the end user is not available before the deadline. If the project does not allow LSDT violations, you must update an expired LSDT before you can schedule the ticket.
How to update the LSDT
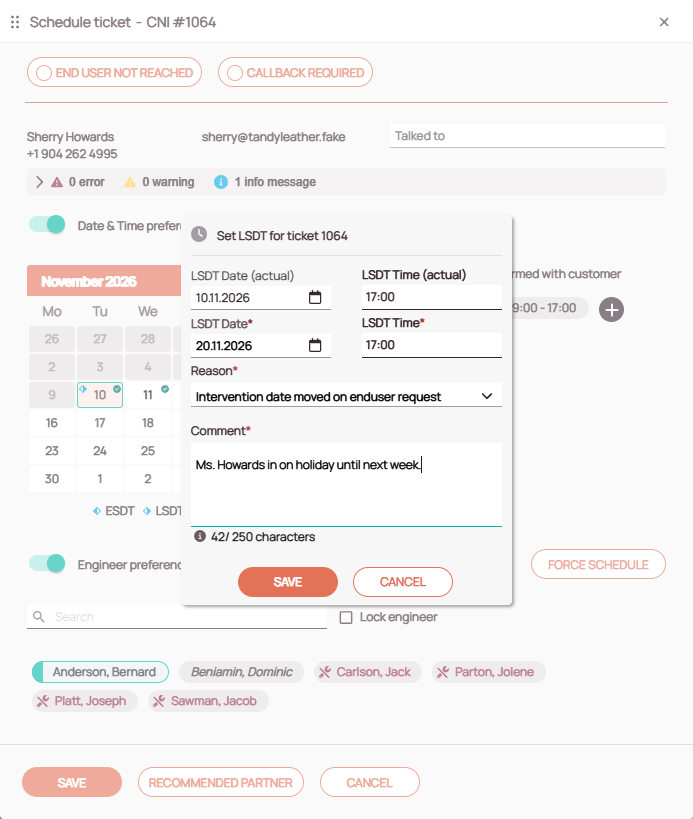
- Open the Scheduling Assistant for the ticket.
- Click Update LSDT. The current LSDT date and time are shown in gray in the first row.
- Select the new date in the LSDT date field in the second row.
- Type the new time in the LSDT time field.
- Select a reason from the LSDT update reason list.
- Type why you changed the LSDT in the LSDT comment field.
- Click Save.
The new LSDT applies immediately, and the change is logged in the History tab of the ticket.
Force scheduling urgent tickets
Force Schedule places an urgent ticket on the Timeline even when your engineers are fully booked. To make room, it can send other tickets back to the Ticket Pool. It then shows a ranked list of options, one for each engineer, with the effect each option has on driving time and distance.
Keep these rules in mind:
- Locked tickets are never replaced. To get more options, unlock some tickets on the Timeline first.
- Tickets that the engineer has started are never replaced. As soon as an engineer starts driving to a ticket, Force Schedule no longer offers to replace it.
- At most 5 tickets go back to the Ticket Pool. Each of these tickets gets a ticket info saying it was moved back.
- Each engineer gets one option. Options that send no tickets back rank highest, followed by options with less driving time and distance.
- An engineer lock moves to the new engineer. If the ticket was locked to an engineer and you choose another, the lock moves to the engineer you choose.
If you do not see Force Schedule, your role does not include it. Roles are described in Permissions Settings.
How to force schedule a ticket
- Open the Scheduling Assistant for the urgent ticket.
- Click Force Schedule. The Force Schedule table opens.
- Select an option in the Select column. The option ranked #1 usually has the least impact on the rest of the schedule.
- (Optional) Click a CNI in the Back to Pool column to open that ticket in Ticket Details and check it.
- Click Save.
To return to the normal scheduling view without force scheduling, click Back to Basic Schedule.
Force Schedule table
The Force Schedule table compares each option with the current Timeline. The last 2 columns have icons instead of names; hover over an icon to see its description. Use the table to choose the option with the least impact:
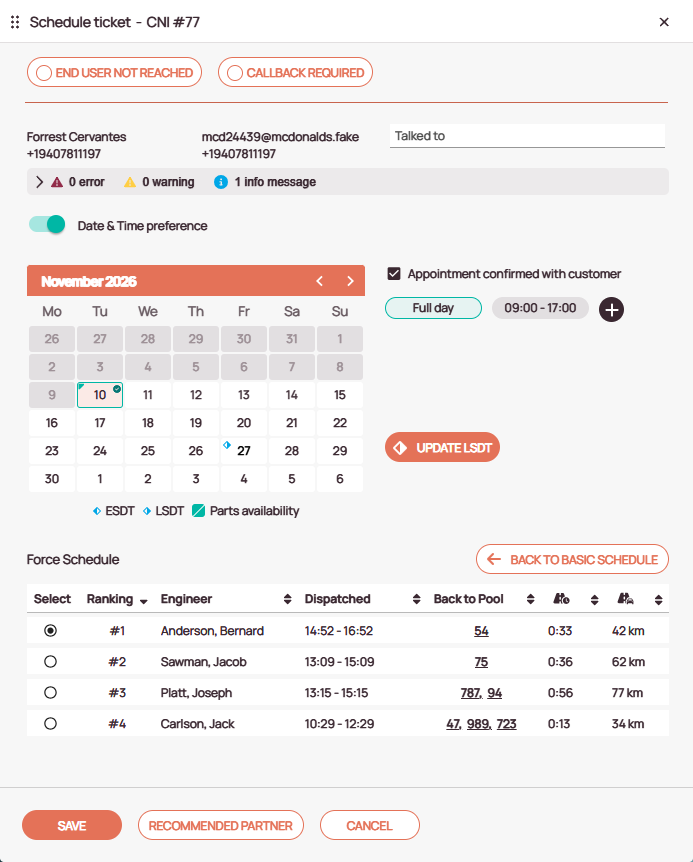
| Column | Description |
|---|---|
| Select | The option button to choose this option |
| Ranking | The rank of the option, where #1 is the best |
| Engineer | The engineer who would get the urgent ticket |
| Dispatched | The time window in which the engineer would work on the urgent ticket |
| Back to Pool | The CNIs of the tickets that would go back to the Ticket Pool. Click a CNI to open the ticket. |
 Driving time difference | The difference in driving time compared with the current Timeline. A negative value means adding the urgent ticket results in shorter drives. |
 Driving distance difference | The difference in driving distance compared with the current Timeline. A negative value means adding the urgent ticket results in shorter drives. |
Recording unsuccessful calls
When a call does not lead to an appointment, record the outcome in the Scheduling Assistant. Fieldcode saves an entry in the call log of the ticket’s History tab, so other dispatchers know what happened.
How to record that the end user was not reached
- Open the Scheduling Assistant for the ticket.
- Click End User Not Reached.
- (Optional) Type a comment that describes the situation.
- Click Save.
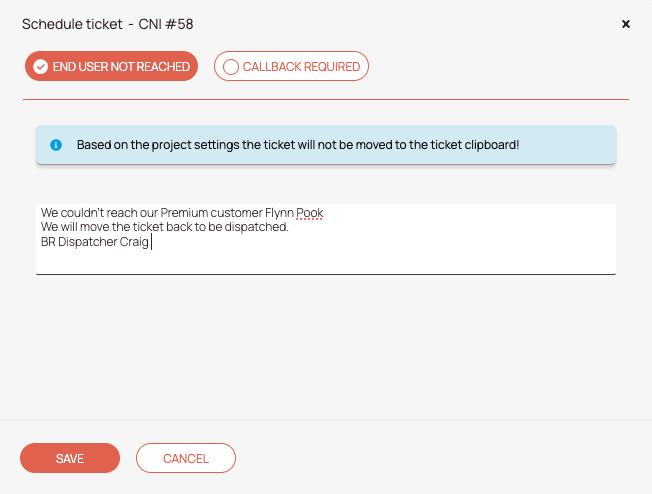
What happens next depends on the call log settings of the project, as described in Project Settings:
- The ticket may move to the Pending tab of the Ticket Clipboard for a waiting time, then return to the Dispatch tab.
- If the project does not move the ticket, the Scheduling Assistant shows “Based on the project settings the ticket will not be moved to the ticket clipboard!”
- The project can limit the number of attempts with a strike count. Once the limit is reached, the ticket can no longer move to the Ticket Clipboard.
How to request a callback
- Open the Scheduling Assistant for the ticket.
- Click Callback Required.
- Type the name of the person you spoke with in Talked to. This field is required.
- Set when the callback is due. Select Time duration and type a duration with its unit, or select Custom end date & time and select a date and time.
- Click Save.
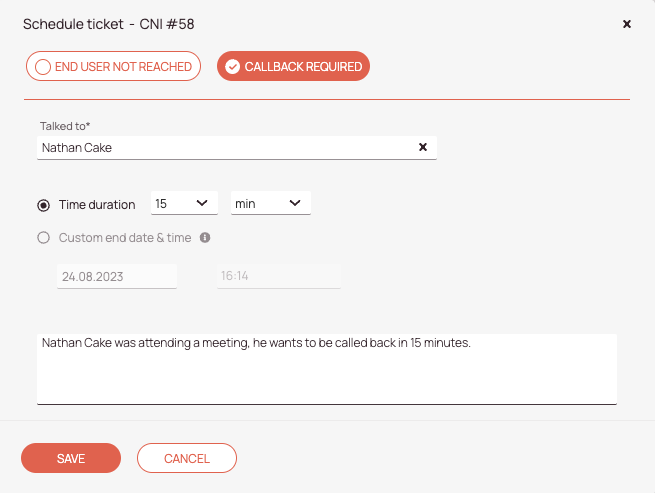
The ticket moves to the Pending tab of the Ticket Clipboard and returns to the Dispatch tab when the callback is due. See Ticket Clipboard Tab Explained.
FAQ - Scheduling Assistant
Because a requirement of the ticket cannot be met on the selected day. Expand the notifications to see the reason. Common causes are spare parts that have not arrived yet, an LSDT before the selected day, or no qualified engineer who is working that day and has free time in their schedule. Days like this show a red triangle with an exclamation mark in the calendar. Select another day, or update the LSDT as described in Updating the LSDT.
Because that engineer has marked the ticket’s spare parts as received. The engineer stays the only option until the parts are returned. See Scheduling Assistant Explained.
Because the ticket has no SLA value. Custom chips only appear if the SLA field is on the ticket creation form and an SLA was selected for the ticket. See SLA Profile Settings.
0 out of 5 stars
| 5 Stars | 0% | |
| 4 Stars | 0% | |
| 3 Stars | 0% | |
| 2 Stars | 0% | |
| 1 Stars | 0% |