Tip: You can use filters for better results
-
Latest News
-
Getting Started
-
Work Place
-
-
-
- About Buttons
- Action Buttons
- Schedule Tickets
- Ticket Info and COMS Buttons
- Add Parts
- Assign Partners
- Remove Tickets from the Ticket Clipboard
- Inline Skill Editing
- Create Intervention Info
- Create Intervention Reports
- Cancel Tickets
- Cancel Appointments
- Clone Tickets
- Edit Ticket Details
- Edit Privat Notes
- Report Tickets
- Close Tickets
-
Admin Panel
-
FMA 2 App
-
Customer Portal
What is the Overview tab?
The overview tab inside the Ticket Details gives you basic information about the ticket and an extended description the tasks.
Inside the Work Place, select a ticket from the Ticket Pool or Timeline. Inside the Ticket Details, select the Overview tab, if it is not already selected.
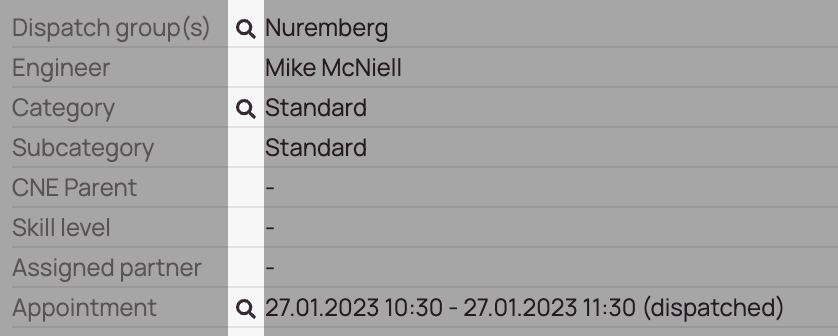
Overview tab terms explained
| Field name | Description |
|---|---|
| Dispatch group | Displays the group(s) the ticket is assigned to |
| Engineer | Name of the engineer to whom the ticket is assigned |
| Category | The general type of tasks for the ticket |
| Subcategory | A more precise categorization, when needed |
| Ticket type | Tickets will be either Single or Container |
| CNE parent | An identifier that links tickets together |
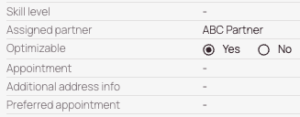
| Skill requirements | Skills assigned to the ticket |
| Assigned partner | If the ticket has been assigned to this ticket, their name will be shown |
| Optimizable | If a No is selected, the ticket will be ignored by the optimizer |
| Appointment | The time when the ticket is scheduled (dispatched) and the window in which the ticket may be scheduled (fixed) |
| Additional address info | Any other details that will help the engineer |
| Preferred appointment | Preferred appointment time |
| Estimated duration | How long the intervention is expected to take from arrival until reported |
| Ticket creation | Ticket creation timestamp |
| Ticket imported | Ticket imported timestamp |
| Cancel reason | Reason why the ticket got canceled |
| Cancel note | Additional details about why the ticket was canceled |
| Customer LSDT | Used by subcontractors to identify the customer's due date |
| Ticket score | Helps the optimizer prioritize tickets |
| Priority | Priority of the ticket |
| Urgency | Urgency of the tasks |
| Diagnose result | displays the result of diagnostics |
| Customer SLA | Used by subcontractors to identify their customer's SLA |
| Customer Special | Used by subcontractors to identify any special instruction from their customer |
| Specification Reference | Specification reference |
| Coverage Code | Coverage code |
| Test Ticket | Test tickets are excluded from the analytics |
| Short description | A summarized description |
| Description | Detailed explanation of the situation and tasks. |
How to refresh dispatch groups
Occasionally, tickets will have no defined dispatch group or will not be assigned to a dispatch group that you expect them to be in. There could be several causes for this including:
- The ticket is geographically located outside of the dispatch group’s boundaries.
- The address is incorrect
- The ticket is filtered out of the expected group
- The ticket was manually assigned to a different group
The first and fastest troubleshooting option is to click on the dispatch group refresh button.
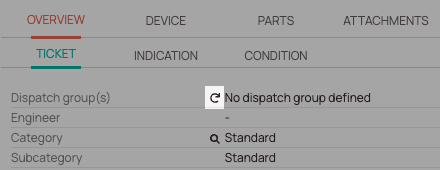
If clicking the refresh button still doesn’t give the results you expect, ask an Admin user to check the dispatch group’s settings for anything that may cause the ticket to be excluded.
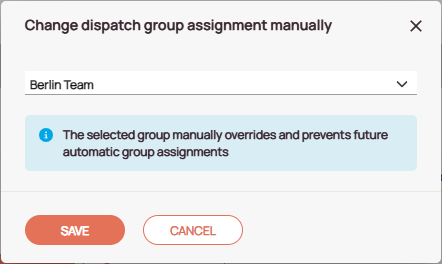
Manually setting the dispatch group
The dispatch group can be manually set by a dispatcher while the ticket is unassigned by selecting the pencil icon on the right and selecting a group in the resulting pop-up.

How to find related tickets
Some fields have the option to search quickly for related tickets. This is especially useful as it is a shortcut for finding related tickets. Currently, Dispatch group, category, and Appointment have this search option:
- Click the Search glass button that is visible in the corresponding field.
- Click Search or Search in new tab.
- The general view should open – with the corresponding query prefilled.
- A further click on the search button should display the corresponding tickets in the Ticket Pool with the corresponding query already prefilled.
How to specify the optimizability
You can decide individually for each ticket whether it may be optimized by the optimizer or not.
- Select the ticket from the Ticket Pool for which you want to decide individually whether it may be optimized by the optimizer.
- Inside the Ticket Details move to the Overview tab.
- Select the matching option (Yes or No) inside the Optimizable field (inline editing)
Bottom tabs
The Overview tab is further split into three bottom tabs which are all explained separately.
These tabs are the Ticket tab, Indication tab, and Condition tab.
Ticket tab (bottom tab)
The Ticket tab (bottom tab) inside the Overview tab consists of basic information about the ticket that are explained above in Overview tab terms explained.
Inside the Fieldcode Work Place to the Ticket Details → OVERVIEW → TICKET
Indication tab (bottom tab)
The Indication tab (bottom tab) inside the Overview tab displays the met indications of the ticket.
Inside the Fieldcode Work Place go to the Ticket Details -> Overview -> Indication.
The tab displays the indication type and the corresponding description of the indication.
Condition tab (bottom tab)
The Condition tab (bottom tab) inside the Overview tab displays the met conditions of the ticket.
Inside the Fieldcode Work Place go to the Ticket Details -> Overview -> Condition.
The tab displays the condition type and the corresponding description of the condition.
5 out of 5 stars
1 rating
| 5 Stars | 100% | |
| 4 Stars | 0% | |
| 3 Stars | 0% | |
| 2 Stars | 0% | |
| 1 Stars | 0% |