
Tip: You can use filters for better results
-
Latest News
-
Getting Started
-
Work Place
-
-
-
-
- About Buttons
- Action Buttons
- Ticket Info and COMS Buttons
- Add Parts
- Assign Partners
- Remove Tickets from the Ticket Clipboard
- Inline Skill Editing
- Create Intervention Info
- Create Intervention Reports
- Cancel Tickets
- Cancel Appointments
- Clone Tickets
- Edit Ticket Details
- Edit Privat Notes
- Report Tickets
- Close Tickets
-
-
Admin Panel
-
FMA 2 App
-
Customer Portal
Scheduling Assistant Explained
About the Scheduling Assistant
The Scheduling Assistant is a window in the Work Place that recommends a date, time, and engineer for a ticket’s appointment. It checks engineer availability, skills, spare parts, and travel distance in real time. This lets you offer the end user a suitable appointment while you are still on the phone.
Dispatchers use the Scheduling Assistant to schedule appointments, assign engineers, update the Latest Service Delivery Time (LSDT), and record calls that did not lead to an appointment. This page explains each part of the window. The procedures are described in Schedule Tickets with the Scheduling Assistant.
You can open the Scheduling Assistant in 5 ways:
- double-click a ticket in the Dispatch tab of the Ticket Pool
- right-click a ticket in the Dispatch tab of the Ticket Pool and select Schedule ticket
- right-click a ticket on the Timeline and select Schedule ticket
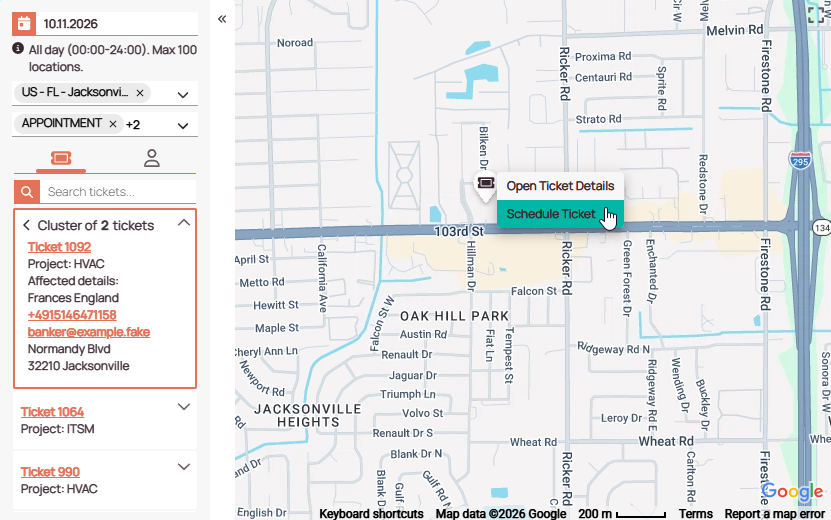
- right-click an appointment pin on the Map and select Schedule ticket
- click the Schedule Ticket workflow button in Ticket Details
An appointment pin is the map pin with a ticket icon that marks a ticket’s location on the Map.
You cannot schedule tickets from the General or Expert tab of the Ticket Pool.
The Scheduling Assistant opens as a separate window over your current view. To move it, drag its title bar. Because it is not part of a view, you cannot add it to a custom view.
Scheduling Assistant window
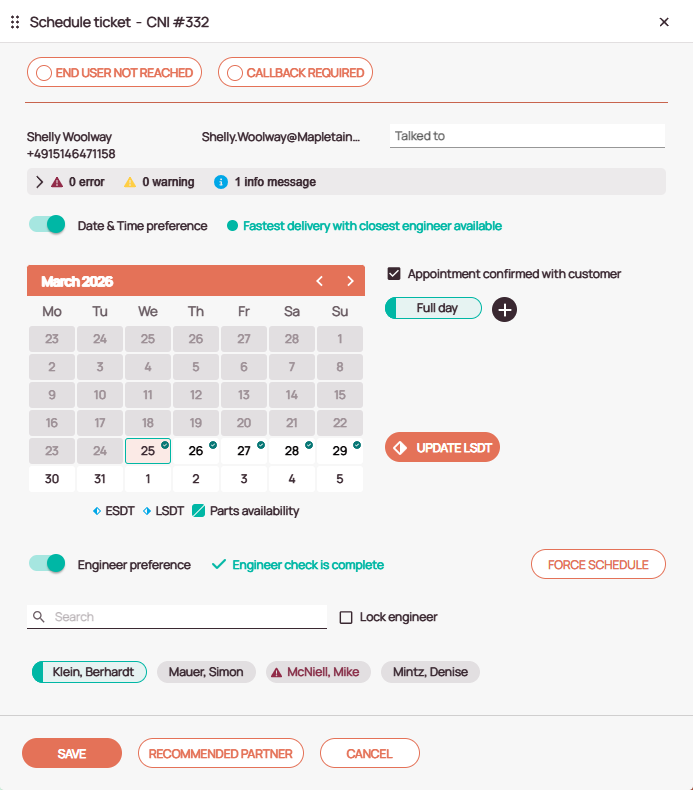
The Scheduling Assistant window is divided into the call outcome buttons at the top, the date and time section in the middle, and the engineer section at the bottom. The numbers in the image match the list below.
-
Title bar – Shows the Call Number Internal (CNI), which is the internal ticket number. Drag the dotted handle to move the window. Click the close icon to close it without saving.
-
End User Not Reached – Records that you could not reach the end user. See Recording unsuccessful calls.
-
Callback Required – Records that the end user wants to be called back later. The ticket moves to the Ticket Clipboard until the callback is due.
-
End user contact details – The name, phone number, and email address of the end user stored on the ticket.
-
Talked to – The name of the person you spoke with. It is required when you click Callback Required.
-
Notifications – The number of errors, warnings, and info messages about scheduling this ticket. Click the arrow to expand them and read the details.
-
Date & Time preference – Turn it on to schedule a date and time. Turn it off to assign an engineer without an appointment. It is on by default. The text next to it shows the recommendation result, such as “Fastest delivery with closest engineer available”.
-
Calendar – The date of the appointment. Use the arrows in the month bar to switch months. Days you cannot schedule are grayed out.
-
Calendar legend – The meaning of the ESDT, LSDT, and Parts availability markers in the calendar. See Recommendations and checks.
-
Appointment confirmed with customer – Select it for a fixed appointment that the end user has confirmed. Clear it for a proposed appointment. It is selected by default. See Fixed and proposed appointments.
-
Time chips – The time preferences of the ticket’s Service Level Agreement (SLA) profile, such as Full day. Click the plus icon to set a custom time window instead.
-
Update LSDT – Opens the fields to change the ticket’s LSDT.
-
Engineer preference – Turn it on to choose the engineer for the ticket. The text next to it shows the state of the engineer check, such as “Engineer check is complete”.
-
Force Schedule – Opens the Force Schedule table, which can place an urgent ticket on a fully booked Timeline.
-
Search – Finds an engineer of the dispatch group by name. Use it when the engineer you want is not among the recommended engineers.
-
Lock engineer – Ties the selected engineer to the ticket, so the Optimizer never moves the ticket to another engineer.
-
Engineer chips – The engineers of the ticket’s dispatch group. Select a chip to choose that engineer.
-
Save – Saves the appointment, assignment, or call outcome and closes the window.
-
Recommended Partner – Opens a list of partners who could handle the ticket instead of your engineers, sorted by score with the best first. See Assign Partners.
-
Cancel – Closes the window without saving any changes.
Recommendations and checks
A recommendation is the date, time, and engineer that Fieldcode suggests for the ticket. When you open the Scheduling Assistant, Fieldcode checks the current day and the 4 days that follow. To check another day, select it in the calendar. Fieldcode checks that day and updates the recommended times and engineers.
When it recommends an engineer, Fieldcode takes into account:
- the engineer’s availability on the selected day
- the mandatory skills of the ticket
- the travel distance to the ticket location
- the arrival of the ticket’s spare parts
- the ticket’s LSDT
- the business days and hours of the ticket’s SLA profile
- any ban conditions that exclude an engineer from the ticket, as described in User Settings
- the engineer’s efficiency factor, which changes the length of the appointment
- same-location grouping, as set in Optimizer Settings
Spare parts limit the choice of engineer in 2 ways. If the parts have not arrived yet, no engineer is available before they arrive. If an engineer has marked the ticket’s parts as received, that engineer is the only one available for the ticket until the parts are returned. The other engineers are still listed, but they are not available for the ticket.
The recommendations work best when your administrator has set up SLA profiles. See SLA Profile Scenarios.
Colors and icons
- Green circle with a checkmark on a day – At least one suitable engineer is available on that day.
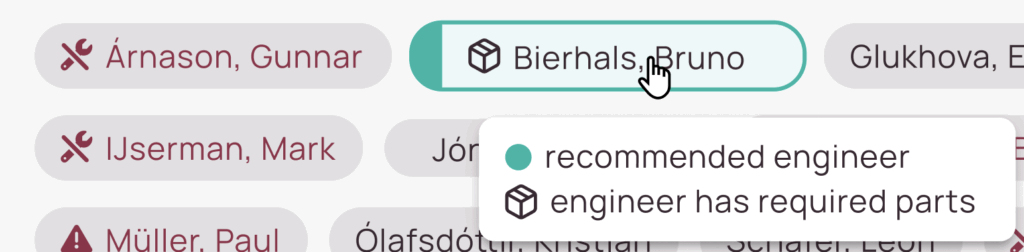
- Green mark on the left side of a chip – Fieldcode recommends this time or engineer.
- Border around a day or chip – The current selection.
- Warning triangle and red name on an engineer chip – The engineer is not available on the selected day. If you select this engineer, Save is unavailable and you cannot lock them.
- Wrench icon and red name on an engineer chip – The engineer lacks a mandatory skill for the ticket. If you select this engineer, Save is unavailable and you cannot lock them.
- Engineer name in italics – The engineer is an external engineer, an account partner user, not one of your own engineers. Italics can appear together with the icons above.
- Box icon on an engineer chip – The engineer has the ticket’s spare parts. Until the parts are returned, this engineer is the only one available for the ticket.
- Locked-person icon on an engineer chip – The engineer is locked to the ticket.
- Red triangle with an exclamation mark in the corner of a day – The ticket cannot be scheduled on that day. Either no qualified engineer is available, or the ticket’s spare parts are not available yet. Engineers are unavailable on days they are not scheduled to work, such as weekends, and on days their schedule is full.
- Gray day – A day you cannot schedule: a day in the past or, if the project does not allow LSDT violations, a day after the LSDT.
- Blue arrow in the corner of a day – The day of the Earliest Service Delivery Time (ESDT) or the LSDT. The legend under the calendar shows which arrow is which.
- Green corner on a day – The day on which the ticket’s spare parts become available or the last day the part is stored at the pick-up and drop-off (PUDO) location. This matches the Parts availability icon in the legend.
Fixed and proposed appointments
A fixed appointment is a time the end user has confirmed. A proposed appointment is a time the end user has not confirmed yet. Select Appointment confirmed with customer for a fixed appointment, and clear it for a proposed one.
Clear Appointment confirmed with customer in these cases:
- you have not confirmed the appointment with the end user yet
- your engineers schedule their own tickets, as described in Schedule Tickets in the FMA
Every appointment has 2 time windows:
- Fixed from/to – The time window agreed with the end user. When an end user books an appointment in the Customer Portal, only this window is set.
- Dispatched from/to – The time in which the engineer works on the ticket. It is the same as the ticket duration.
The Optimizer has the most room to plan good routes when the fixed window is large and the dispatched window is small. For example, a fixed window from 08:00 to 17:00 with a 1-hour dispatched window lets the Optimizer move the visit anywhere in the working day.
Appointments that end users book in the Customer Portal appear in Ticket Details and in the Scheduling Assistant. See About Customer Portal.
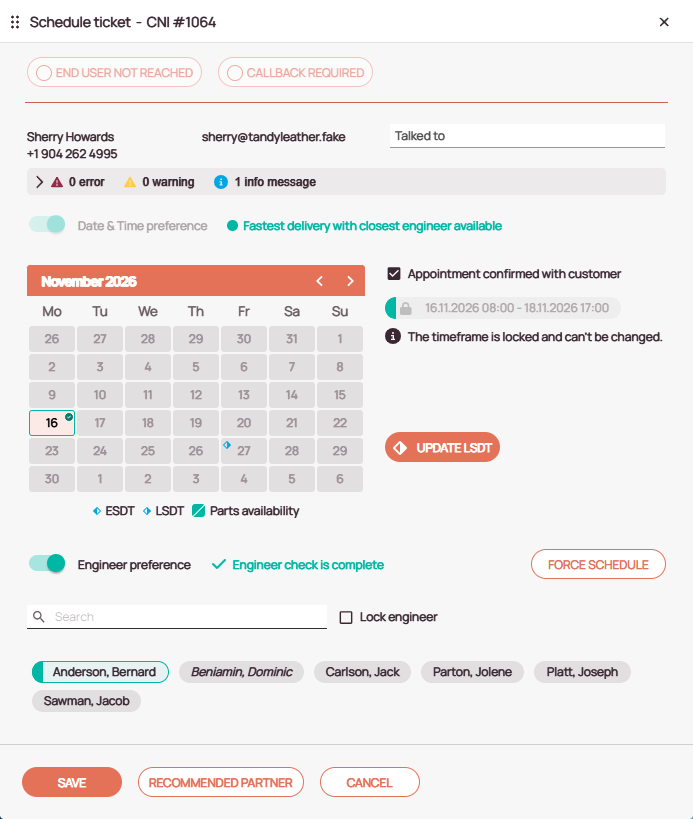
The Scheduling Assistant locks the time frame of a booked appointment. You can still choose the engineer, but the date and time stay as the end user booked them:
- only the booked day, or the days of a booked date range, can be selected in the calendar
- the time chip shows the booked window with a lock icon, and the message “The timeframe is locked and can’t be changed.” appears below it
- Date & Time preference, End User Not Reached, and Callback Required are unavailable
5 out of 5 stars
1 rating
| 5 Stars | 100% | |
| 4 Stars | 0% | |
| 3 Stars | 0% | |
| 2 Stars | 0% | |
| 1 Stars | 0% |