Tip: You can use filters for better results
-
Latest News
-
Quick Start
-
Work Place
-
-
- How to schedule tickets
- How to search for tickets
- How to query tickets
- How to filter for tickets
- How to use the Ticket Clipboard tab
- How to grab/ungrab tickets
- How to link & unlink components together
- How to download ticket data as a excel sheet
- How to copy filters/queries for colleagues
- How to email filters/queries to colleagues
- How to assign/unassign tickets to partners
- How to manage parts
- How to show tickets on Map
- How to open tickets in a new tab
- How to use container tickets
-
-
- How to use the Optimizer
- How to schedule tickets
- How to publish/unpublish tickets
- How to lock/unlock tickets
- How to lock/unlock engineers
- How to manually reschedule PUDOs
- How to show tickets on Map
- How to manage availabilities
- How to manage subgroups
- How to display an additional time zone
- How to move tickets back to the Ticket Pool
-
-
-
- How to manage parts
- How to assign/unassign tickets to partners
- How to use the Interaction buttons
- How to use the Workflow buttons
- How to use communications
- How to schedule tickets
- How to edit ticket details
- How to cancel a ticket
- How to use the Remove Pending button
- How to report a ticket
- How to create intervention infos
- How to create intervention reports
- How to cancel an appointment
- How to clone tickets
-
Admin Panel
-
- What is the Process menu?
- What does workflow mean?
- What are Appearances?
- What are Actuators & Invocations?
- What are Automations?
- What are Guides?
- What are Actions?
- How to create & edit projects
- How to create & edit custom forms
- How to create & edit lists
- How to customize the Customer Portal
- How to create & edit automated actions
- How to create & edit conditions
- How to create & edit indications
- How to set up email templates
- How to create & edit ticket durations
- How to create & edit custom fields
- How to create & edit value sets
- How to create & edit SLA Profiles
- How to move stuck tickets
-
Fieldcode FMA app
-
- Fieldcode FMA app
- How to download the Fieldcode FMA app
- How to login
- How to configure multiple accounts
- How to enable/disable notifications
- How to change the theme
- How to log work times
- How to synchronize tickets
- How to navigate to appointments
- How to log drive times & drive breaks
- How to inform dispatchers
- How to view archived appointments
-
-
Customer Portal
How the manual is structured
Here you can learn how the Fieldcode Manual is structured in general.
Knowing how the manual is structured may help you to find the info you need, therefore please try not to skip this short read.
By the way: You can learn how we use terms internally and externally on the Fieldcode Glossary page which may also be beneficial for learning Fieldcode.
We structure the manual according to "What you see, you get described"
Work place and Admin panel are structured as follows:
- AP/WP Header: This is the upper row of the application which contains general settings and lets you change the view (inside Work place).
- AP/WP Sidebar: This is the left row of the application which can be collapsed and expanded and contains some important main actions (like eg. ticket creation).
- WP Components: A view consists of different components which you can tailored to your specific role needs. The first view you may encounter is the Dispatch view.
- WP Tabs: Some components, in particular the Ticket Details component, are divided into different tabs so that a lot of information is visible at first glance.
- AP Menus: Each setting in the Admin panel has a menu above it, which in turn serves a specific setting purpose.
For example, the Users menu is subordinate to the Account setting purpose. - AP Tabs: The individual settings are in turn divided into different tabs to make it easier to adjust many individual settings.
For example, some menus have a “Basic” and “Advanced” tab.
So it may really help you if you know where in the app you currently are to quickly find the right help in the manual in the left navigation of the Fieldcode Manual.
Of course, we are constantly working to improve the search in the top bar nonetheless, so that it is always easy to find what you are looking for.
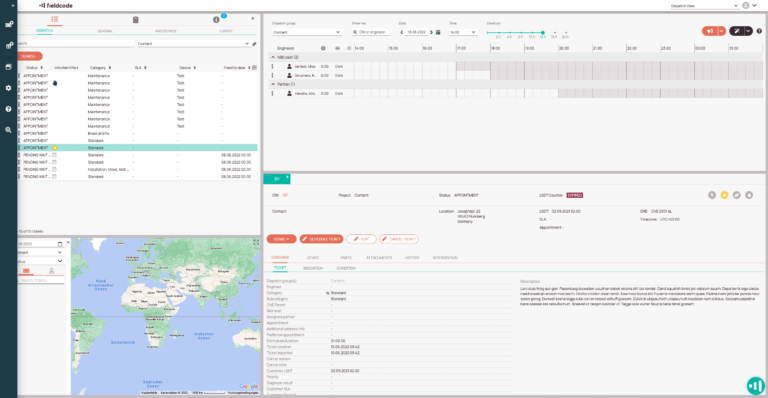
Work place in particular is structured as follows:
- Ticket Pool -> often also referred to as Ticket Pool component
- Timeline -> often also referred to as Timeline component
- Ticket Details -> often also referred to as Ticket Details component
- Map -> often also referred to as Map component
- Analytics -> often also referred to as Analytics component / PowerBI/ Forecasting
- Scheduling Assistant -> your choice to smartly schedule tickets as a dispatcher
- Workload Calendar ->your choice to keep the workloads of your engineers on track
- Quicklaunch -> your choice to edit ticket details fast one-by-one
In the different components you will encounter terms like:
- Workflow buttons
- Interaction buttons
- Tabs
You can customize the whole Fieldcode Work Place experience with the help of:
- Admin Panel
-
Work place header
-
Work place sidebar
-
Ticket Pool
-
Timeline
-
Map
-
Ticket Details

-
Scheduling Assistant
How to open the assistant
Option 1: By double-clicking on a particular ticket in the Ticket Pool.
Option 2: From the context menu of a ticket in the Ticket pool in the Dispatch view.
Option 3: From the Timeline by right-click (opening the context menu) on Schedule ticket.
Option 4: From the Ticket Details by clicking on the corresponding
workflow button.
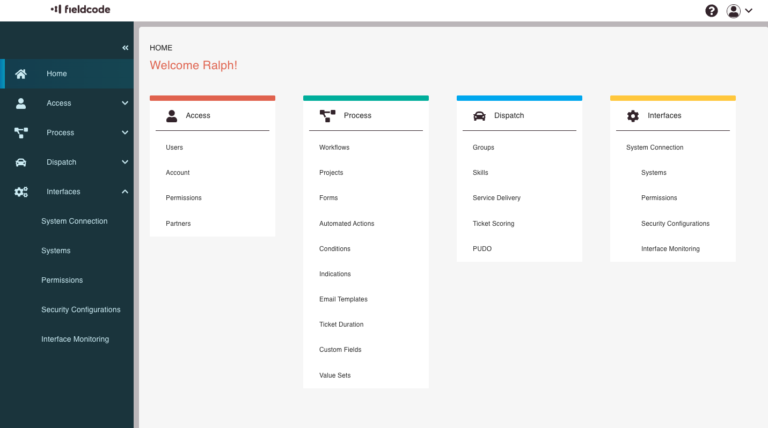
Admin panel in particular is structured as follows:
- Configure users, accounts, permissions, and partners -> Access configuration
- Configure your custom company workflow -> Process configuration
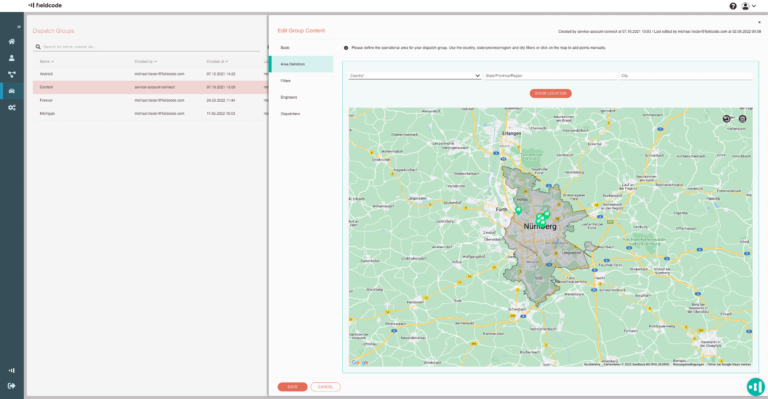
- Configure your dispatch network -> Dispatch configuration
- Configure system connections -> Interface configuration
They have corresponding sub-menus like:
- Users, permissions, partners…
- Workflows, projects, forms, automated actions, conditions, indications…
- Groups, skills, service delivery, ticket scoring, PUDOs…
- Account, system connection…
The terms describe affected parts of the system you are going to configure for Work place.
- You are going to manage user accesses for your engineers, dispatchers, partners etc.
- You are going to manage process-related options such as eg. workflows, projects, forms, automated actions etc.
- You are going to manage dispatch-related options such as assigning dispatch groups, skill assignment, service delivery preferences, ticket scores etc.
-
Access configuration
-
Process configuration
-
Dispatch configuration
-
Interface configuration
-
Sidebar to quickly access all the sections and sub-sections
-
Admin panel header
-
Admin panel sidebar
-
List view of an opened menu
-
Tabs inside an selected item
-
Menu for configuration
5 out of 5 stars
3 ratings
| 5 Stars | 100% | |
| 4 Stars | 0% | |
| 3 Stars | 0% | |
| 2 Stars | 0% | |
| 1 Stars | 0% |